Are you looking for new ways to skyrocket your email list with content upgrades?
While content upgrades are great at growing your email list exponentially, the downside is that they usually require a lot of work to put together.
Emphasis on the word “usually.”
We’re going to show you a trick for using your existing blog posts as a lead magnet in the form of a content upgrade.
More specifically, we’re going to show you step by step how to take your popular blog posts, create a content locker, and use that as a content upgrade to grow your email list.
But first, let’s talk for a minute about what a content upgrade is.
What Is a Content Upgrade?
A content upgrade is a piece of bonus content you offer to your audience, usually in exchange for email addresses. In that sense, content upgrades are a lot like lead magnets.
Unlike a standard lead magnet, though, a content upgrade offers a highly-targeted piece of content to your audience. Most lead magnets are broader in topic to attract a wider audience.
Content upgrades, on the other hand, are intimately connected with an existing piece of content and are more concentrated on a particular subject.
For example, you may have an ebook on social media marketing that you offer across your entire site. That’s a generic lead magnet.
But you may also have a popular blog post on 5 ways to grow your Instagram following. Then, you offer a downloadable bonus guide with 3 more exclusive tips or a helpful cheat sheet.
That’s a content upgrade.
And since they’re highly targeted to a specific audience engaged with existing content, they convert a lot more of your visitors.
In fact, with the right content upgrades, you can grow your email list 10x faster than other methods.
The Problem With Typical Content Upgrades
There’s no doubt that content upgrades are powerful. We’ve written a case study that shows how Whole Whale increased email signups 100% and lifted conversion by 62%.
So why doesn’t every company use content upgrades as part of their strategy? Because each content upgrade requires a lot of work to put together.
Think about it: If you want to create content upgrades for your ten most popular blog posts, that means you’ll need to create ten different downloadable resources and ten post-specific optin forms.
Just reading that last sentence is tedious and time-consuming, let alone doing it.
But for every problem, there’s a solution.
And, today, the answer to your content upgrades is OptinMonster.
We believe that email list building with content upgrades shouldn’t be difficult. With OptinMonster’s content lock feature, you can strengthen your email marketing strategy by using existing posts as lead magnets.
That means you’ve already done the hardest part of the work. And 1 little trick will drastically improve your content marketing strategy.
Sound too good to be true? It’s not.
In fact, using popular blog posts as content upgrades is remarkably simple. All you need is OptinMonster’s Content Lock feature.
Bonus content: Gated Content Best Practices: Your Ticket to Expert-Level Engagement & Conversions
Create Content Upgrades Easily With Content Lock
OptinMonster’s Content Lock feature allows you to block a portion of your content to non-subscribers. So you can have 75% of a blog post open to everyone, but make the last 25% accessible to members only.
If visitors are already one of your subscribers, great. They’ll see the whole post without any problems.
But if readers aren’t subscribed to your email list, they’ll be prompted to sign up to finish the article.
Now, we know what you’re thinking: Won’t that be off-putting for our users?
No, not at all! Content locking is used by lots of big names like The Wall Street Journal, New York Times, and more.
The reason is simple: you probably spent several hours writing your most popular blog posts. Maybe even days.
Plus, you’re giving the majority of the information away with no strings attached.
A Content Lock still provides the rest of the article 100% free but asks the small trade-off of an email address. If readers really love your content and learn from your writing, getting on your email list will benefit them in the long run.
And you get rewarded fairly for all the hard work you do on your content creation.
The best part of all of this, though, is that Content Locks streamline the content upgrade process. That way, you can sit back and focus on what really matters: making the best and most abundant content in your niche.
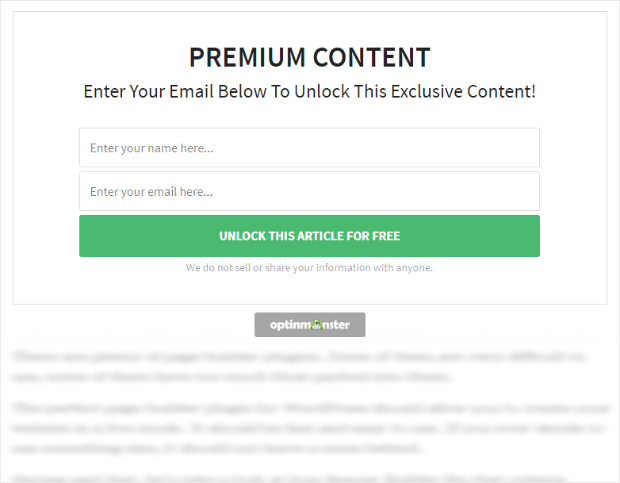
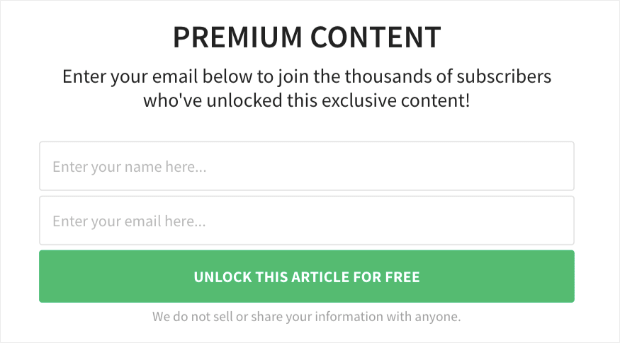
Excited? We hope so because here’s the Content Lock optin we’ll be creating in this post that could substantially grow your email list:
We’ll also show you how to customize the look of your optin to match your site’s branding.
Let’s get started.
Step 1: Identify Your Popular Posts
The first thing you need to do is to identify the most popular posts on your blog to add content upgrades. You can find this information in a few ways:
- In Google Analytics
- An analytics plugin like MonsterInsights
Using the MonsterInsights plugin for WordPress is the easiest way to find the most popular posts on your blog.
With MonsterInsights, you have all the information you need right in your WordPress dashboard.
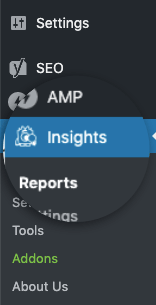
Simply find the MonsterInsights plugin in the left-hand side of your WordPress dashboard menu:
Then scroll down, and you’ll see a list of your site’s Top Posts/Pages:
From there, you can make a list of which posts would be good for creating content upgrades.
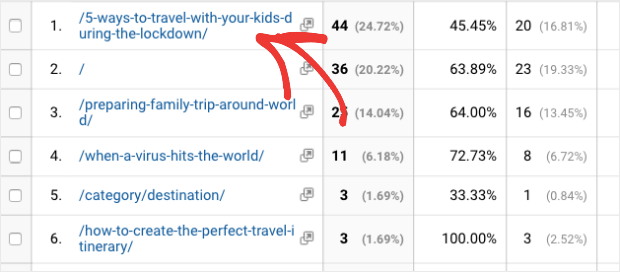
The best content upgrades come from blog posts with lists. In the example above, we have the top-performing post “5 ways to travel with your kids during the lockdown.”
You can make a content upgrade by showing the first 3 tips publicly but make the last 2 tips exclusively for subscribers.
Again, everything starts with identifying your most popular blog posts.
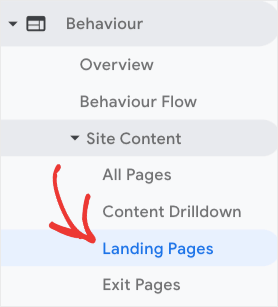
If you’re not using MonsterInsights, you can log in to your Google Analytics account, and then go to Behavior » Site Content » Landing Pages to find popular posts.
You’ll then see a list that’s identical to the one from MonsterInsights in your WordPress dashboard (assuming your date ranges are the same):
One difference you may note while pulling up your popular posts is that MonsterInsights is more visually appealing. It’s simpler to navigate than Google Analytics, and the information is displayed more clearly.
Still, when you need to find your top-performing posts, those 2 tools work well. Now let’s head over to our OptinMonster dashboard to create an Inline optin form.
This will then become our Content Lock.
Step 2: Create an Inline Optin Form
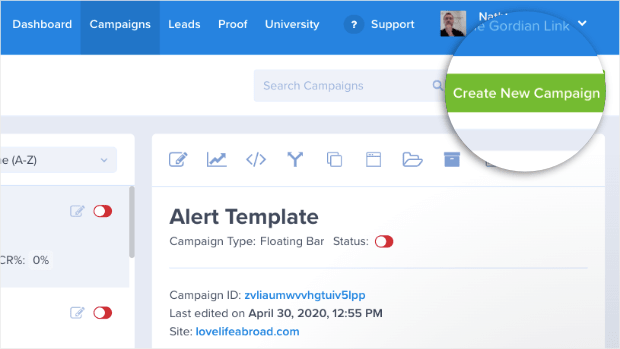
Log in to your account and click the Create Campaign button:
Next, select the In-Line optin type and choose from one of the templates. For this tutorial, we’re going to choose the Basic template:
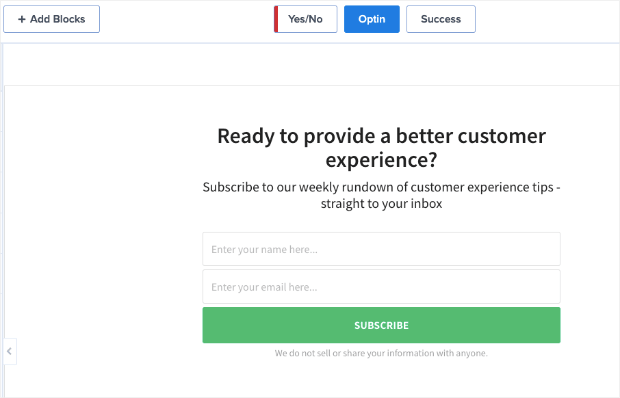
Once you name your campaign and assign it to a website, your Basic template will be in the editor:
We won’t get into how to edit your campaign in too much depth for this tutorial. If you need help, check out this article on how to grow your email list with OptinMonster. That post walks you through how to make edits.
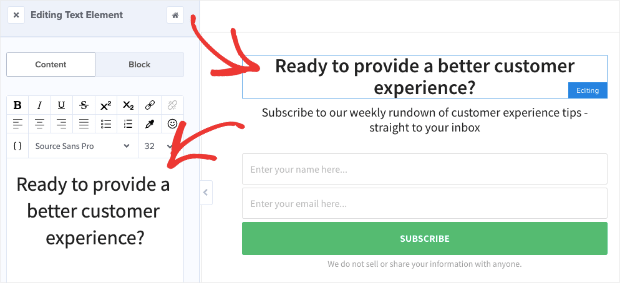
For now, it’s enough to know that to change any element in your campaign, you can simply click on it in the editor. That will pull up the tools in the left-hand side menu:
While editing the template, you’ll want to tell your visitors that your content is for subscribers only, and entice them to sign up to your newsletter so that they can read the rest of the content.
That means working on your optin campaign copy.
We recommend using curiosity-inducing power words like “confidential,” “exclusive,” or “secret” for a high-converting optin. These are terms that are classified as power words.
Power words are key terms that you can use to evoke certain emotions and connect more deeply with your readers. Here’s a list of 700+ power words to help you out.
For this campaign, try to make your copy something that inspires both curiosity and a fear of missing out (FOMO). These are the emotions you want your readers to see to make them opt into your Content Lock:
You may also want to change the call to action text to remind visitors that it’s free, as shown in the image above.
From there, all you need to do is set up your Content Lock.
Step 3: Set Up Your Content Lock
Now you’ll need to hide the content of the page in which you’re going to add the inline optin form.
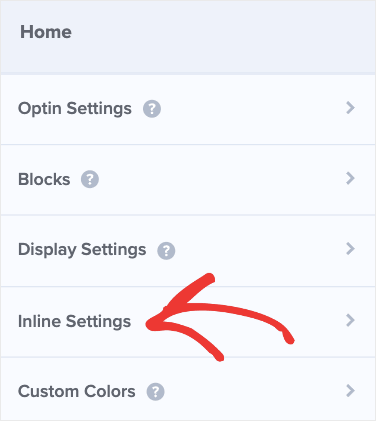
To configure content blocking for your optin, click the Inline Settings tab in the left-hand side menu of the campaign builder:
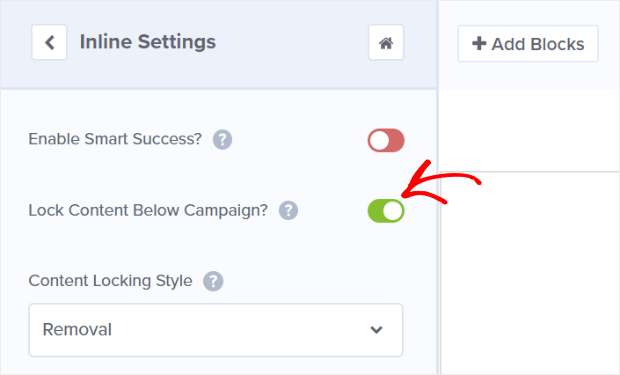
Then, toggle the content locking button from red to green:
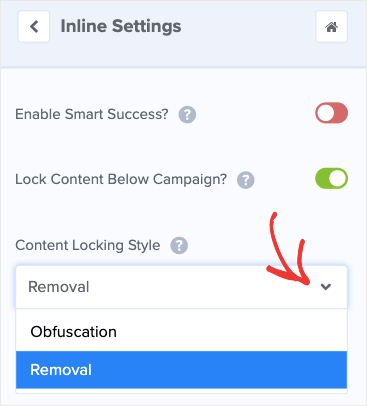
OptinMonster allows you to select from 2 blocking methods:
- Obfuscation: Blurs out the text below the optin
- Removal: Removes the text completely below the optin
You can select the most appropriate one for your content upgrade. Once you’re done, it’s time to embed it in your blog post or content area.
Step 4: Embed the Optin in Your Site
You can embed the optin form before the content you want to block.
Not super techy? Don’t worry, it’s easy. All you have to do is follow along.
Let’s embed the Inline campaign on our site.
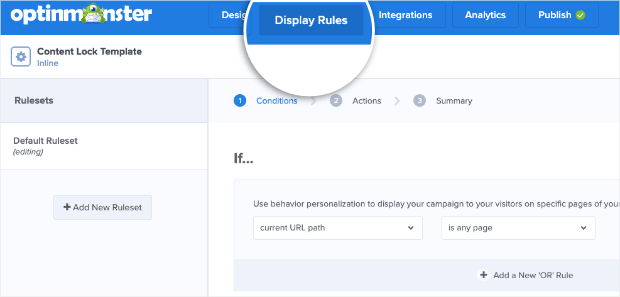
First, you need to head over to Display Rules at the top of your OptinMonster editor:
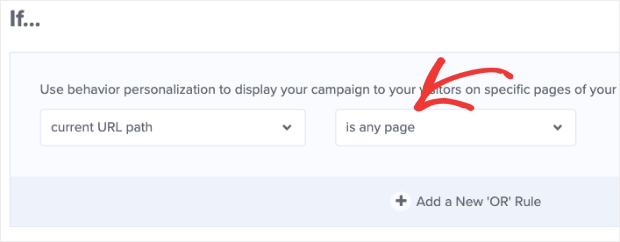
That way, you can set the Content Lock on the exact post you want. Under If… locate the condition is any page (which is located next to current URL path):
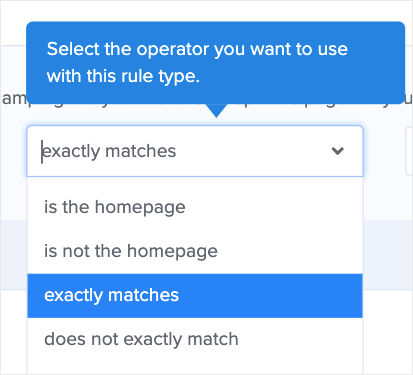
Change this to exactly matches:
Then insert the URL slug of the popular blog post you’re using for the content upgrade:
Don’t forget to Save your work. 😉
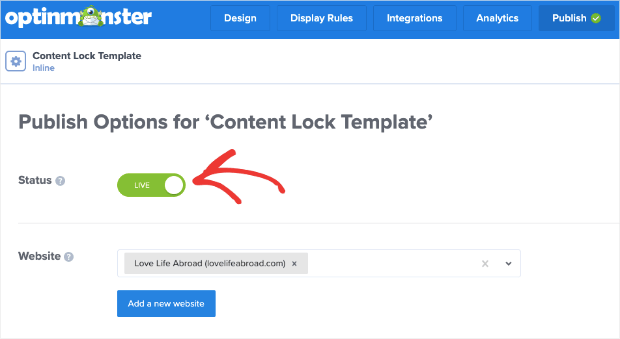
Then go to the Publish tab and select the site you want to use your campaign on. Set the status to Live and save the campaign.
And the rest is easy!
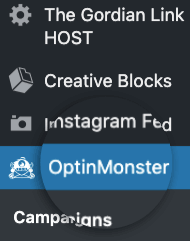
If you’re on WordPress, you can use the free OptinMonster plugin to embed the form on your site. Find the plugin in your left-hand side WordPress menu:
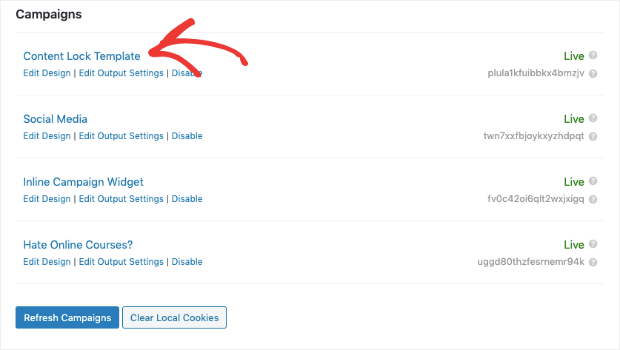
And you’ll see your OptinMonster campaigns in your WordPress dashboard. Click on your Content Lock campaign:
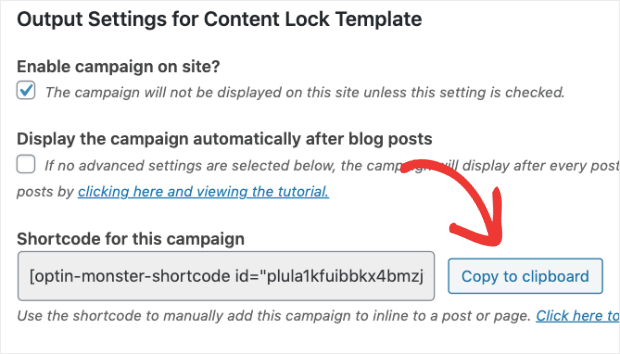
Copy the shortcode generated for your Content Lock campaign:
Now you can embed this shortcode directly in your WordPress editor for the post you want it to appear on. This works for both the classic editor and the Gutenberg editor in WordPress.
Not sure how to embed a shortcode in your WordPress editor? No worries. Check out this article by WPBeginner on how to add a shortcode in WordPress.
Spoiler Alert: It’s super simple.
But what if you’re not using WordPress? Can you still use OptinMonster’s Content Lock feature?
Absolutely.
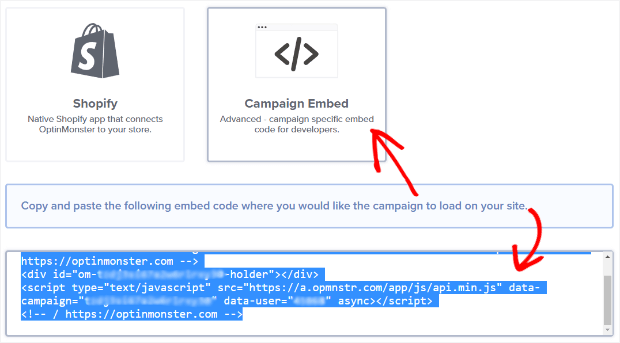
To embed optin in your non-WordPress sites, you can go to the Publish page of your display editor and scroll down to the bottom. Then, select Campaign Embed:
Now get the embed code and paste it where you’d like the campaign to load on your site.
For more help, check out our docs on how to integrate OptinMonster with an HTML site.
While embedding, keep in mind that your optin will only block content that is in the same HTML container. Be sure the optin embed code is not wrapped in a separate div container, or it will not block any of the content that appears visually beneath it.
And that’s it!
You’ve now turned part of your popular blog post into a valuable content upgrade. If you’re looking for additional ways to capture your readers’ email, check out these 69 irresistible lead magnet ideas to boost conversion rates.
From there, you need to know how to use the emails you get to increase revenue. Check out this article with 18 proven ways to increase your conversion rate throughout your sales funnel.
But now, we want to hear from you:
Have you tried Content Lock campaigns to grow your email list? If so, how did it work?
Let us know on Facebook, Twitter, or in the comment section below.
And if you enjoyed this tutorial, you’d love our YouTube channel. We’ve got loads of videos to help grow your email list and increase your sales.
Want to make a Content Lock campaign like we did in this article?
Get started with OptinMonster today risk-free with our 14-day money-back guarantee.








Add a Comment