Are you looking to send users to a specific page once they hit the ‘Submit‘ button on your form?
Redirecting visitors could help improve user experience (UX) by taking them to a relevant page after they’ve shown interest in your form.
It could be a ‘thank you’ page, a URL where they can download a file, or a page to get more information.
From this guide, you’ll learn 2 easy methods to redirect a form to another page:
We selected these 2 tools because they’re both powerful and have something unique to offer. The best part is that everything is done at the click of a button with zero coding knowledge required.
Ready to dive into the tutorial? Let’s get started.
1. Redirect a Form With OptinMonster
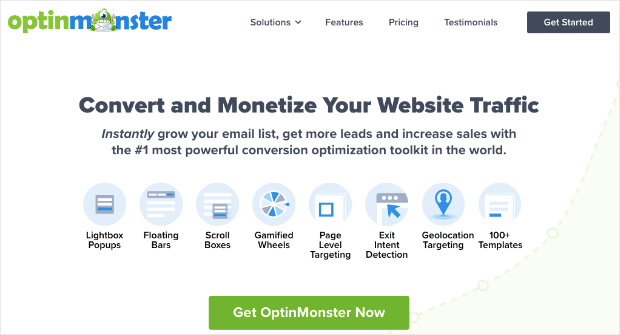
OptinMonster is hands down the best lead generation tool in the market. It lets you create all sorts of forms for your website such as contact, registration, and signup forms to collect leads and subscribers.
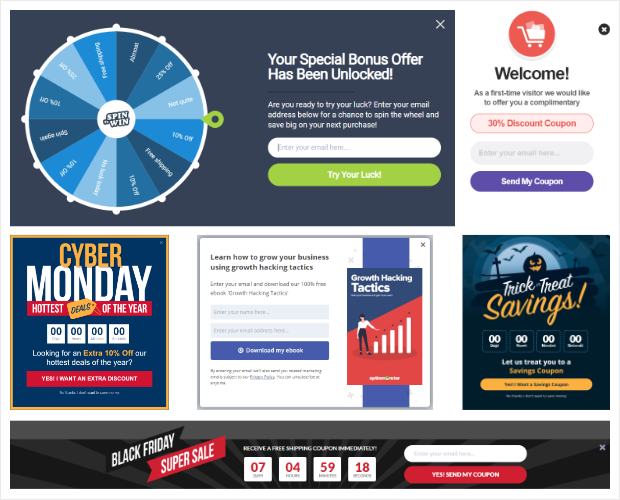
OptinMonster comes with 9 campaign types like popups, floating bars, inline forms, slide-ins, welcome mats, and gamified wheels. Added to that, there are 50+ beautiful templates so you won’t have to spend much time designing the form.
With OptinMonster, you get full control over what happens when a user submits your form. For instance, you could redirect them to a URL, open a new window, or simply make the campaign disappear.
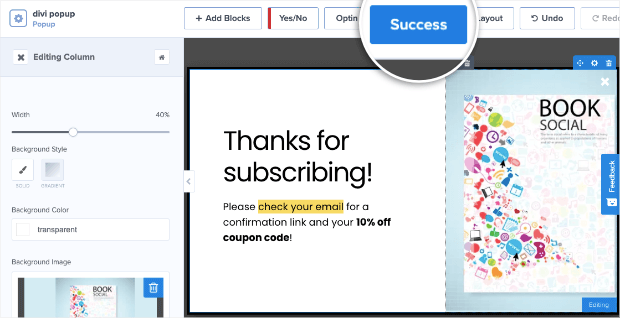
OptinMonster even lets you display a ‘success’ or ‘thank you’ message instantly without redirecting the user to a different page.
You can even combine the success message with a URL redirect to further the user’s journey. That’s exactly what DateID did, and they increased Freemium subscriptions by 162.5%!
All of these controls are available at the click of a button inside OptinMonster’s intuitive drag and drop builder.
This makes it possible to create and configure campaigns in under 10 minutes.
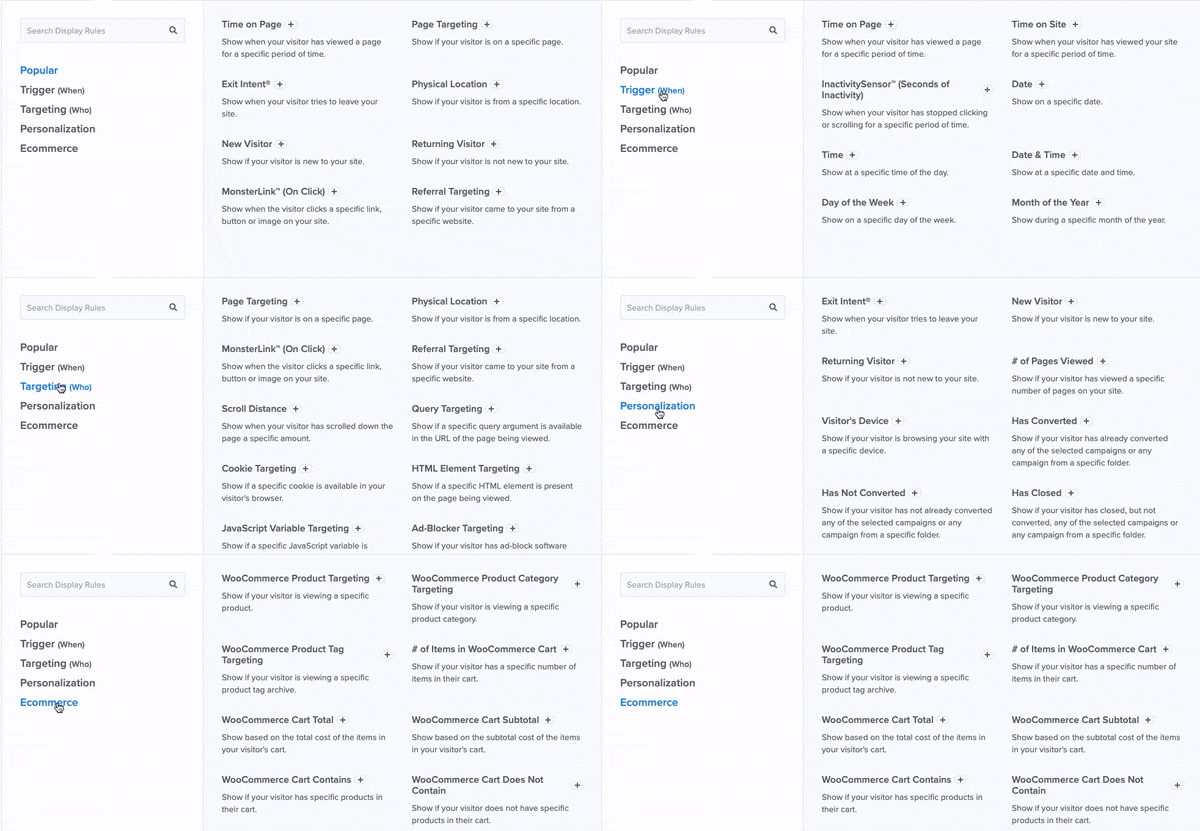
What customers really love about OptinMonster is its powerful targeting rules that let you show the campaign to the right people at the right time. The popular display rules include:
- On click: Make a form appear when a user clicks on a button, link, or image on your site.
- Page view: Show only if a visitor is on a specific page
- Exit-Intent®: Capture visitors who are about to leave your site
- Onsite Retargeting®: Follow up with visitors that have already engaged with a form before
These are just a few popular rules but there are plenty more that let you show your form based on a visitor’s activity, behavior, and interests on your site.
Ready to create a stunning form that redirects to a page of your choice? Sign up for your 100% risk-free OptinMonster account below:
In the tutorial below, we’ll show you how to quickly create an OptinMonster form for your site with a URL redirect, so users are taken to a new page when they submit it.
If you already have an OptinMonster account and know how to use the builder, skip ahead to where we show you how to redirect your form.
If you’re new to OptinMonster, you’ll want to follow the steps below:
Step 1: Installing and Activating OptinMonster
The first thing you’ll want to do is sign up for your 100% risk-free OptinMonster account.
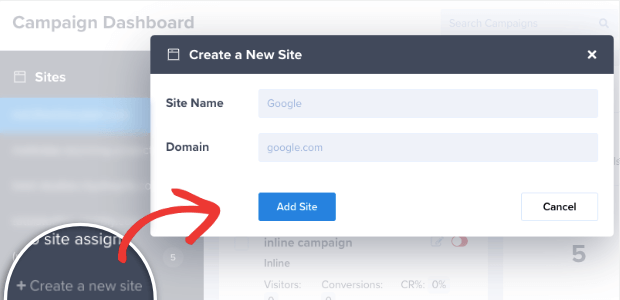
You can then add your website inside the OptinMonster dashboard.
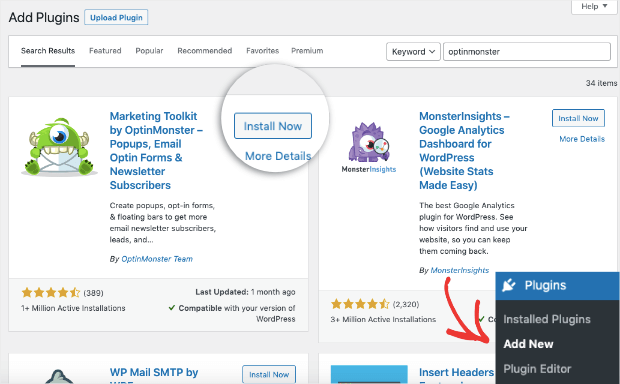
Next, you’ll want to sync your OptinMonster account with your website. If you’re using WordPress, you can install the OptinMonster plugin on your site.
There are apps available for Shopify and BigCommerce sites, too.
While installing these apps, make sure you’re logged into your OptinMonster account in another tab. OptinMonster will auto-detect your account and sync it to your website app/plugin.
For all other websites, you can go ahead and create your first campaign and we’ll show you how to add it to your website after that.
Step 2: Creating a Form
In the OptinMonster dashboard, you can get started by clicking on the Create New Campaign button.
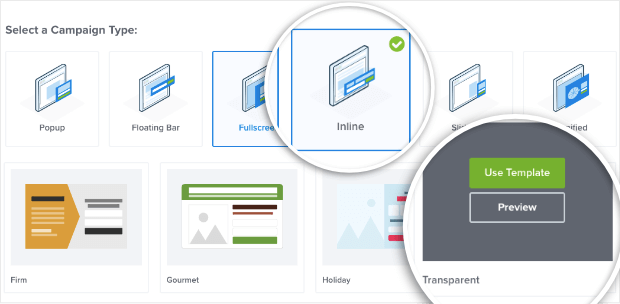
This will open up a page where you can select a campaign type and template. For this tutorial, we’ll create an Inline form that you can add to any page, post, footer, or sidebar.
If you want to create a popup or any other kind of campaign, select the one you want. The steps below will remain pretty much the same.
Next, you can explore the templates by hovering over them and seeing a preview.
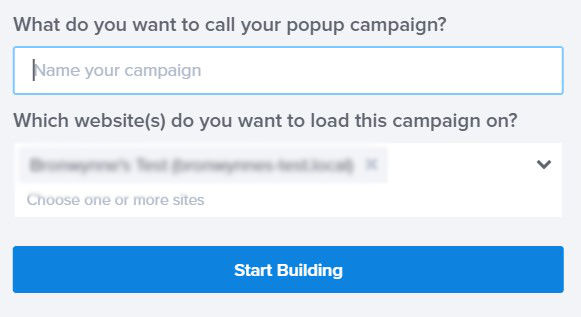
When you select a template, Optinmonster will ask you to name your campaign, so you can easily find it in the list of campaigns you create.
Once you click on the ‘Start Building’ button, OptinMonster’s campaign builder will open up where you can customize the inline form using the drag and drop builder.
Step 3: Customizing the Inline Form
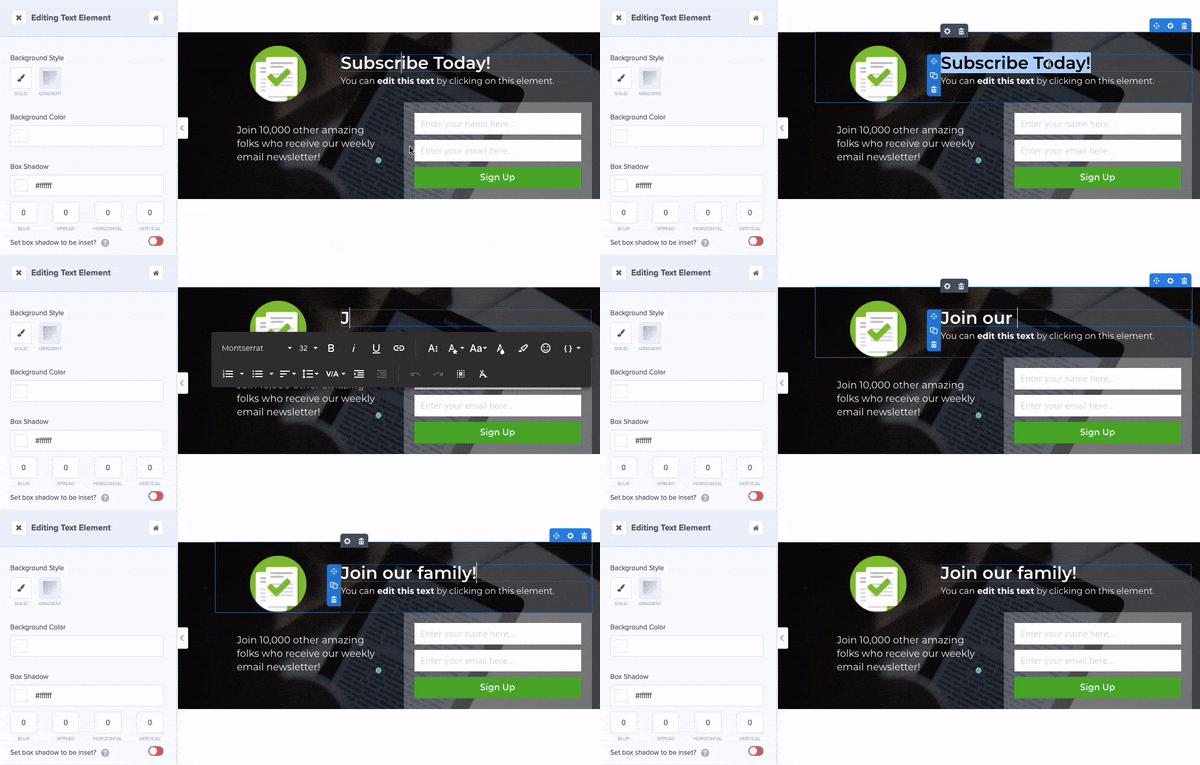
OptinMonster’s campaign builder is incredibly easy to use. You’ll see a preview of the template you selected, which you can edit directly.
To customize the template, select the existing text in the campaign and simply replace it with your own.
When you select the text, you’ll see an editor menu bar appear that lets you change the color, style, alignment, and more.
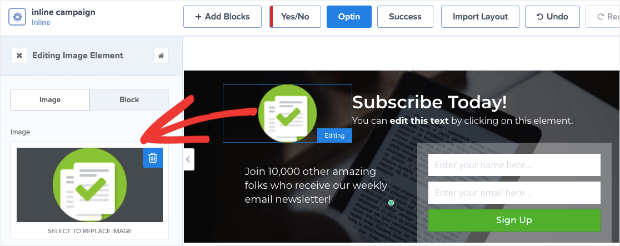
In the same way, you could add your logo or upload an image of your choice:
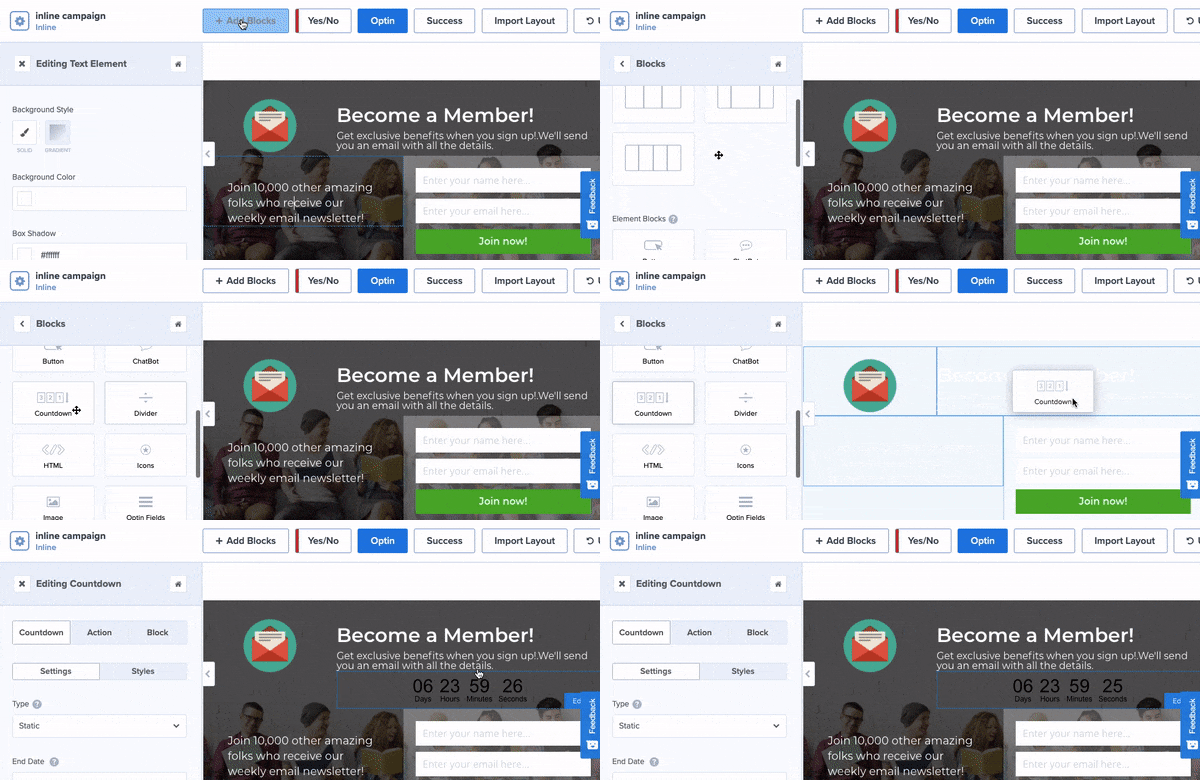
If you want to add more elements to your campaign, use the Add Blocks button and then drag and drop new blocks into your form.
OptinMonster lets you add countdown timers, optin fields, images, videos, icons, and even your own HTML code.
OptinMonster’s templates are designed to look great and function out of the box, so you won’t have to do much when it comes to designing. However, it also lets you customize every aspect of your campaign if you want to do that.
For more help on using the builder, follow our guide to create your first campaign.
Once your campaign is customized and ready, you can set up the URL redirect.
Step 4: Adding a Page Redirect to the Form
To add a redirect, you’ll simply need to customize the button in the campaign. There are 2 ways you can redirect visitors using OptinMonster.
1. Adding a Redirect Immediately After Submitting Form
If you want to redirect visitors as soon as they hit the ‘Submit’ button on your form, select the button in the campaign template.
You’ll see options to change the text, color, and style in the left-hand side column.
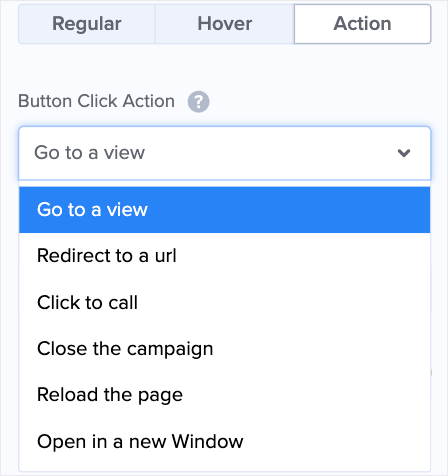
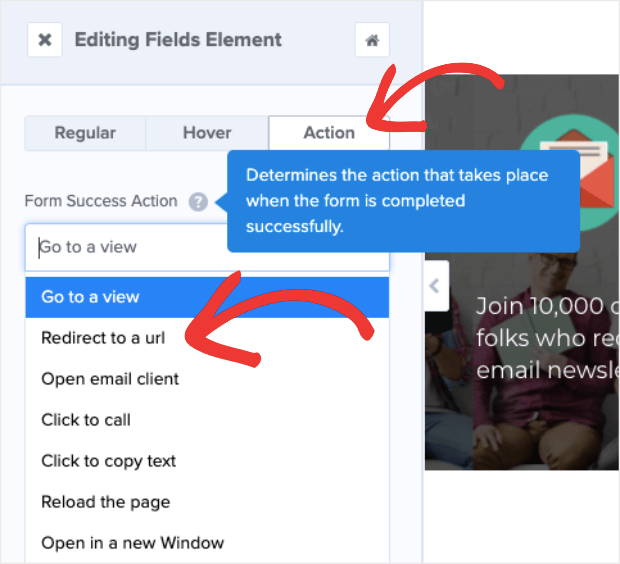
Scroll down the left menu and open the Action tab. You’ll see different options under the Form Success Action menu to control what happens when someone clicks this button.
These controls include:
- Go to a view: Show a Yes/No option or display Optin fields for users to enter their information
- Redirect to a url: Open another page in the same browser tab
- Open an email client: Open an email composer that lets the user write and send an email
- Click to call: Embed a phone number that the user can call to connect with you
- Click to copy text: Let the user click to copy coupon codes, discount links, and more
- Reload the page: Simply refresh the page
- Open in a new window: Keep your website open while a new URL opens in another window
You’ll want to select ‘Redirect to a URL’ and then enter your link in the text field just below.
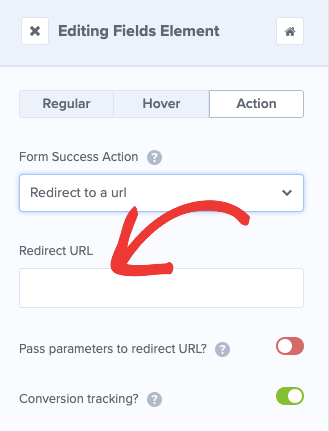
With this rule in place, when someone submits your form, they’ll be taken to the page of your choice.
2. Adding a Redirect After Success Message
You may want to display a ‘thank you’ or confirmation message when someone submits your form before you redirect them to another page.
OptinMonster lets you do this using its ‘Success Message’ feature.
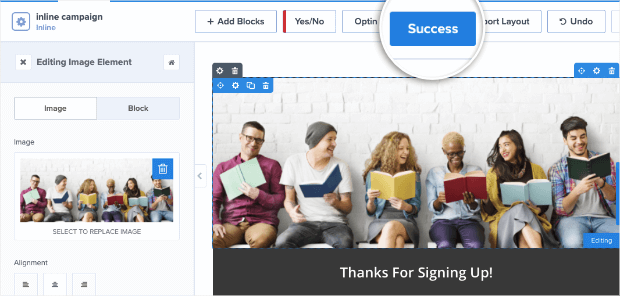
In the campaign builder, switch to the Success tab. Here, you’ll see the confirmation message that you can customize to match your campaign.
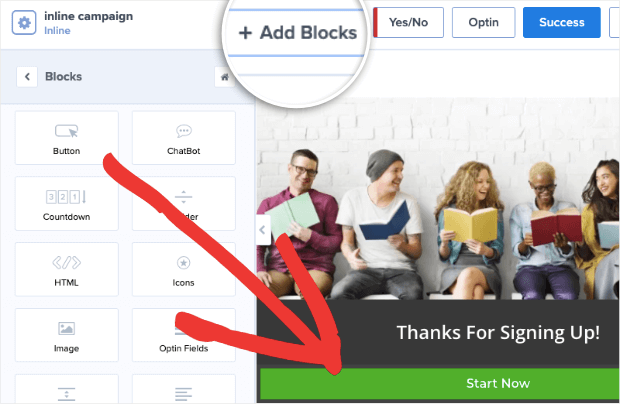
To add a redirect here, click on the ‘Add Blocks’ button, then drag and drop the ‘button’ field into your form.
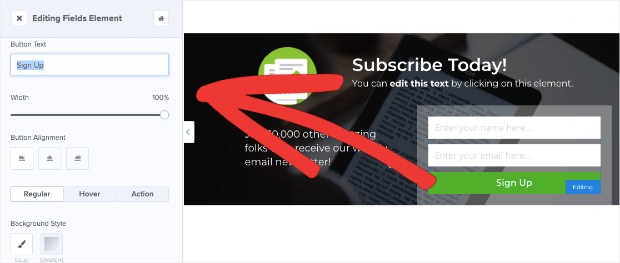
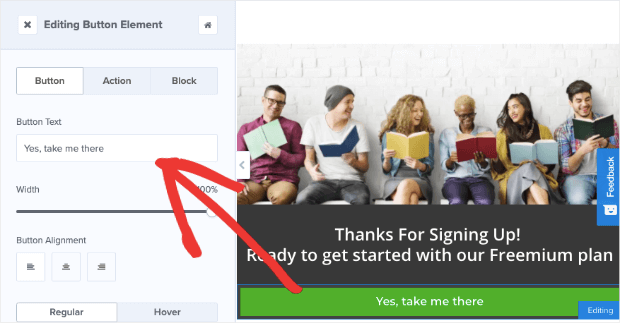
When you select the button, you’ll see options on the left to add your own color and style. You may also want to customize the call to action (CTA) by changing the button text.
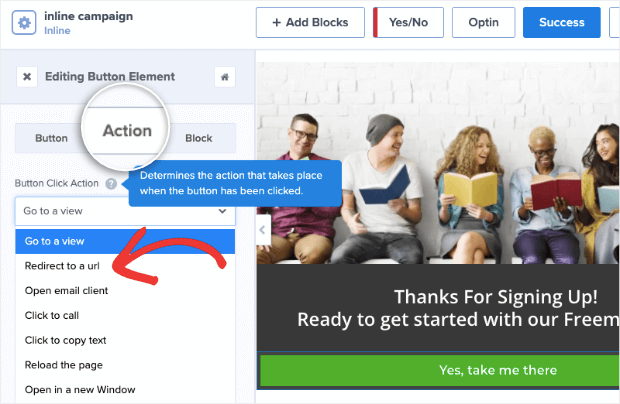
Next, under the Action tab, you’ll get the drop-down menu with options that determine what happens when someone clicks this button.
Select ‘Redirect to a URL’ and then enter your link in the next field.
And with that, the form will now redirect visitors to another page as soon as they hit the button in your success message.
Step 5: Adding Display Rules
The next step in creating an OptinMonster campaign is to set up display rules that help you target your visitors according to their behavior, activity, where they’re located, and more.
Since we’re working with an inline form, you won’t need to configure any display rules. The form will appear where you embed it on your site.
However, when you’re creating other OptinMonster campaigns, like popups, slide-ins, and more, you can create display rules that will determine when, where, and to whom they appear.
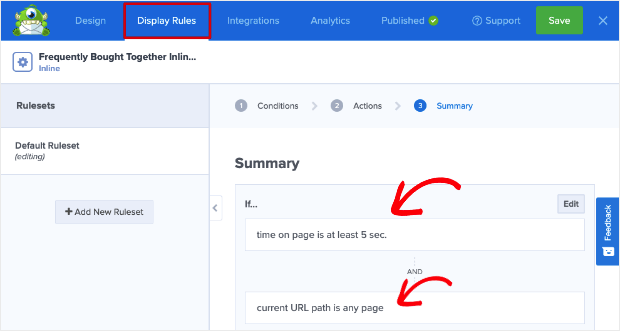
Switch to the Display Rules tab and you’ll see that OptinMonster displays the campaign after a user spends at least 5 seconds on any page of your website.
You can edit these rules or add your own by simply clicking on the rule you want.
What’s great about OptinMonster is that every rule comes with an explanation about what it does and how you can use it.
So, for example, you can add an Exit-Intent® rule to display the form just before someone leaves your site.
Again, if you’re using an inline form, you don’t need to do anything in this tab. Next, we’ll show you how to integrate the campaign with your email account.
Step 6: Connecting to Your Email Account
OptinMonster lets you connect your inline form to your email service provider (ESP). This means all new leads will be automatically added to your email list. You can then trigger emails to be sent as soon as a person submits the form.
This lets you automate the process of sending lead magnets you promised, welcome emails, webinar and event links, or confirmation emails.
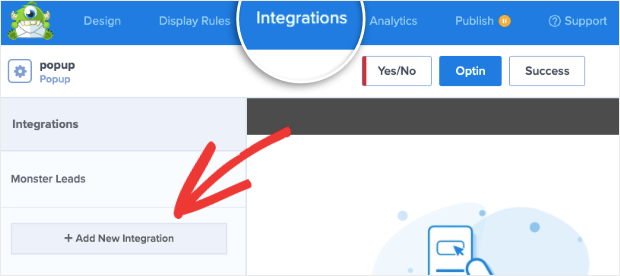
Inside the Integration page, you’ll see an option to Add New Integration.
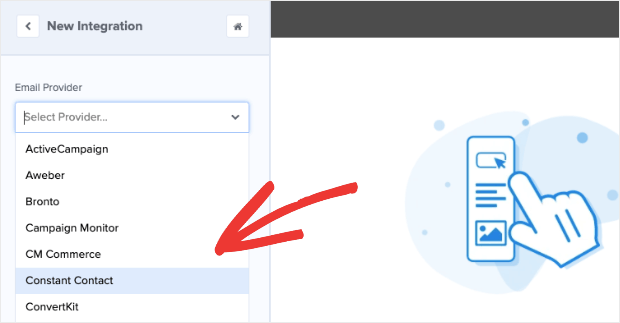
When you click on this button, you’ll get a drop-down menu of all the ESPs available.
OptinMonster integrates with a long list of email service providers including Constant Contact, Mailchimp, AWeber, Brevo (formerly Sendinblue), and ActiveCampaign.
Simply choose your ESP and follow the onscreen instructions to sign in to your account and make the connection.
Now you can go ahead and add the form to your site.
Step 7: Publishing OptinMonster Campaign
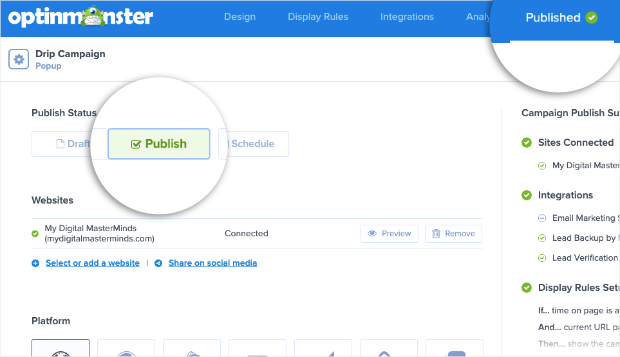
To publish your OptinMonster campaign, switch to the Publish tab and set the status to ‘Publish’ here.
In case you haven’t connected your OptinMonster account to your website yet, you’ll find onscreen instructions to do so on this page.
For more help on that, OptinMonster has plenty of documentation you can follow. Check out the following detailed guide: How to Add OptinMonster to Any Website.
If you’re working with campaigns like popups and floating bars, OptinMonster will automatically display the campaign on your site according to the display rules you set. You don’t need to take any further steps.
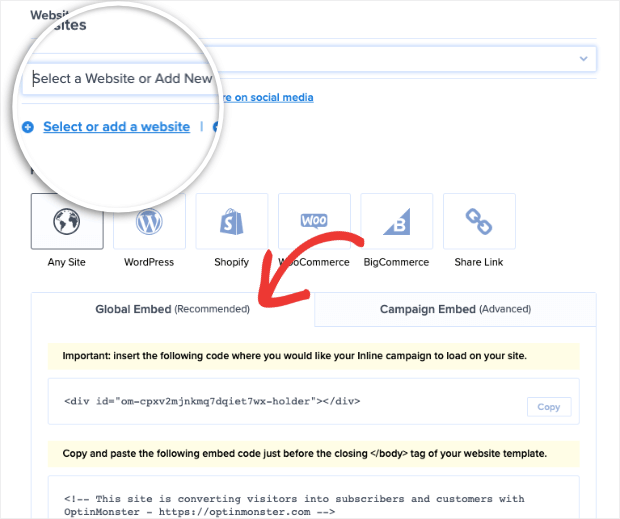
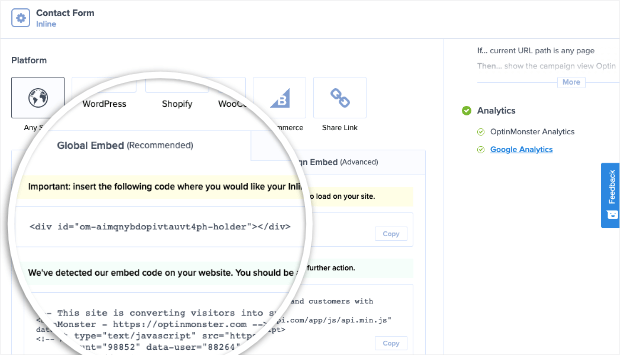
Inline forms are a bit different. You’ll need to add the form where you want it to appear. On the same Publish page, you’ll see a campaign embed code like this:
Copy this code and paste it on your website where you want the inline form to appear.
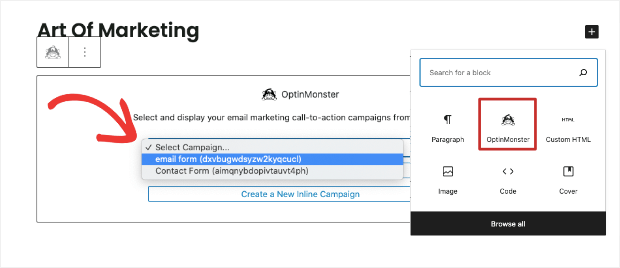
If you’re using WordPress, you can skip this method and use the built-in widget to add the form at the click of a button.
The OptinMonster widget is available in Gutenberg editor as well as the Classic editor. You can also find it inside all popular page builders like Elementor and Beaver Builder.
You can add the block and then select your campaign, and the form will automatically be added to your page or post.
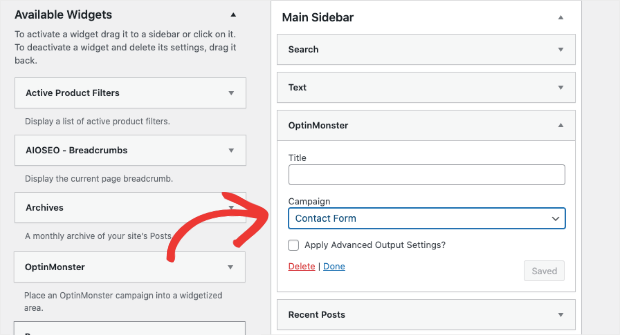
If you want to add the inline form to a WordPress sidebar, navigate to the Appearance » Widgets tab. Then drag and drop the OptinMonster widget into your sidebar menu and select the inline form.
Once you save and publish your page or sidebar, you can visit your site and see your inline form in action.
With that, you’ve learned to use OptinMonster to create functional forms with full control over what happens when a user submits the form.
Explore more OptinMonster features for inline forms in our detailed guide: How to Create an Inline Form in Under 10 Minutes.
If you haven’t signed up for OptinMonster yet, what are you waiting for? Get your 100% risk-free OptinMonster account now by clicking below:
2. Redirecting a Form with WPForms
WPForms is the best form builder for WordPress. It lets you create beautiful forms for your site including contact, registration, login, and survey forms.
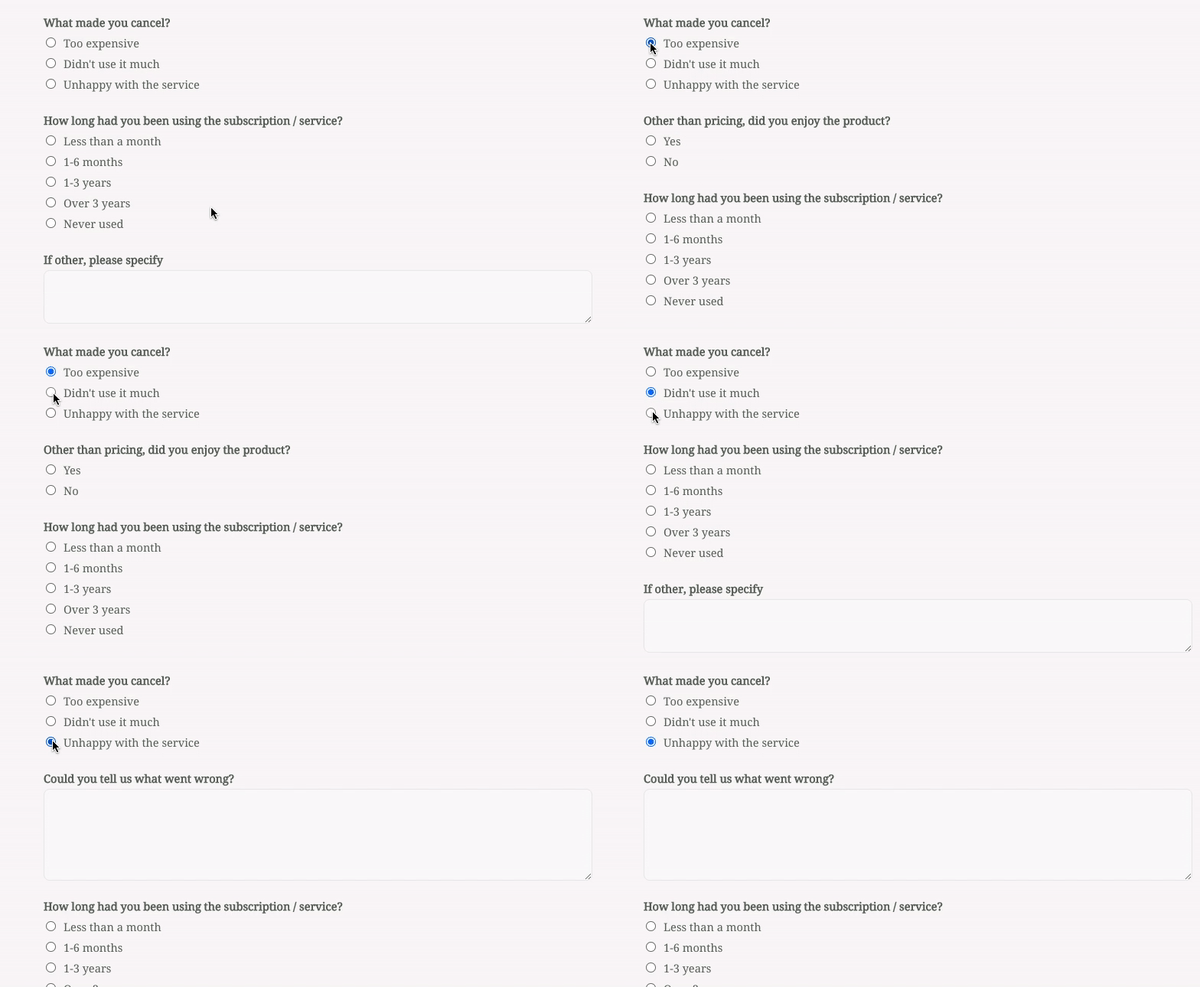
WPForms comes with powerful features that make form building and lead collection a breeze. Take, for instance, its smart conditional logic feature that lets you ask follow-up questions based on a customer’s answer.
This lets you shorten the process and time taken to fill out lengthy forms, which increases your form completion rates.
You can even create conversational forms that display the next question only when the previous one is complete. This keeps users engaged and makes it seem more like a conversation rather than a long form.
WPForms’ highlights include:
- Choose from 100+ responsive templates to create any kind of form
- Enable anti-spam protection to block bot entries
- Add Google reCAPTCHA, hCaptcha, and Custom Captcha
- Manage and delete form entries from a centralized dashboard
- Get instant notifications for you and your team
- Integrate with popular payment gateways and email service providers
We’ll show you how to create a form with WPForms and add a URL redirect so visitors are taken to your desired page when they submit the form.
To follow along in this tutorial, you’ll want to install and activate the WPForms plugin on your site. Never installed a WordPress plugin before? No worries.
Just follow this guide from IsItWP to install a WordPress plugin.
Once you’ve done that, you can get started with the tutorial.
Step 1: Create a WordPress Form
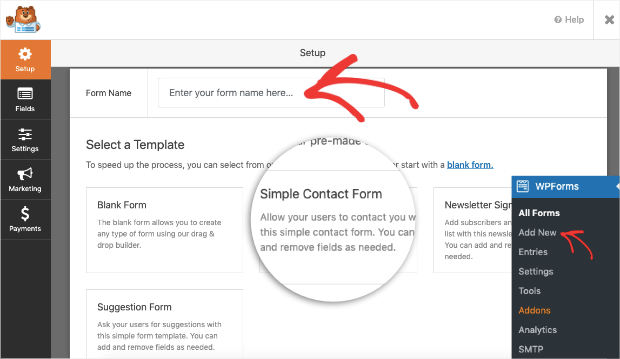
In your WordPress dashboard, navigate to WPForms » Add New page. This will open up a list of templates you can choose from.
First, give your form a name and then select a template.
When you do this, the form builder will open where you can customize the template.
Step 2: Customize the Form
In the form builder, the default template will appear in a preview on the right, and you’ll see customization options in the left-hand side menu.
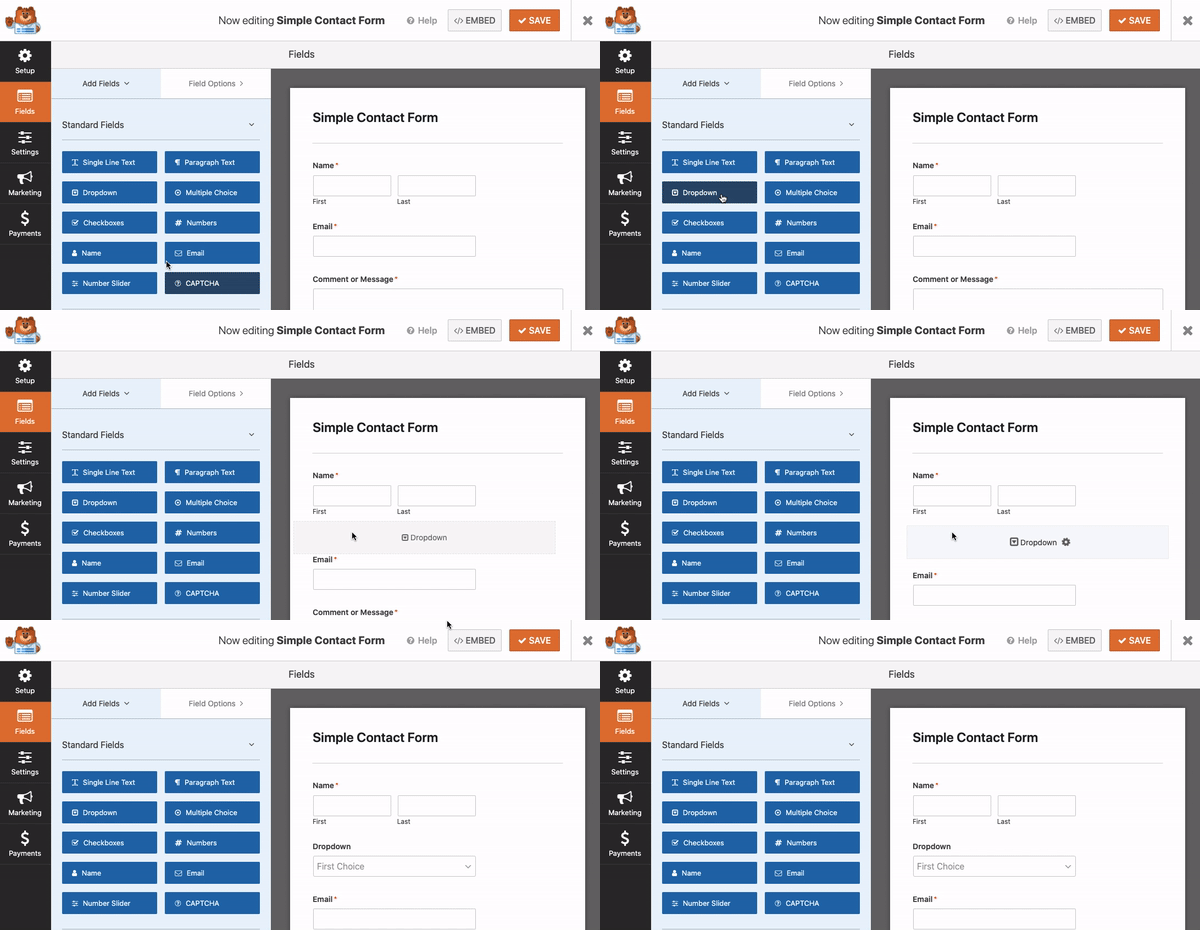
You can select any field in the preview to edit or delete it. You can even drag the fields up and down to change the order.
To add new fields, simply drag a field from the left and drop it into the form.
You can then change aspects of your form in the left-hand side menu. When you’re happy with your form, you can add the URL redirect to take users to another page when they submit the form.
Step 3: Adding a Redirect to Form
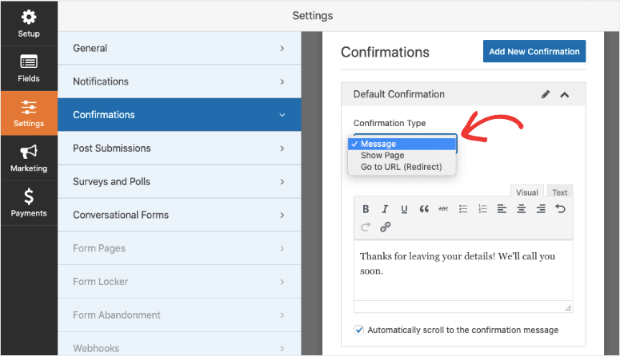
In the WPForms builder, navigate to the Settings » Confirmation tab in the left menu.
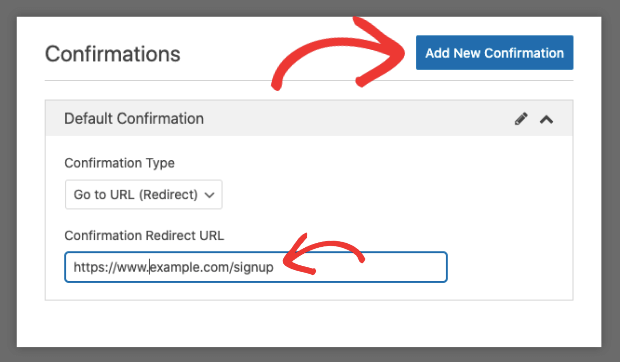
Here, you’ll see options to display a message, show a page, or go to a URL. Select ‘Go to URL (Redirect)’ and enter the link in the field below.
To save these settings, click on the ‘Add New Confirmation’ button.
Step 3: Add the Form to Site
WPForms makes it easy to add the form inside any page, post, or sidebar.
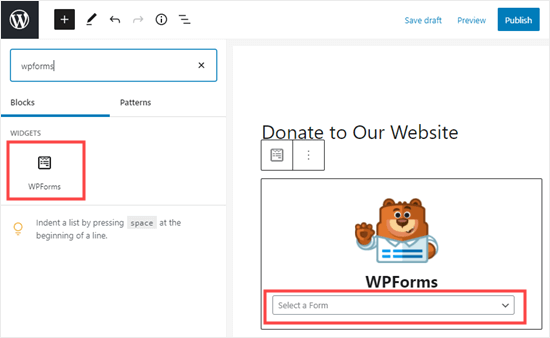
To embed the form inside a post or page, you can use the WPForms widget in the block editor.
When you add the WPForms block to your page, you’ll get an option to select the form you want from the list of forms you’ve already created.
If you’re using the Classic editor in WordPress, you’ll see an ‘Add Form’ button in the post edit screen.
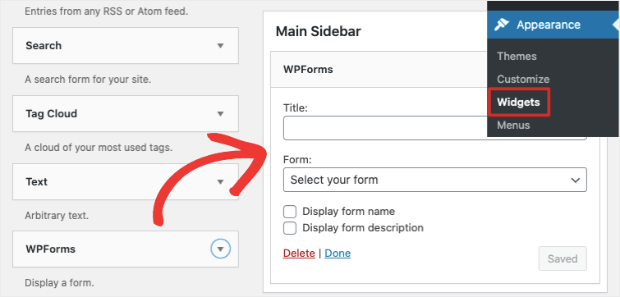
And if you want to display your form inside a sidebar, navigate to the Appearance » Widgets page. Drag and drop the WPForms widget into the sidebar and select your form.
It’s that simple! Now when someone submits your form, they’ll be redirected to the URL you’ve added to the Settings page.
And that’s all we have for you today. You may be interested to know that WPForms and OptinMonster work really well together.
You can create forms with WPForms and then embed them inside targeted popups, floating bars, welcome mats, and much more using OptinMonster.
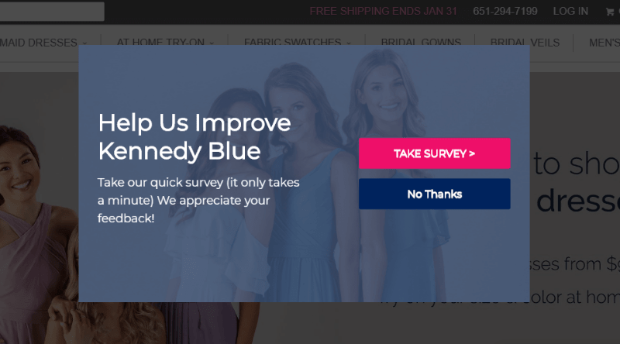
For example, you can create an exit survey with WPForms and then add it to a popup that appears when a customer has completed their purchase and is about to leave your site.
This helps you collect valuable feedback from customers about their experience and how you can improve.
You can also embed a form inside a button using MonsterLinks™. So when a visitor clicks on this button, the form appears inside a popup like this:
OptinMonster is really so flexible and versatile that you can use it in a ton of different ways on your site to:
- Maximize leads and subscribers with targeted campaigns
- Recover abandoned sessions/carts with Exit-Intent®
- Schedule flash sale and seasonal sale campaigns
- Improve engagement with popups, gamified wheels, and more
- Segment leads and organize contacts
- Automate lead generation and email marketing processes
- Track performance of marketing campaigns and optimize results with actionable analytics and A/B testing
If you haven’t yet signed up for OptinMonster, what are you waiting for? Get your 100% risk-free OptinMonster account now by clicking below:
We hope you found this tutorial helpful in redirecting visitors that submit a form on your site. There are also plenty of other redirection plugins you can choose from. We have a few other resources that you should definitely check out:
- 8 Email Validity Tools to Add Higher Quality Leads to Your List
- How to Make More Money With OptinMonster (in ANY Business)
- How to Make a Profitable Follow Up Campaign to Drive More Revenue
These posts will help you get more genuine subscribers, improve user engagement, and grow your website faster.







Add a Comment