Are you looking to boost traffic on your site using push notifications?
Push notifications let you send messages to a user even when they don’t have your website opened in a browser. This helps remind visitors about you and bring them back to your site.
In this article, we’ll show you how to easily create push notifications to boost traffic and conversions on your WordPress site.
What are Push Notifications?
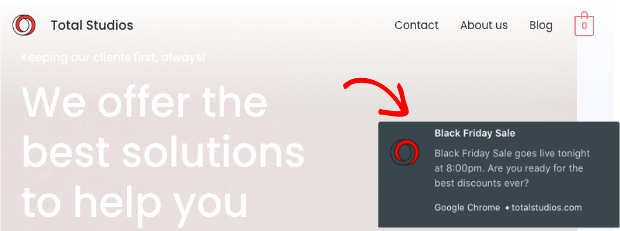
Push notifications are short popup messages that appear on a user’s desktop or mobile. These messages are clickable and will take the user to the desired URL.
Here’s an example of a push notification on desktop.
You can display notifications to users who have visited your website before and get them to come back.
Push notifications can be used on all devices including desktops, laptops, tablets, and smartphones. So no matter which device the user is on, they’ll get your message.
Why Use Push Notifications?
Did you know that 75% of people who visit your site will never come back? This makes it so crucial to make a good first impression.
That said, there are other ways you can get them to come back such as email marketing, SMS marketing, social media, and push notifications.
Out of the different marketing tactics, push notifications are very effective and see a high return rate of visitors.
They work so well because people can optin by simply clicking a button which makes the process very easy. There’s no need to enter an email address or phone number so it’s definitely a preferred option among many people.
Apart from this, there are so many more reasons why push notifications work. Here are a few important reasons:
- Users have the option to allow or block your notifications giving them control over whether they are interested in your messages or not. Users can also snooze notifications if they want to temporarily pause them.
- Messages appear as popups that are hard to miss and can be viewed without needing to open them like an SMS or email.
- Push notifications contain very few words and require a very short attention span. They get the point across immediately.
- Compared to emails and SMS, people receive far lesser push notifications which mean it’s less likely to get lost among spam.
All these reasons make the click-through rate for push notifications much higher than emails. So it’s easy to see why all top businesses including LinkedIn, Netflix, and Facebook use them.
Now, if you’re wondering how hard it’s going to be to add push notifications to your site, you don’t have to waste another minute worrying about it.
We’re going to show you how easy it is to add push notifications to your site using the best push notification tool for WordPress.
Creating Push Notifications in WordPress
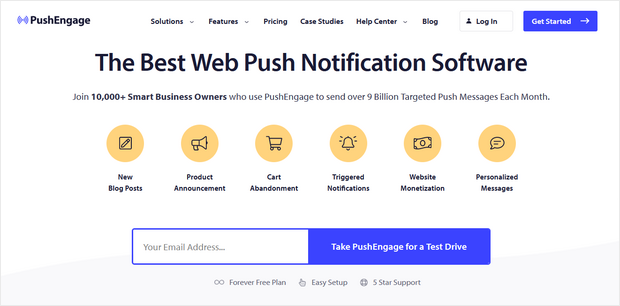
For this tutorial, we’re going to use PushEngage to create push notifications.
PushEngage is the leading push notifications app on the market. It has powerful features to help you boost engagement, traffic, and return rates.
It lets you easily create custom push notifications and it automates the process so that you can spend minimal time setting it up and get maximum returns.
Setting Up Your PushEngage Account
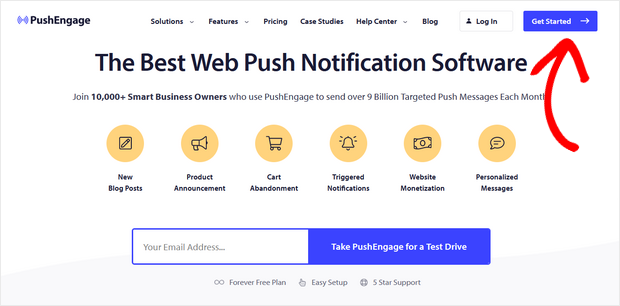
The first thing you’ll need to do is set up an account with PushEngage. To do this, go to the PushEngage website and click on the ‘Get Started’ button to create an account.
With the free plan, you can send 120 notifications to 2,500 subscribers every month. As your site grows, you can upgrade your plan to get more features and extend your subscriber limit.
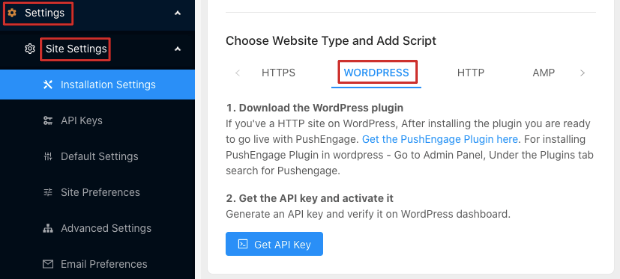
Once you’ve signed up for an account, the PushEngage dashboard will open. You’ll need to go to the Settings » Site Settings » Installation Settings page.
Here, you can enter your site’s name and URL. You can also upload an image of your site or your logo which will appear in your push notifications.
The recommended size for the image is 256x256px and it accepts PNG and JPG formats.
After you’ve uploaded the image and added your site’s details, your PushEngage account is ready.
Connecting PushEngage to WordPress
To connect your WordPress site to your PushEngage account, simply scroll down on the same Installation Settings page. You’ll see options to choose your website type where you need to select ‘WordPress’.
Following the instructions given here, first, install and activate the PushEngage plugin.
You simply need to find the PushEngage plugin in the WordPress repository and install it on your site. If you need more help on this, check out this guide on how to install a WordPress plugin.
If you’re using HTTPS on your site, you’ll need to carry out an additional step here.
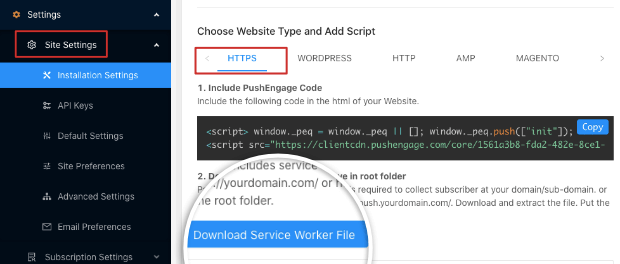
On the same Installation Settings page on your PushEngage dashboard, open the ‘HTTPS’ tab. Then, you need to click on the ‘Download Service Worker File’ button and a zip file will save to your computer.
When you unzip the file, you’ll get a file named ‘service-worker.js’ which is a Javascript file. You’ll need to upload this to the root folder of your site.
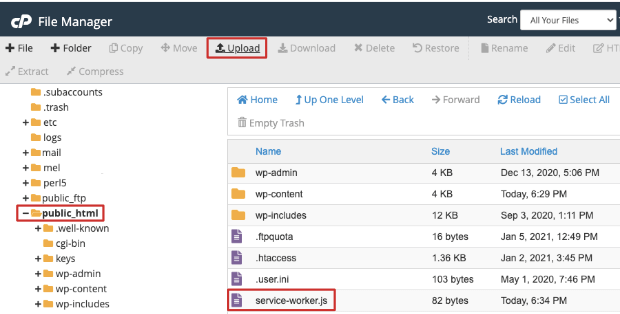
You can do this using cPanel » File Manager in your web hosting account. By default, the root folder is named public_html and will contain three sub-folders called wp-content, wp-includes, and wp admin inside.
Note: In case you or your developer has renamed the website folder, you’ll need to select the folder accordingly.
Next, simply use the upload button, select the file on your computer, and upload it to the public_html folder.
You can also connect to your website’s folder using an FTP client like FileZilla. For more details on this, check out this guide on using FTP to upload files.
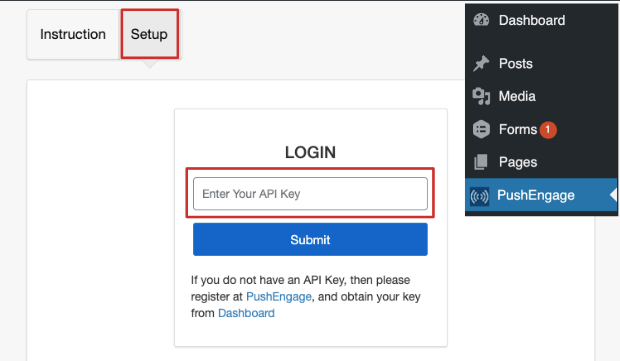
Once you’ve done that, you can open your WordPress dashboard and select the PushEngage plugin from the menu. You’ll see a window with ‘Instructions’ and ‘Setup’ tabs available. Switch to the ‘Setup’ tab where you’ll need to enter your API key.
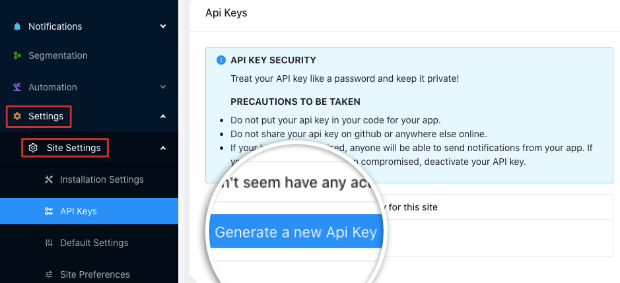
If you don’t have this key, go back to your account on the PushEngage website. Here, navigate to Settings » Site Settings » API Keys. Simply click on the ‘Generate a new API Key’ button and an API key will be created for you.
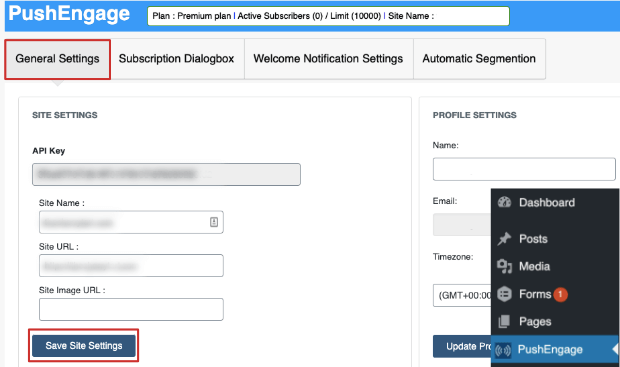
Now, copy this key and head back to your WordPress dashboard to paste and submit the API key. This will open up the PushEngage settings page on your site.
Here, you’ll see that your site’s details and API key have been filled in automatically.
Your website is now successfully connected to your PushEngage account and you can start creating your notifications.
Creating Push Notification Messages
In the settings page that just opened up, you’ll see a number of options that we’ll walk you through to create your push notification campaign.
Create Optin Message
First, you need to set up the optin message that will prompt people to subscribe to your notifications.
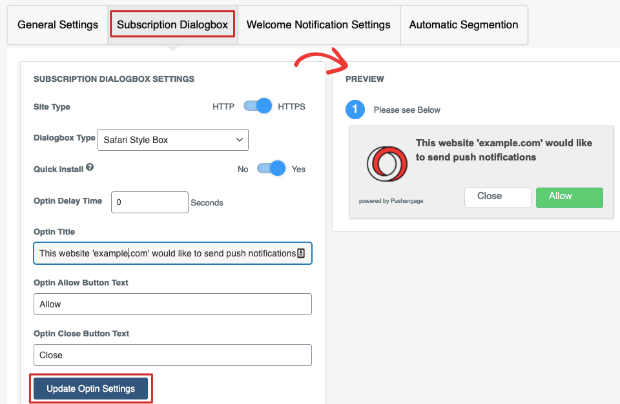
To do this, switch over to the ‘Subscription Dialogbox’ tab where you’ll see a preview of the default push notification on the right. To customize this message, you’ll see options on the left-hand side.
First, you can change the dialogbox type. We’ve selected ‘Safari Style Box’ for our campaign.
You can also change the title and button text that will appear in the notification. When you’re happy with your settings, click on the ‘Update Optin Settings’ button to save your changes.
Change Intermediate Page Message
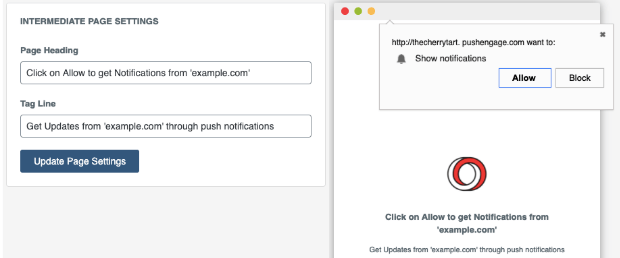
Next, when a user clicks on your notification to subscribe, they will be taken to an intermediate page that asks them to ‘Allow’ notifications. You can change the message that’s displayed on this page as well.
On the same page, scroll down to ‘Intermediate Page Settings’ to change the page heading and tag line.
You can see a preview of the page on the right-hand side so you adjust your message accordingly.
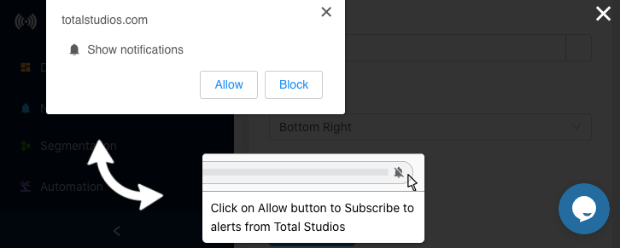
In this preview, you’ll also see a browser popup that has a bell icon with ‘Show notifications’ text and the ‘Allow’ and ‘Block button’.
You won’t be able to change this popup because these are default browser settings and not a part of PushEngage.
Once you’re happy with the notifications, don’t forget to click the ‘Update Page Settings’ button.
Create Welcome Message
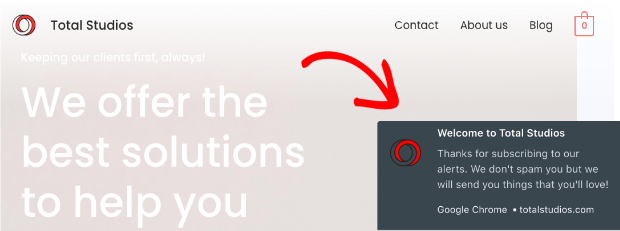
After the intermediate page, you can display a popup that welcomes and thanks the user for subscribing.
To create a welcome message, switch to the Welcome Notifications Settings tab.
On this page, you can type out a title and message to welcome subscribers. You can also set a condition that will take your users to your home page or a specific page.
When you’re ready, check the box that says ‘Send Welcome Notifications to Subscribers’ and then update your settings.
With that, you’ve successfully created the subscription optin and welcome messages.
Testing Push Notifications
It’s a good idea to check if your campaign is working as expected on your site. To test your push notifications, simply open your website in your browser and check out how it looks.
You should see a subscription dialog box open immediately with the ‘Allow’ and ‘Block’ buttons.
You’ll see the same notification appear on mobile as well.
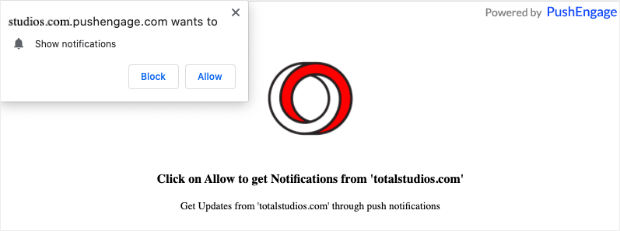
When you click the ‘Allow’ button, the intermediate page will open up in a separate popup window. This will also have the browser popup present on the top with ‘Allow’ and ‘Block’ buttons.
Here too, you’ll need to click on the ‘Allow’ button. Upon doing so, the welcome message should appear on your screen in a few minutes.
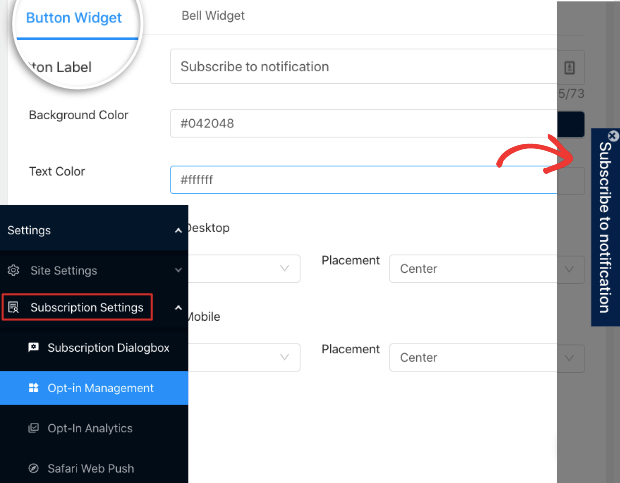
In case a visitor closes the popup without subscribing, a bell icon will appear at the corner of the site. If you hover over the icon, you’ll see a text bar appear that says ‘Subscribe to notification’. This allows your visitors to subscribe at any time.
If you want to customize this bell icon and text, head over to Settings » Subscription Settings » Opt-in Management in your PushEngage dashboard.
You get to choose a bell icon or a button widget on the side of the page.
Once you’ve made your selection, you can customize the color, text, position, and placement of the widget to match your website. You can preview the widget to see how it looks and then update your settings to make it live.
Now you can be sure your notifications are working correctly and they look great too!
Sending Push Notifications to Users
PushEngage makes creating and sending push notifications simple and easy. By default, it will send out a notification for every new post you publish on your site. The message will include the post title and a thumbnail feature image.
When a user clicks on the popup, they’ll be directed to your new blog post.
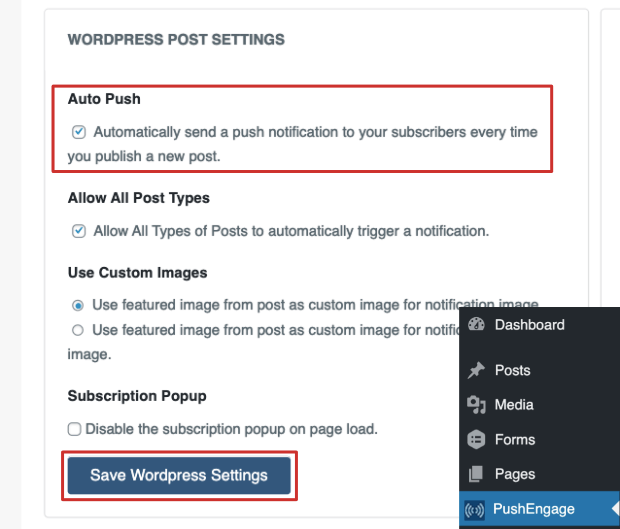
If you want to turn off automatic notifications, you can go to your WordPress dashboard and open the PushEngage » General Settings page.
Under the ‘WordPress Post Settings’ section, you can uncheck the ‘Auto Push’ box and then save your WordPress settings.
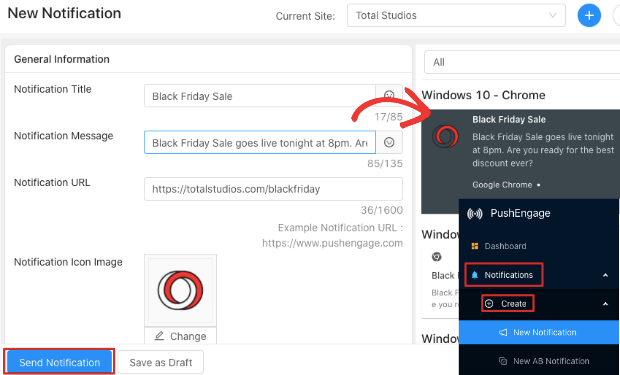
To create your own custom notifications, head over to your PushEngage account and then go to Notifications » Create » New Notification.
You’ll see a preview of a default notification in the right column. You can use the settings in the left panel to customize the message.
You can change the title, text, URL, and icon image. The page gives you a number of customization options to explore.
When you’re happy with your custom notification, you can click on the ‘Send Notification’ message to make it live instantly.
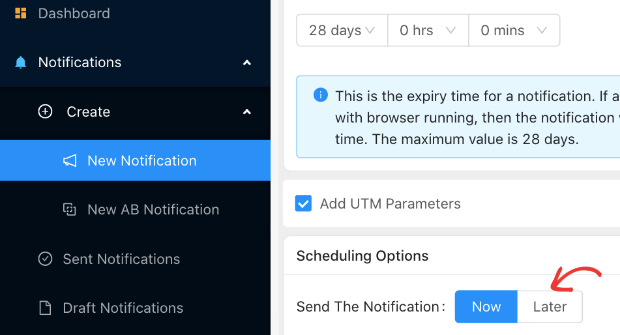
If you’re not ready to publish the notification, you can save it as a draft or schedule the post. To schedule the post, scroll down on the same page, and under Scheduling Options, select the ‘Later’ button.
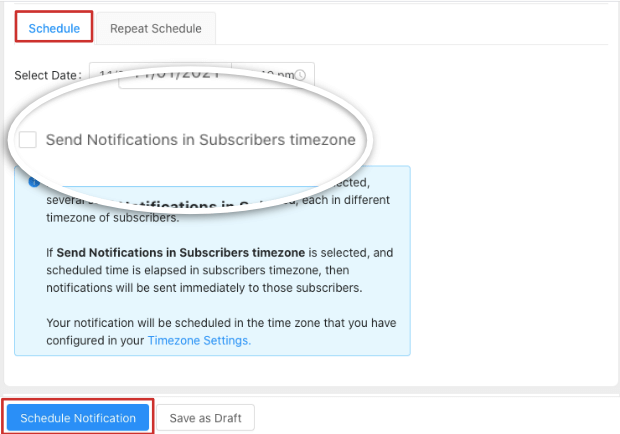
This will open up scheduling options such as a time and date. We recommend checking the box that lets you send notifications in subscribers timezone.
If you have subscribers from around the world, they could get the message at all odd hours reducing your chances of them seeing it. With this option, PushEngage will create different time slots according to timezones so that your users are more likely to get the message.
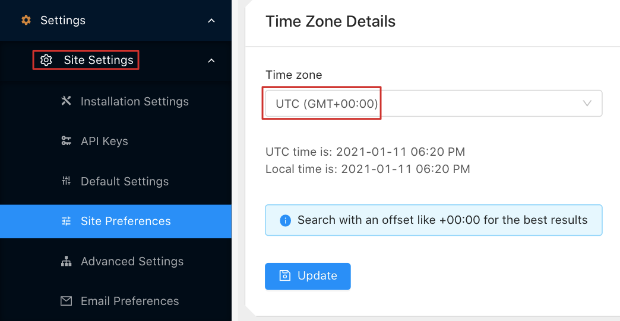
To make sure your timezone settings are correct, go to the Settings » Site Settings » Site Preferences page in your PushEngage account.
Here, you can set your timezone so that your scheduled notifications will line up correctly with your timezone.
Once done, you can schedule your notification and your users will see it at the time you’ve selected.
Do More With PushEngage
PushEngage is packed with features to help you optimize your push notification campaigns. We’ll explore a few of them that we think are really helpful.
- Create an Overlay Popup
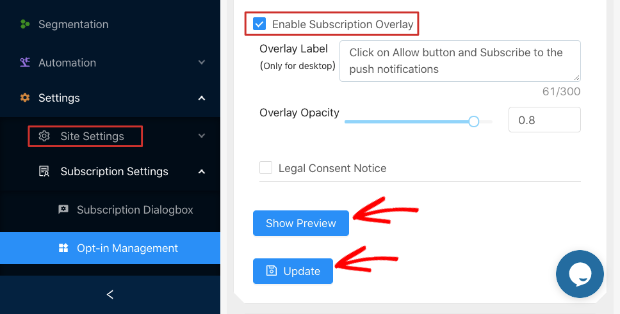
You can set up the notification to appear as an overlay popup on your site. This draws more attention to the popup by fading out the background and focusing on the popup.
To set this up, go to Settings » Subscription Settings » Opt-in Management and scroll down to the ‘Subscription Overlay’ section.
Here, you can customize the label and then check the ‘Enable Subscription Overlay’ box to activate this feature.
- Trigger Subscription Notifications on Click
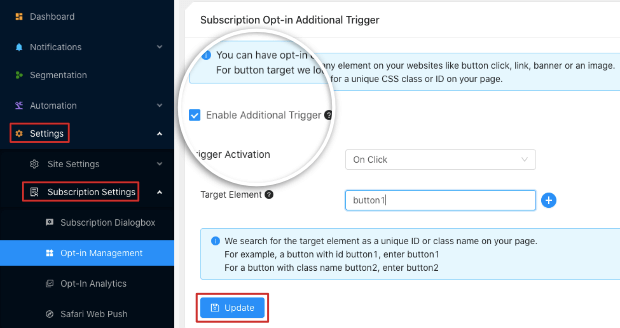
You can trigger the subscription optin popup when a user clicks on a button. Here too, go to the Settings » Subscription Settings » Opt-in Management page.
You’ll find this option under the ‘Subscription Opt-in Additional Trigger’ section. First, activate it by checking the ‘Enable Additional Trigger’ box.
Then, you can enter a target element here which is your button ID or class name. Once you update the settings here, when a user clicks on the targetted button, a subscribe notification will appear.
- Enable Notifications in Posts and Pages
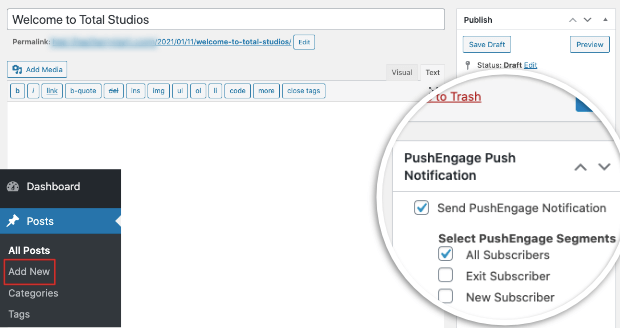
PushEngage gives you the option to enable notifications for individual pages and posts that you create on your site.
In the post edit page, you’ll see a PushEngage section in the settings panel.
You can push the notification to all subscribers, new subscribers, or exit subscribers.
- Track Your Notifications and Optimize Them
PushEngage lets you track how well your notifications are performing to help you determine what’s working and what’s not. This helps you optimize your campaigns and get better results.
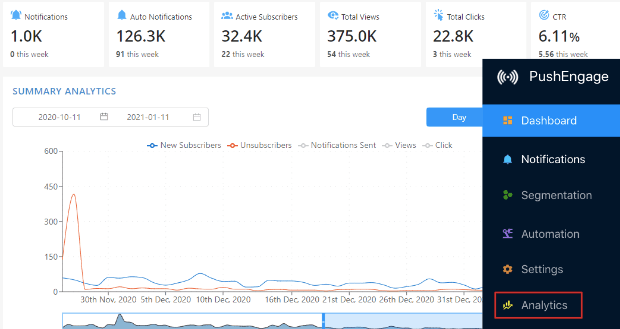
When you open the dashboard in your PushEngage account, you’ll see a summary of your push notifications performance.
You’ll see how many notifications were displayed, how many active subscribers you have, along with the total clicks and click-through rate.
For more data analytics, visit the Analytics tab in your PushEngage account and you’ll get different statistics of your campaigns.
Creating Lead Generation Notifications
Are you interested in more ways to drive traffic, generate leads, and increase sales and conversions? Try OptinMonster which is the most powerful lead generation tool in the market.
OptinMonster lets you easily create stunning lightbox popups, floating bars, scroll boxes, and slide-ins to increase engagement with your visitors.
It comes with 100+ pre-made templates and a drag and drop builder that makes it easy to create sophisticated lead generation campaigns in under a few minutes.
You can check what works with A/B testing to optimize campaigns. You can also personalize and target campaigns based on user behavior.
It can even detect when a visitor is leaving your site and trigger a popup to convert them into email subscribers so you can bring them back later.
We hope this article helped you easily set up push notifications to generate more traffic and leads. If you like this post, then you may also be interested in
- 38 Best Lead Generation Tools to Get More Targeted Leads
- Highly Effective Lead Magnet Ideas to Grow Your Email List
- Conversion Rate Optimization Tools that Pros Can’t Ignore
These posts are packed with info to help you grow your subscribers list, get targeted leads, improve conversion rates, and generate more sales.
If you are ready to start generating targeted leads right away, try OptinMonster now!





Add a Comment