Want to win back customers who’ve decided to cancel their plan?
Watching customers churn is painful and can hurt your bottom line.
The bright side is that their decision isn’t final yet. You can still reach out to win them back before they’re gone for good.
In this post, we’re going to show you a sure-fire way of reaching out to customers as soon as they cancel.
That way, you can find out why they left and give them an incentive to come back.
Before we get started, though, let’s get clear on why you should send a cancellation survey in the first place.
Why Send Customers a Cancellation Survey
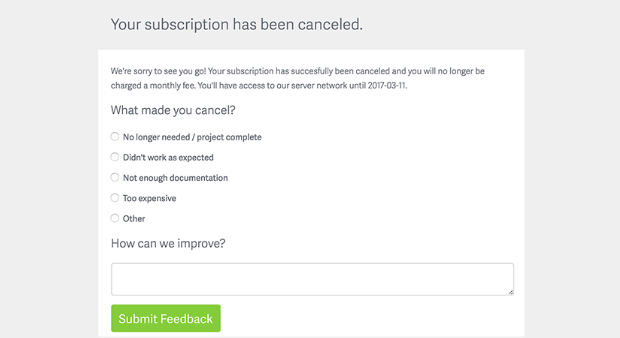
Customers cancel their subscriptions for a wide range of reasons. They may feel the product isn’t giving them the results they want, or their business has grown bigger and doesn’t need it anymore.
There are also some customers who realize the product isn’t what they were looking for. You may not be able to do anything to bring these customers back because you simply don’t offer what they want.
For the rest of your customers, you need to consistently engage with them, hear their feedback, and let them know that you’re with them all the way.
When they’re dissatisfied or no longer need your product/service, that’s when you need to find out what you can do to keep them on. They may simply need a demo or a tutorial to show them how to use the product correctly.
So when they cancel, by simply asking them “why,” you may be able to resolve the issue and retain them.
The best way to get their feedback is by sending them a cancellation survey.
A cancellation survey can help you:
- Identify problems that are causing customers to cancel
- Find areas to improve your user experience, product/service, and pricing
- Create a strategy to boost customer retention and reduce churn
A cancellation survey not only shows you care, but it can also get you insights into what’s going wrong with your business.
That way, you can fix the issue and maximize customer retention.
Creating a Customer Cancellation Survey
In this tutorial, we’ll show you how to create a survey form with all the right fields to ask a customer why they canceled.
We’ll help you ask questions based on a customer’s response, so the form is user-friendly and easy for the customer to fill out.
This will help you get a higher response rate.
Then, we’ll show you how to make the form appear at the click of a button inside a page or an email.
Customers can access and fill out the survey right away on the same cancellation page or right from their inbox.
Here’s a table of contents so you can navigate this post easily and skip ahead to the section you’re most interested in:
- Step 1: Choosing Effective & Powerful Cancellation Survey Tools
- Step 2: Creating a Cancellation Survey with WPForms
- Step 3: Creating a Popup Survey Campaign
- Step 4: Embedding the Survey in Webpages and Emails
- Step 5: View Customer Feedback & Suggestions
Ready to dive in? Let’s get started.
Step 1: Choosing the Right Cancellation Survey Tools
To create an effective cancellation survey, we recommend using 2 powerful tools:
- WPForms – The best form builder for WordPress to create stunning customer survey forms
- OptinMonster – The #1 lead generation and conversion optimization tool to embed surveys in webpages and emails to maximize responses
Both tools are packed with features to help you create and send attention-grabbing cancellation survey forms. Here’s why…
1. WPForms
WPForms is hands down the best form builder to create beautiful surveys, polls, and any kind of form for your site.
The reason we chose WPForms is that it comes with a premade cancellation survey template.
This makes it super easy to create and customize a full-fledged survey in just minutes. The template is also optimized to make sure you ask for key information you need.
That way, you won’t have to spend hours researching questions to ask.
WPForms also comes with conditional logic which means you can ask follow-up questions based on the customer’s response. This means you don’t have to make your survey longer than it has to be.
You can ask only the most relevant questions according to the customer’s experience and their reason for cancellation.
Plus, you can access all the cancellation survey responses in one place so your data is easy to manage.
WPForms has a free version that gives you access to basic form templates for your site. To access more advanced survey templates, you’ll want to get the premium version.
Sign up for your risk-free WPForms account now!
2. OptinMonster
OptinMonster is the best lead generation tool on the market. It lets you embed the customer cancellation survey in popups, fullscreen mats, buttons, and so much more.
It comes with powerful targeting features so you can make sure the survey form appears to the right people, in the right places, and at exactly the right time in their customer journey (yes, even at the end of their customer journey).
Using OptinMonster’s display rules, you can trigger the cancellation survey form on the cancellation page as soon as the customer cancels their plan.
You can even embed the form in a call-to-action button inside an email.
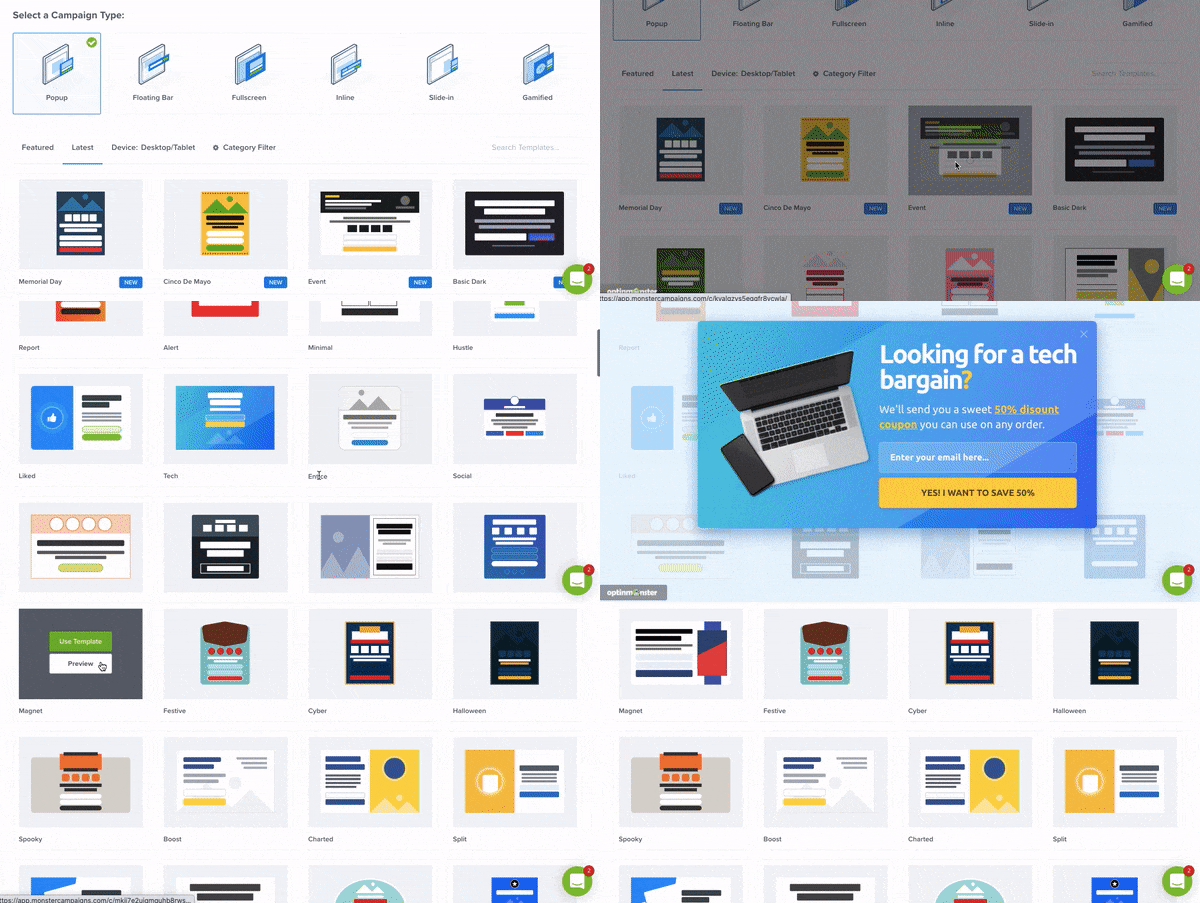
OptinMonster also comes with 50+ beautiful templates and 9 campaign types to choose from.
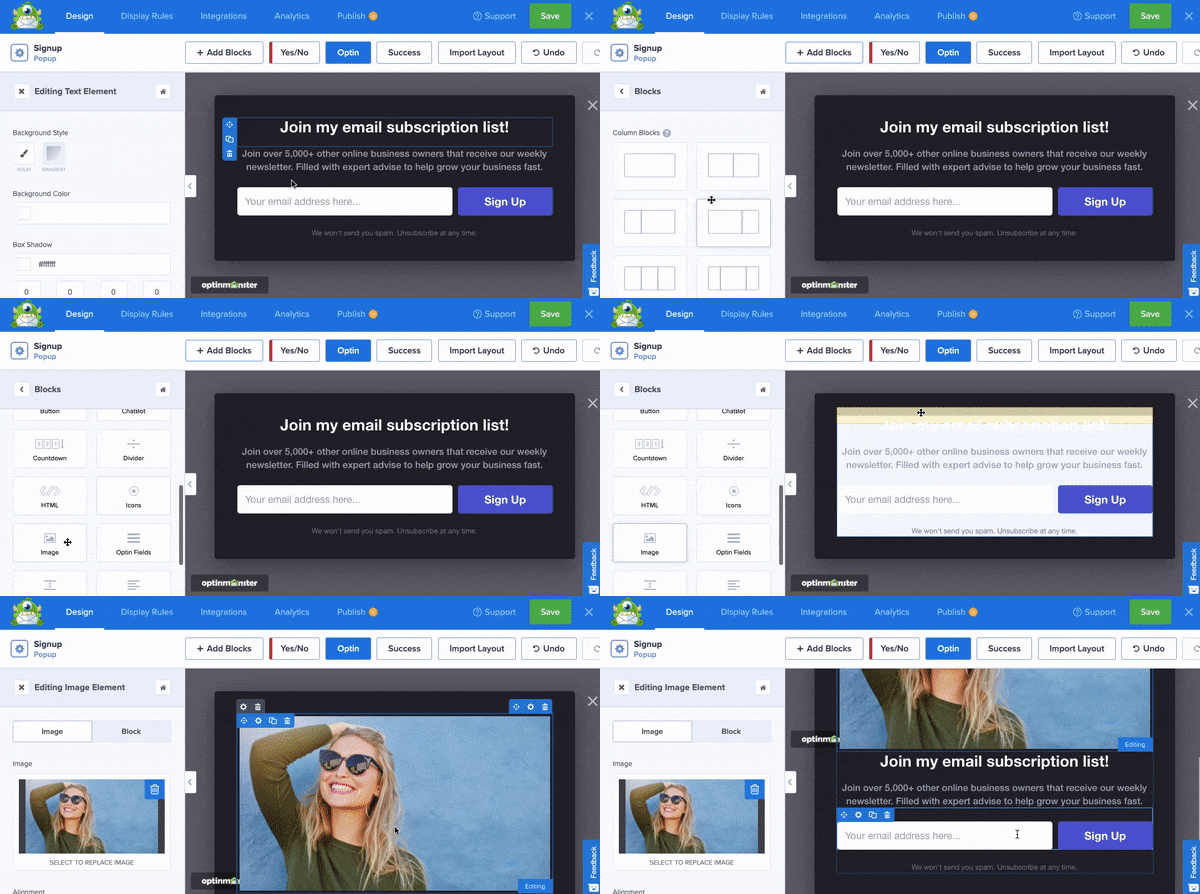
The drag and drop builder makes it easy to customize your campaigns so they match your website theme and brand:
It takes just a few minutes to set up a cancellation survey campaign. Ready to join OptinMonster now?
Now let’s walk you through step-by-step how to create a cancellation survey for your clients.
Step 2: Creating a Cancellation Survey with WPForms
1. Set Up WPForms on Your Site
The first thing you’ll need to do is install and activate the WPForms plugin. For more details, see this detailed guide on how to install a plugin in WordPress.
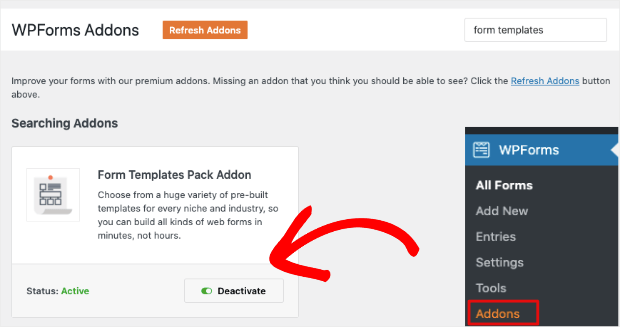
After you’ve activated WPForms on your WordPress site, navigate to the WPForms » Addons page. Search for the Form Templates Pack Addon to install and activate it.
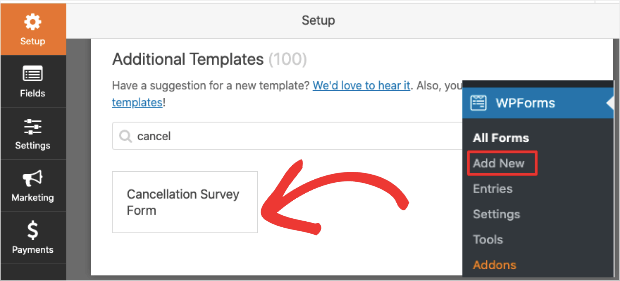
Next, go to WPForms » Add New page.
On this page, you can give your form a name and then select a template. In the Additional Templates section, select the Cancellation Survey Form template.
This will open up the WPForms builder where you can customize the form.
2. Customize the Cancellation Survey Form
WPForms comes with an easy visual builder. This means you’ll see a preview of your form as you build and design it.
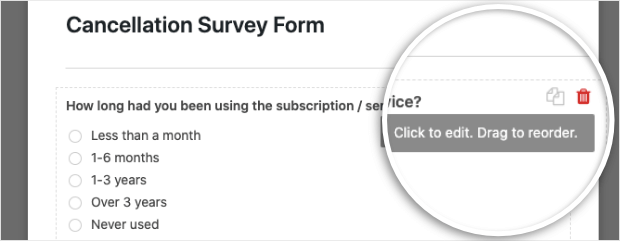
The default template already has prewritten questions.
To change a question, simply select it and edit the text in the right column. And to add new fields, under the Add Fields tab, you’ll want to drag the field from the menu on the left and drop it into the form.
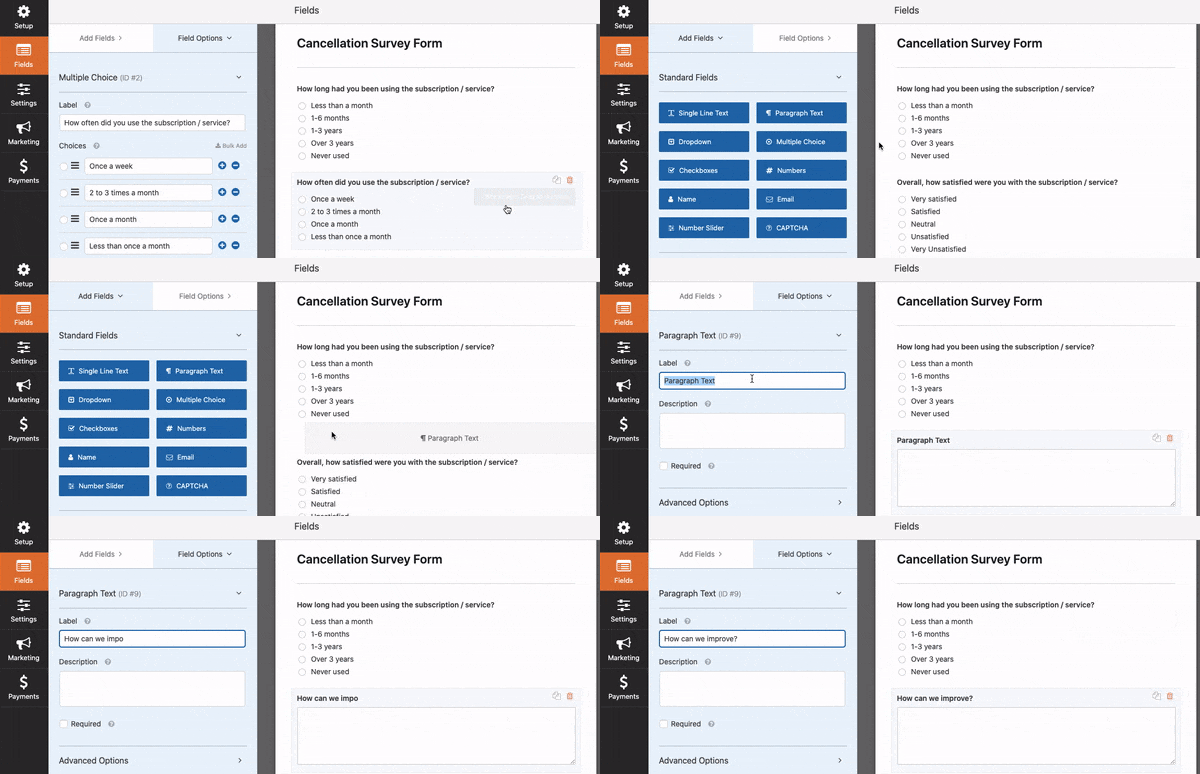
You can delete fields using the trashbin icon next to them and duplicate the field using the pages icon. You can also drag them up and down to change the order.
For the survey form, we recommend exploring these form fields:
- Checkbox – Let the user select multiple options in a list.
- Multiple Choice – Allow the user to select only one answer from the list.
- Rating – Lets your customers provide a rating of 1 to 5 stars.
- Likert Scale – Give your customers options to pick their level of satisfaction or how likely they are to recommend you.
- Net Promoter Score – Let customers give you feedback on a scale of 1 to 10.
These are great options to make your survey form more user-friendly.
While customizing your form, you may want to check out these survey best practices to make your form interesting and engaging so customers will actually want to fill it out.
3. Set Up Conditional Logic
If you want to reduce the length of your survey and make it more conversational, conditional logic is the way to go.
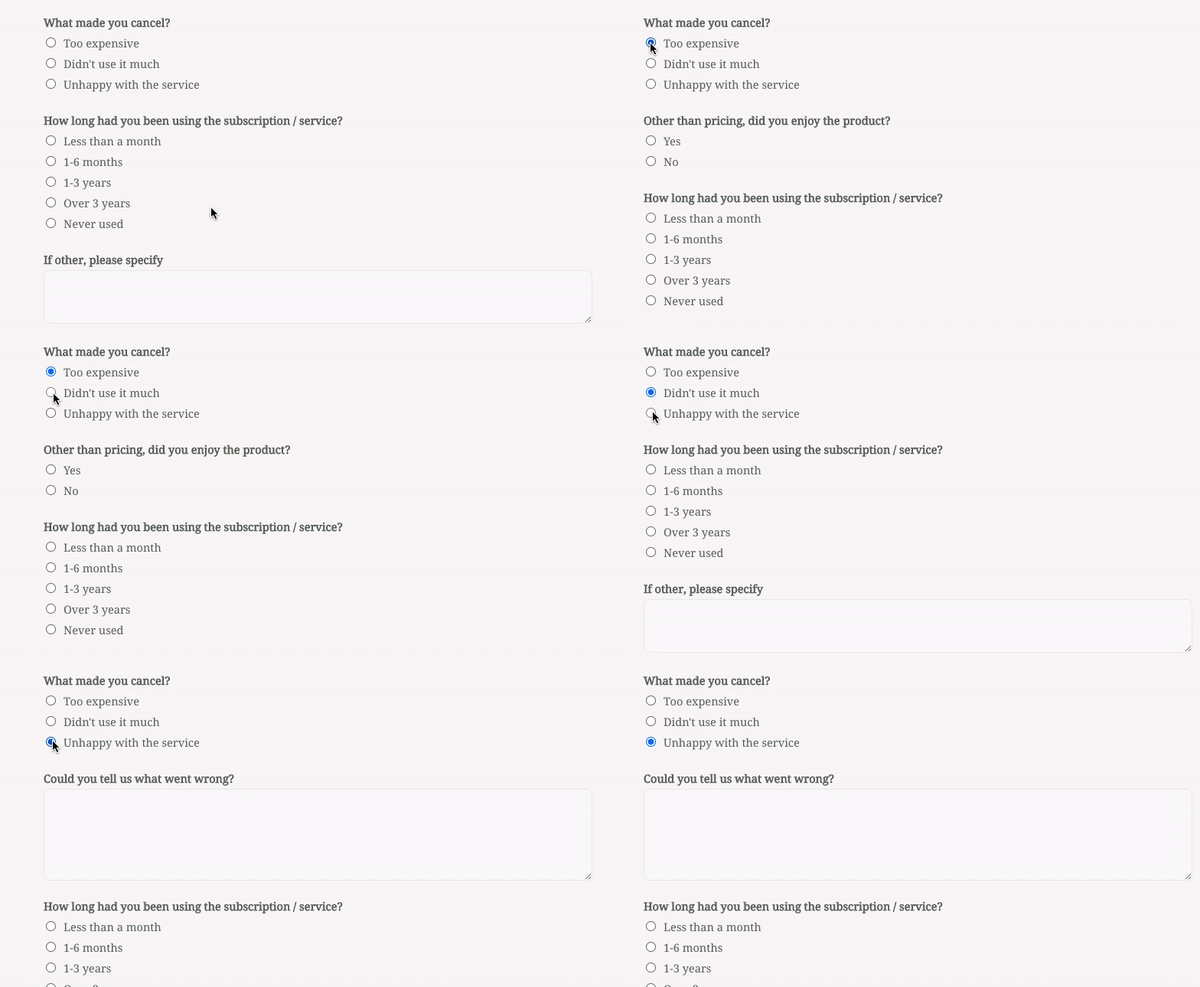
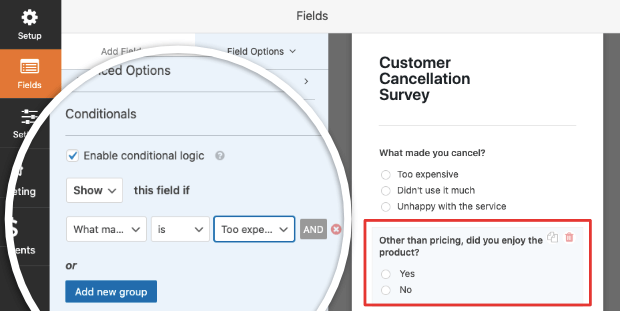
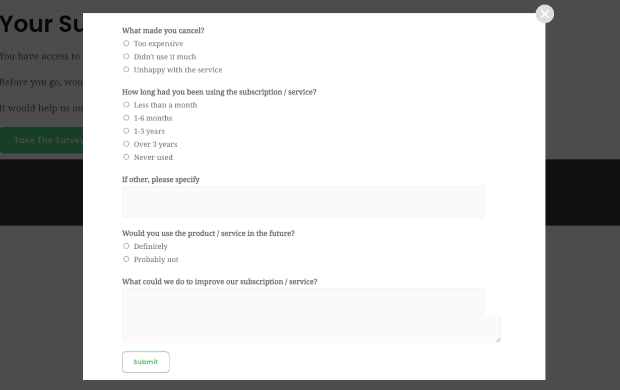
In our survey, we want to ask follow-up questions based on why the customer canceled. So if the customer canceled because it was too expensive, we’d like to ask if they still enjoyed the product.
To do this, we’ll create a multiple choice form field with the question ‘Other than pricing, did you enjoy the product?’
Now select this field, and open the Conditionals tab in the left menu.
Here you check the box to enable conditional logic. Then add a rule to show this field if the answer to ‘What made you cancel’ field is ‘Too expensive’.
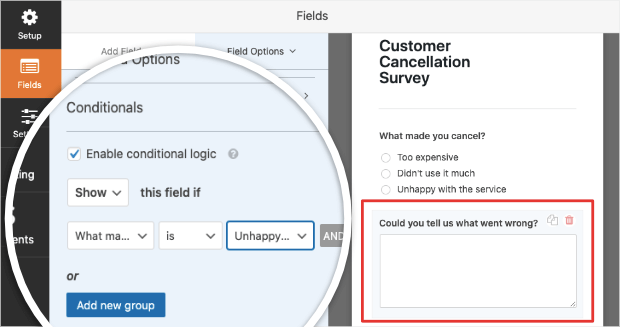
Next, if the customer selects ‘Unhappy with the service’, we’ll ask them ‘Could you tell us what went wrong?’.
For this question, we’ll create a paragraph field so they have more room to type in the answer.
Again, select this field and enable conditional logic. Then create a rule to show this field only if the customer selects ‘Unhappy with the service’.
Like this, you can make your entire form conversational and relevant to the user’s answers.
4. Configure the Cancellation Survey Form
Once you’ve created your form, WPForms has a ton of options to configure the settings just the way you want.
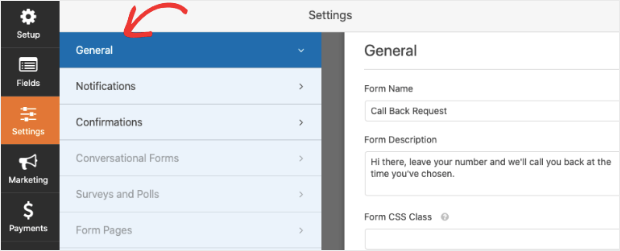
In the form builder, select the Settings » General tab.
Here you can change your form’s name, description, and ‘Submit’ button copy.
You can also enable anti-spam prevention to block any spam submissions.
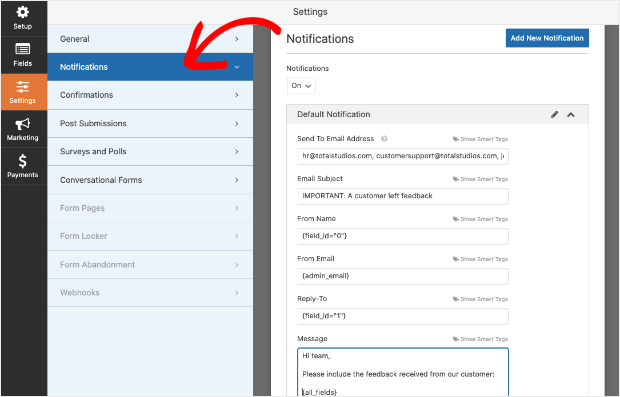
Next, switch to the Notifications tab to set up where and how you want to receive form submission alerts.
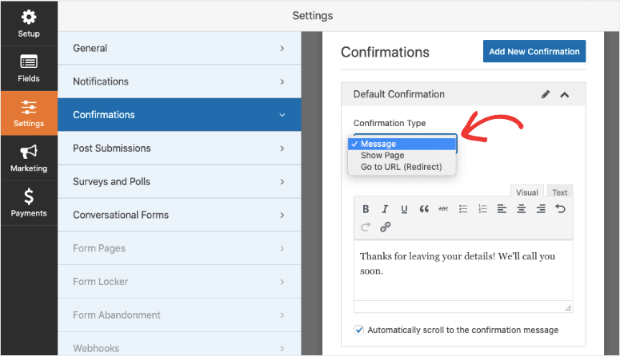
Finally, under the Confirmations tab, you can customize the message displayed to visitors once they submit a form.
WPForms has 3 confirmation types:
- Message: A simple message that displays once someone submits a form on your website thanking them for their feedback.
- Show Page: Redirect users to another page on your website, such as a thank you page.
- Go to URL (Redirect): Send site visitors to a different website.
If you want to display different confirmations to site visitors based on their survey answers, you can learn more in this guide: How to Create Conditional Form Confirmations.
Once you’re done configuring your settings, Save your form using the button on top.
Then exit the form and on the WPForms dashboard, you’ll see a shortcode next to your form. Copy this code and keep it ready for the next step.
With that, your customer cancellation survey is ready! Now we’ll embed it into an OptinMonster campaign that can be added to your website and emails.
Step 3: Creating a Popup Survey Campaign
You may want to send the form to your customers through email or show it to them in a popup as soon as they cancel their subscription on your site.
The best way to do this is by using OptinMonster.
1. Create a New OptinMonster Campaign
First, you’ll want to sign up for OptinMonster.
Once you’ve done that, log into your OptinMonster dashboard and create a new campaign.
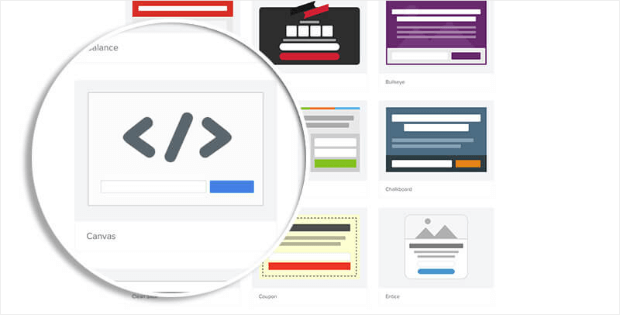
This will open up a page with campaign types and templates that OptinMonster has to offer. Today, we’ll create a Popup mat so the survey appears on the same page without any redirects.
Then select the Canvas template that lets you create a campaign from scratch.
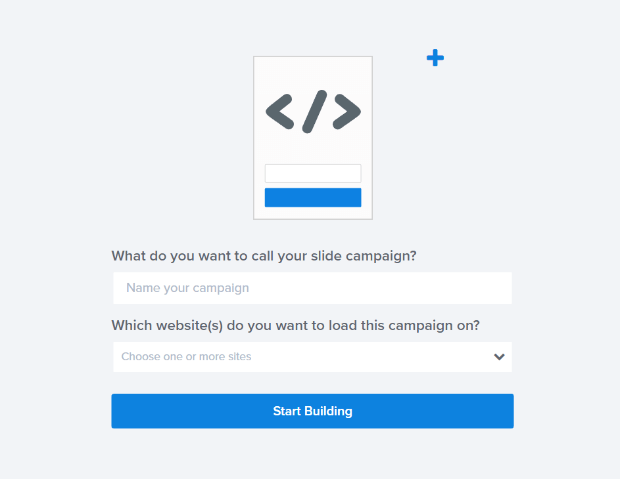
Next, you’ll need to add a name for your campaign such as ‘Cancellation Survey’ and click on the ‘Start Building’ button.
This will open the OptinMonster campaign builder where you can customize the template.
2. Customize Popup Campaign
Inside the campaign builder, you’ll see a preview of your campaign on the right with customization options on the left.
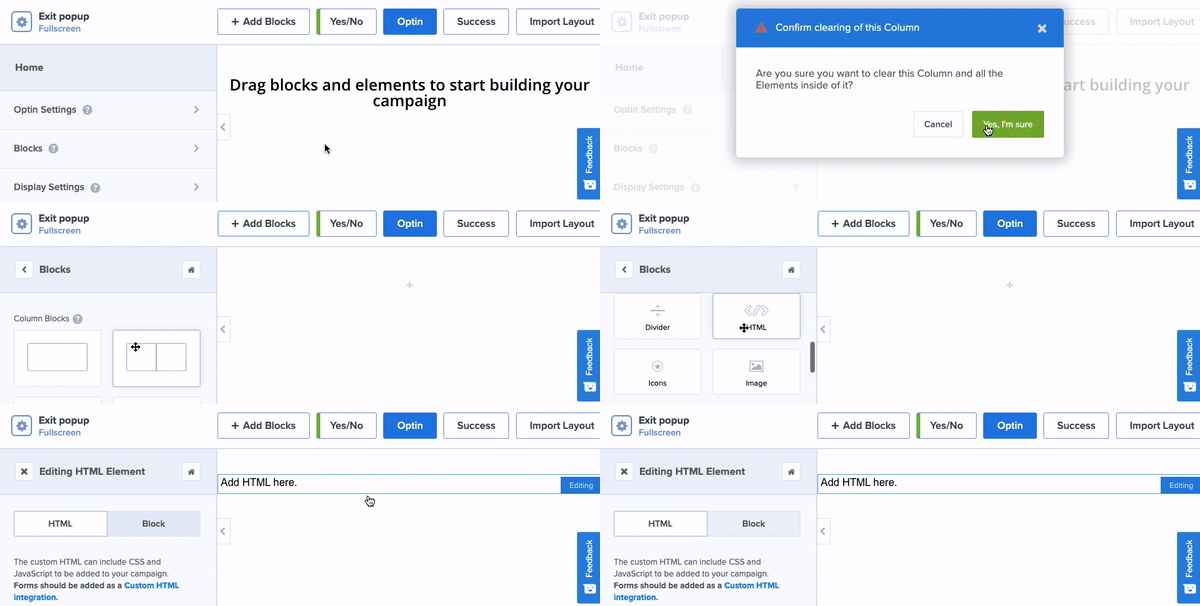
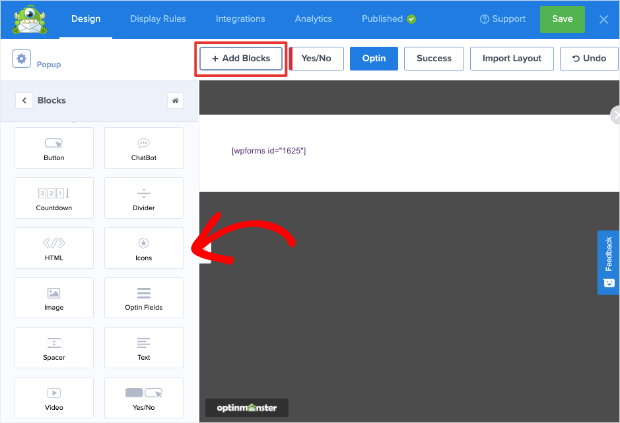
First, we’ll delete the elements here using the trash bin icon because we don’t need them. Then, add a new block using the Add Blocks button and drag and drop the HTML block into your campaign.
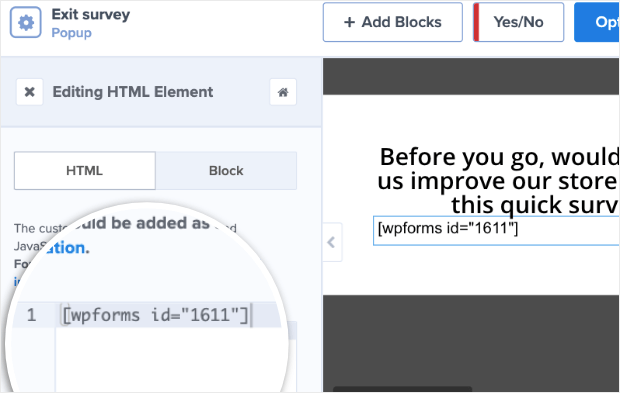
When you do that, you’ll see an HTML field appear on the right. You’ll need to paste the WPForms shortcode here.
When you use shortcodes in OptinMonster, you won’t see the survey form populate here. You’ll see it only when your campaign goes live.
To add more elements to your campaigns such as images and text, you can use the Add Blocks button at the top and drag and drop them into your campaign.
Now that your campaign design is ready, save it using the Save button on top.
Up next, we’ll show you how to control when and where this popup appears on your site.
3. Create Display Rules
Today, we’ll display the cancellation survey on click. This means the form will be embedded in a button and will appear when a user clicks on it.
To do this, we’ll use OptinMonster’s powerful MonsterLink™ technology.
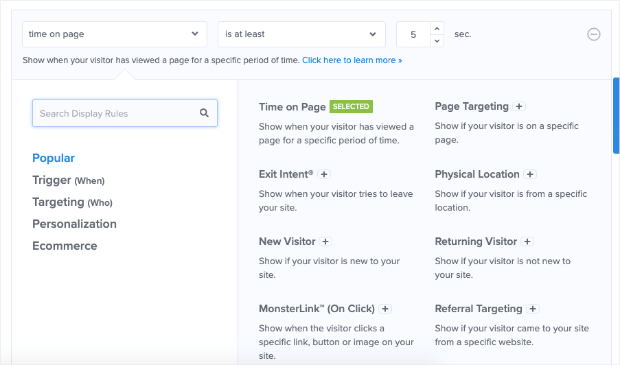
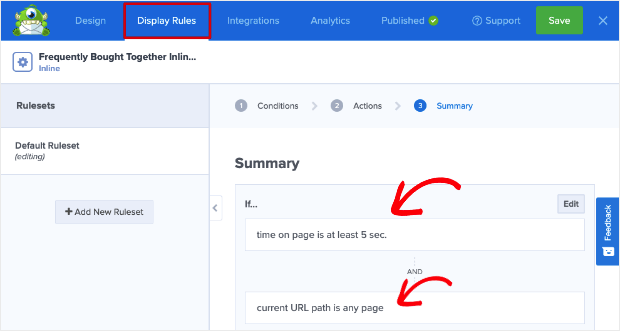
Switch over to the Display Rules tab and you’ll see that, by default, the campaign appears to every visitor after they’ve spent 5 seconds on the page.
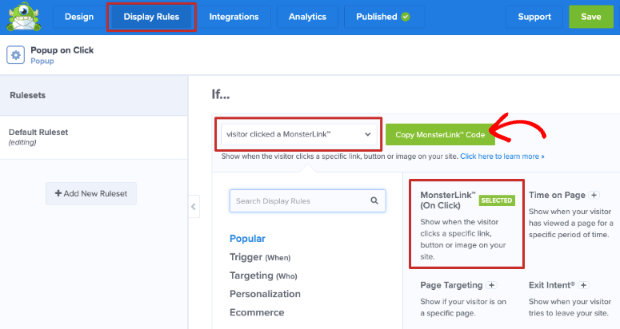
We’ll change that by editing the existing rule and choosing the MonsterLink™ option.
When you select this, you’ll see a green button to Copy MonsterLink™ Code.
Click this button to copy the code and keep it ready for when we embed it into a button in a page or email.
We won’t need the second default rule, so you can go ahead and delete it.
When you’ve set your display rules, save your changes.
4. Style the Campaign With Javascript
OptinMonster templates are designed to look awesome on any device. In this tutorial, however, we’ve started from scratch using the ‘Canvas’ template and added a shortcode.
To make sure your campaign looks great, we recommend adding a small snippet of Javascript code.
And don’t worry if you don’t have coding experience. All you need to do is copy and paste the code that we’ve created for you.
That’s it, nothing more!
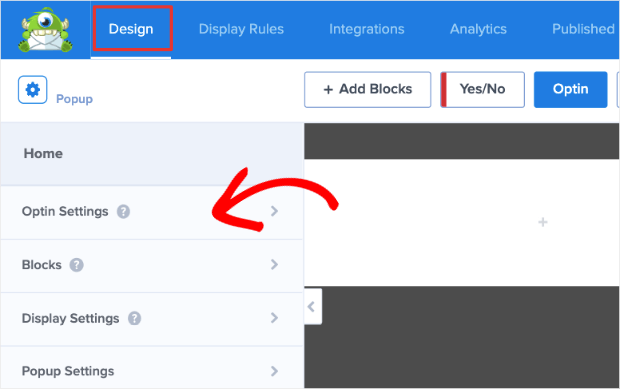
Go to the Design » Optin Settings tab in the OptinMonster campaign builder.
Scroll down to the Custom JavaScript section where you’ll see an empty field to enter your own code.
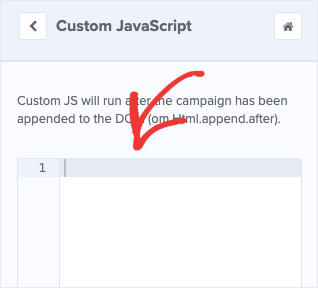
This will add a few styling rules to your website survey popup so that it looks much nicer.
If you’re experienced with Javascript and CSS, you can customize it even further.
Now you’re ready to publish your campaign.
5. Publish Your Campaign
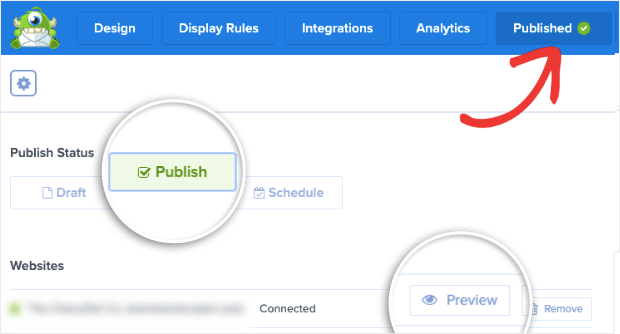
The cancellation campaign is ready to be activated. To do this, switch to the Publish tab.
You’ll see an option to preview your campaign. Then you can set the status to ‘Publish’ to launch your cancellation survey.
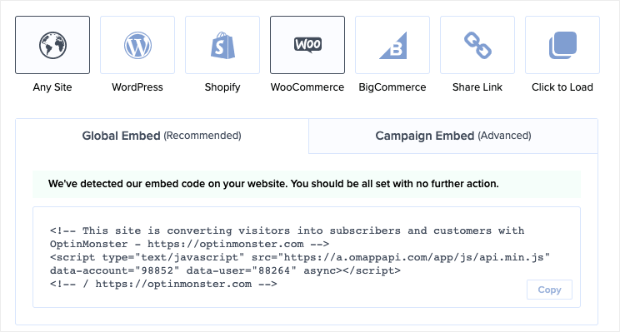
If you haven’t yet connected your website to OptinMonster, you’ll find instructions to do so at the bottom of this page.
We recommend heading to your OptinMonster dashboard and refreshing the page there. This will make sure the latest changes are reflected in your campaign.
If you’re using WordPress, you’ll need to visit the OptinMonster » Campaigns page in your WordPress admin area.
Make sure your campaign is set to ‘Published’ here as well.
Now the last step you need to take is to embed the MonsterLink™ on your website or email.
Step 4: Embedding the Survey in Webpages and Emails
OptinMonster’s MonsterLink™ is extremely flexible and can be used inside any button on your page or post. You can even add it inside emails and messages.
We’ll show you how to embed the MonsterLink™ inside web pages and emails.
1. Embedding the Cancellation Survey on a Webpage
When a customer cancels their plan, we’ll ask them to take a survey and add a CTA (call to action) button to ‘Take the Survey’. When they click on this button, the cancellation survey popup will appear.
OptinMonster works with all popular website builders so you can seamlessly add your campaign to your site.
We’ll show you how to set this up in WordPress, however, the steps will remain similar for other website and email service platforms.
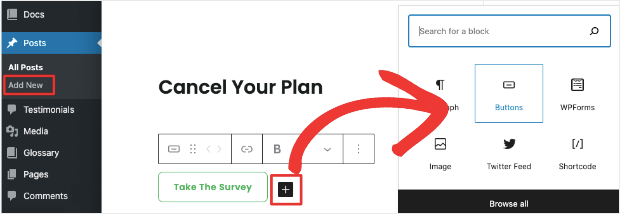
In your WordPress dashboard, open the Pages » Add New tab. Create the confirmation page by entering a title and text.
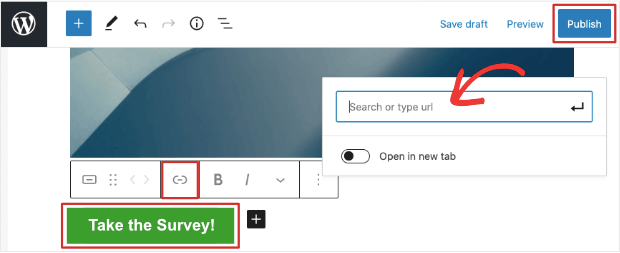
Next, add a button to your page and select the Link option in the block settings. You can paste the MonsterLink™ code inside.
That’s it! Save or Publish your page and preview it to see that the cancellation survey appears when you click on this button.
Like this, you can paste the code into any button link no matter which website platform or email service provider you’re using.
2. Embedding the Cancellation Survey in an Email
Email is one of the best ways to reach out to customers that have canceled their plan. Make sure you reach out to them immediately or within a reasonable timeframe.
You can offer them discounts or a special offer to stay on with their plan.
To add the survey to your emails, you can copy and paste the MonsterLink™ as hyperlinks or in buttons.
If you’re using our favorite email service provider Constant Contact, most of the templates already have premade buttons. You’ll simply have to select it and use the Link option to paste the MonsterLink™ code.
When the user clicks on the button in the email, they’ll see the survey where they can quickly fill out their reasons for leaving and any suggestions they might have.
For more on this, read: how to use MonsterLinks™ to load your popup with the click of a button.
Step 5: View Customer Feedback & Suggestions
Once customers start filling out your survey, you can view their entries inside the WPForms dashboard.
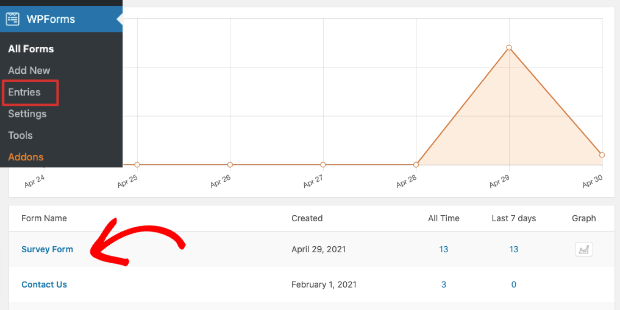
Head over to your WordPress site and open WPForms » Entries page. You’ll see a list of forms that you’ve created using WPForms.
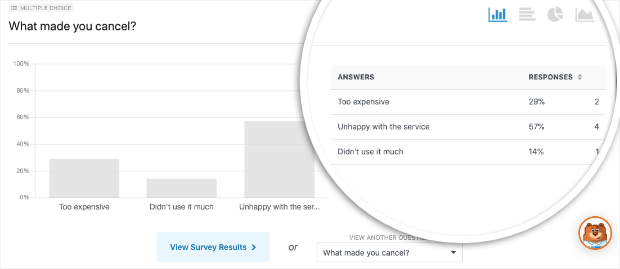
Select your form and on the next page, you’ll see statistics of your survey.
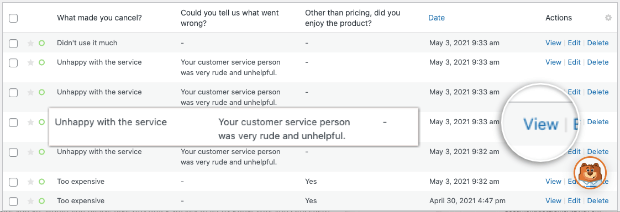
Below that, you’ll see your form entries with the customer’s responses to each question.
Finally, click on the ‘View’ button next to an entry to see detailed reasons for cancellation, suggestions, and more.
Once you get the customer’s response and reason, you can reach out to them over email to get them to come back.
We’ve listed a few suggestions below that we think work for the form options we added earlier:
- Too expensive – Offer a discount or deal which you feel would retain the customer without incurring losses
- Unhappy with the service – Tell them that their feedback has been incorporated and that you’re taking measures to fix it so they can come back to better support
- Didn’t use it much – Offer them a demo so that they can find more ways to use your product and get better results
Check out our guide on 7 Types of Emails That Keep Customers Coming Back for more ideas!
That brings us to the end of this tutorial. You’ve learned how to ask customers why they canceled and how to give them an incentive to come back.
If you haven’t signed up for OptinMonster yet, what are you waiting for? Just click below to start your 100% risk-free OptinMonster account today:
We hope you liked this post. Now that you know how to create a cancellation survey, you may want to try your hand at creating follow up campaigns with OptinMonster.
And if you’re looking for more ways to get insights into your audience, check out our resources on:
- 7 Best Online Survey Tools for Small Businesses (Compared)
- 9 Best Ways to Collect Customer Feedback on Your Website
- 13 Surprisingly Simple Ways to Reduce Customer Churn
These posts will help you understand your audience better so you can boost sales, revenue, and growth.















Add a Comment