Do you want to improve engagement by adding tweets to your site?
A Twitter feed is the best way to accomplish that because it automatically fetches your tweets and displays them across your site. This keeps visitors engaged for longer and gets more visibility for your Twitter channel.
In this article, we’ll show you the best way to add a Twitter feed to your website to improve user experience (UX) and engagement.
Why Add a Twitter Feed To Your Website?
Twitter is one of the most popular social media platforms with 192+ million active users. It’s a powerful tool for your business to get more site traffic, build a loyal customer base, and spread your brand name.
By connecting Twitter to your site, you can give users more content to engage with. This increases interaction with your brand and at the same time, gets more exposure for your Twitter channel.
Now, the best and easiest way to showcase your tweets is through a Twitter feed. This is automated, so it only needs to be set up once and will run on its own.
Plus, adding a Twitter feed to your site has so many benefits. For instance, you can:
- Add fresh content to your site regularly which is great for SEO
- Grow your Twitter following
- Keep visitors engaged for longer as they have more interesting content to browse
- Boost social media activity as visitors can like, retweet, and comment
- And much more…
It’s easy to set up a custom Twitter feed, and we’re going to show you how to do it in under 5 minutes (without any technical skills needed).
Adding a Twitter Feed To a Website
The easiest and quickest way to add a Twitter feed to WordPress is by using Custom Twitter Feeds by Smash Balloon:
Custom Twitter Feeds is hands down the best Twitter feed plugin for WordPress. It lets you seamlessly connect your website with Twitter to display an automated feed of your tweets.
A few highlights of this plugin include:
- Easy to set up – Create a beautiful Twitter feed in under 5 minutes with just a few clicks.
- Fully customizable – Easy to match the Twitter feed to your website’s theme and design. You can also choose which tweets to show on your site with filters.
- Responsive design – Works on any device such as your laptop, desktop, and mobile.
- Optimized for speed – Loads quickly and will not slow down your site.
- Display social icons – Add buttons to like, retweet, and follow so your visitors can engage with your Twitter timeline while they are on your site.
With Custom Twitter Feeds, you’ll have everything you need to create a Twitter feed that’s beautiful and engaging.
For more information on this plugin, check out our detailed review of Smash Balloon.
Ready to create your own Twitter feed?
To follow along in this tutorial, make sure you sign up for your risk-free Smash Balloon account.
Now, let’s take a step-by-step look at how to add a Twitter feed to your WordPress site.
Step 1: Connect Your Twitter Account
The first thing you need to do is install and activate Smash Balloon’s Custom Twitter Feed plugin on your WordPress site.
Next, from your WordPress menu, navigate to Twitter Feeds » License page.
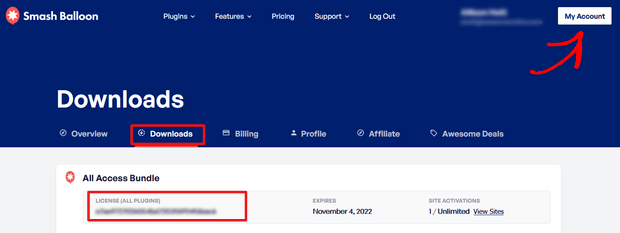
Here, you can enter your license key to activate the plugin:
You can find this information in the Downloads section in your account on the Smash Balloon website:
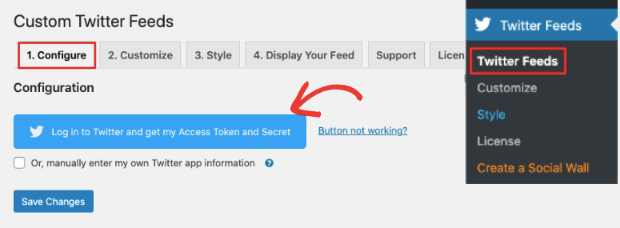
Once your license is active, open the Configure tab and you’ll see a big blue button that says ‘Log in to Twitter and get my Access Token and Secret’:
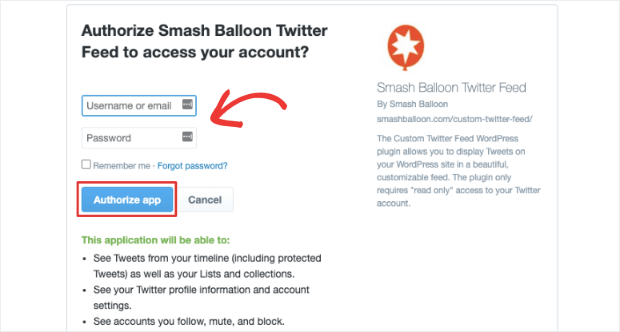
By clicking on this button, you’ll get an option to enter your Twitter username and password. When you log in, Smash Balloon will ask for permission to view your tweets and account information:
When you grant access, Smash Balloon will take you back to your WordPress dashboard. Now, you’ll see that the plugin has automatically filled in your Access Token and Secret information.
All you have to do is hit the ‘Save Changes’ button to store your details. With that, your website is successfully connected to your Twitter account.
Step 2: Set Up Your Twitter Feed
Now that you’ve connected your site to Twitter, you can create the Twitter feed.
To do this, scroll down on the same Configure page. You’ll see the Feed settings here.
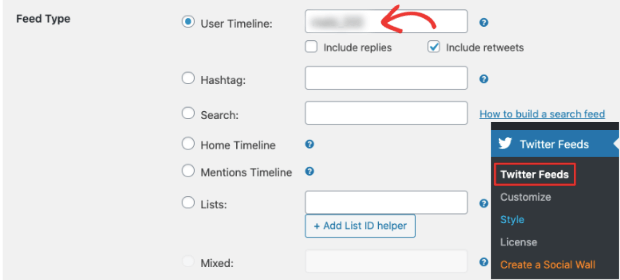
First, you can choose what type of feed you want.
For instance, you can display your entire timeline or filter by hashtag, search words, mentions, and lists. Smash Balloon also lets you create mixed filters so you can add more than one type of rule here:
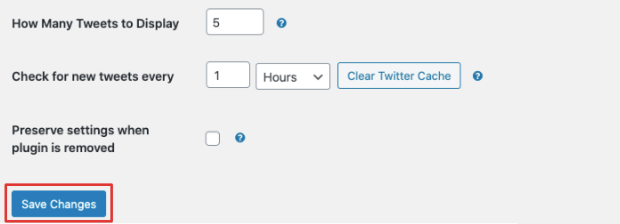
Next, you’ll see that by default, the plugin displays 5 tweets in the feed. It also checks for new tweets every hour:
You can customize these options by increasing or decreasing the numbers here.
When you’re done, hit the ‘Save Changes’ button to store your configurations. Now that your feed is set up, you can customize it to your liking.
Step 3: Customize Your Twitter Feed
Smash Balloon’s Custom Twitter Feeds plugin gives you full control over the look and details displayed in your Twitter feed.
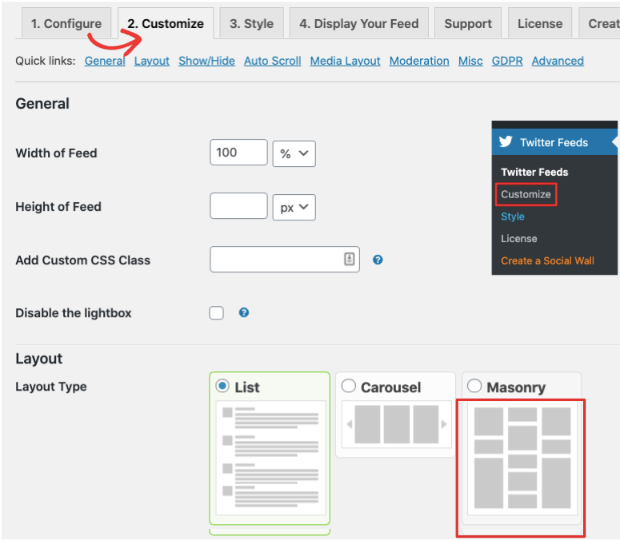
To personalize your feed, switch to the Customize tab. Here, you’ll see all the customization options available. We’ll take you through the basics to create a beautiful Twitter feed.
First, you can change the height and width of your feed. This is helpful to adjust the feed to suit your website’s theme:
Next, you can choose a layout for your feed. There are 3 options here that include list, masonry grid, or carousel.
When you select a layout, you’ll get more customization options to select the number of columns to display on desktop and mobile devices.
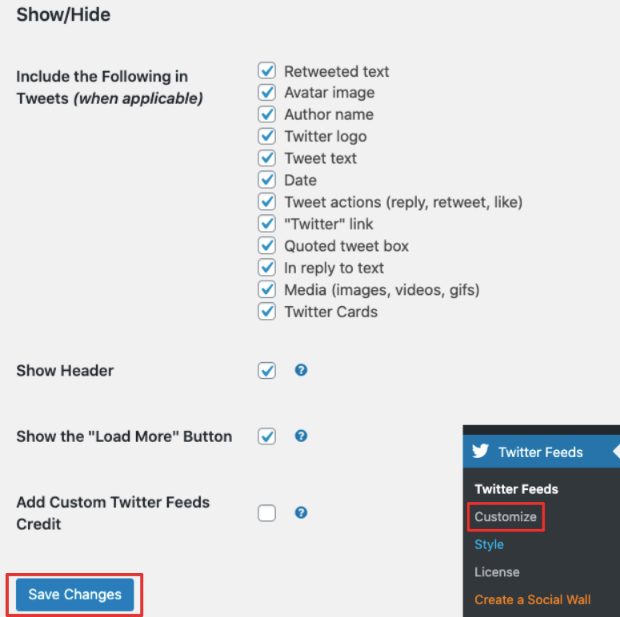
After this, you can scroll down further and you’ll see a list of details you can choose to show or hide in your feed. This includes the name, image, retweeted text, date, link, and more:
To show a detail, simply tick the checkbox next to it. And to hide a detail, you’ll need to uncheck the box.
Below this, there are more advanced customization options.
By default, the recommended settings are turned on here so we suggest leaving them as is. But you can explore them and change them if you feel the need.
Smash Balloon also has custom CSS and Javascript options for developers.
Now that your Twitter feed is customized, hit the ‘Save Changes’ button.
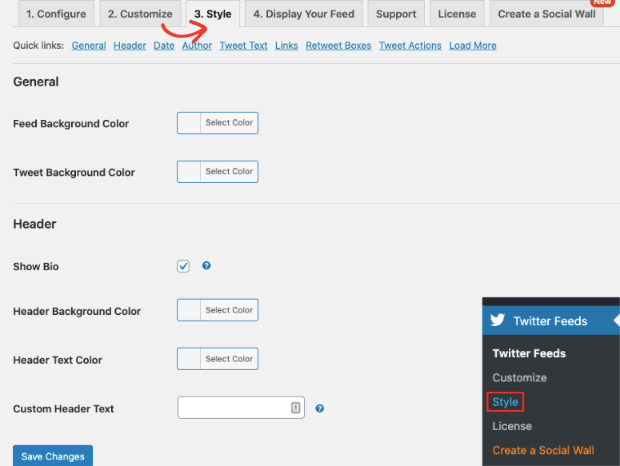
Next, there are a few styling options you can use to further customize your feed. Switch to the Style tab and you’ll see options to change the color of the feed:
The plugin also lets you change the timezone, date, and author name. After you’ve made the styling changes, you’re ready to add the feed to your WordPress site.
Step 4: Embed Twitter Feed on Your Site
Custom Twitter Feeds lets you add your Twitter feed to any WordPress page, post, and sidebar. It’s a simple process and takes just a few seconds.
1. Add the Twitter Feed to WordPress Posts and Pages
You can create a dedicated page for your Twitter feed or you can embed it into an existing one. You can even display it in blog posts to improve engagement and increase session times.
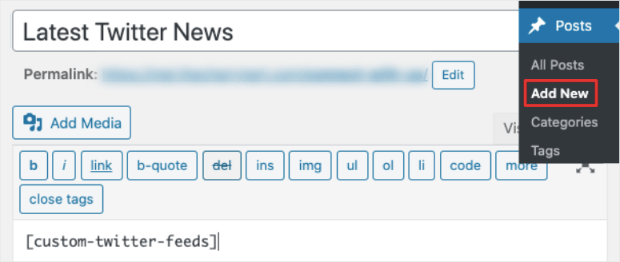
To add the Twitter feed to a new page, navigate to Pages » Add New to open the page editor.
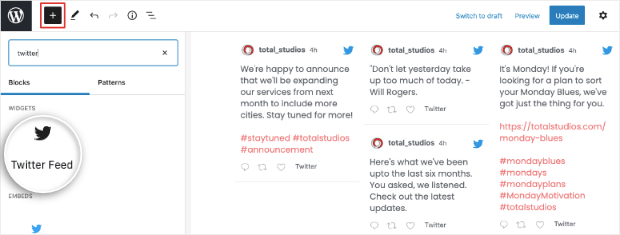
Now, add a new block and search for the Twitter Feed widget in the left column.
When you select the widget, a preview of your feed will automatically appear in the page editor.
You can preview the page to see how the custom Twitter feed looks. Then, publish your page to make the Twitter feed live on your site.
You can use the same steps to embed the feed inside blog posts and other pages on your site.
And in case you’re still using the classic editor, simply paste the shortcode [custom-twitter-feeds] inside any post or page.
When you preview or publish your post, you’ll see the Twitter feed in action.
2. Add the Twitter Feed to WordPress Sidebar
By embedding a Twitter feed in your sidebar, you’ll have a constant stream of fresh content for visitors to view on any page that has a sidebar enabled.
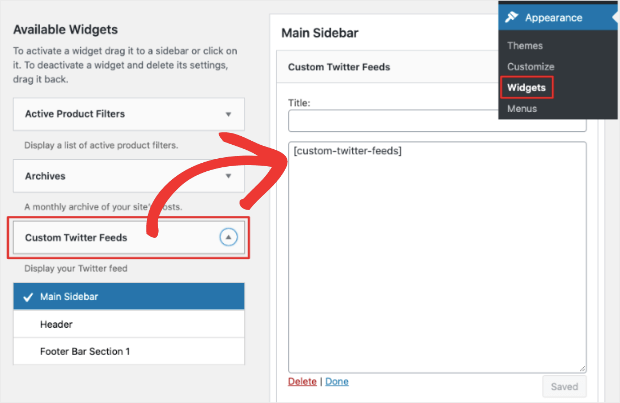
To add the feed to a sidebar, go to the Appearance » Widgets page. Under ‘Available Widgets’, scroll down to find the Custom Twitter Feeds widget.
Drag and drop it into the sidebar in the righthand menu:
You can also add a title if you like, and that’s it! You can now visit any page on your website that has a sidebar enabled and you’ll see the custom Twitter feed live on your site.
With that, you’ve successfully added a customized and automated Twitter feed to your site.
Grow Your Followers With a Twitter Popup
Now that your Twitter feed is set up, you can also promote your Twitter channel in a popup to get more followers and engagement.
These popups are simple yet powerful and give you the opportunity to convert as many site visitors into Twitter followers.
You can easily create these popups in with OptinMonster.
OptinMonster is a premium marketing tool that lets you create stunning popups, slide-ins, floating bars, gamified wheels, and much more.
You can use it to collect leads, subscribers, and followers on your site. OptinMonster comes with 50+ templates and a drag and drop builder to easily customize your campaigns:
It also has powerful targeting features to display campaigns to visitors when they’re most likely to convert:
For instance, you can display the Twitter popup when someone has just viewed the Twitter feed page and is about to leave your site.
You can ask them to follow you on Twitter to get updates and more amazing content.
To create a Twitter popup with OptinMonster, follow our Custom “Follow Us On Twitter” Popup tutorial.
It takes you through the steps in detail. And you can design and add the popup to your site without the need for technical skills.
And that’s all for today!
We hope you found this tutorial helpful. If you’re looking for more ways to leverage social media on your site, check out:
- 8 Best Social Media Feed Tools to Boost Followers
- 33 Social Media Marketing Tools That Will Give You an Unfair Advantage
- Twitter for Lead Generation: 19 Clever Ways to Explode Your List
These posts are packed with info to help boost your social media and website engagement so you can grow your business.








Add a Comment