OptinMonster makes it easy to further customize your campaigns using CSS.
In this article, you’ll learn how to use OptinMonster’s custom CSS tool.
Before You Start
Here are some things to know before you begin:
- We recommend using Chrome’s Dev Tools feature to inspect elements in your campaign to identify the specific selector to use when writing your CSS. Learn more about using Dev Tools here.
Custom CSS Tool
To use OptinMonster’s custom CSS tool, follow these steps:
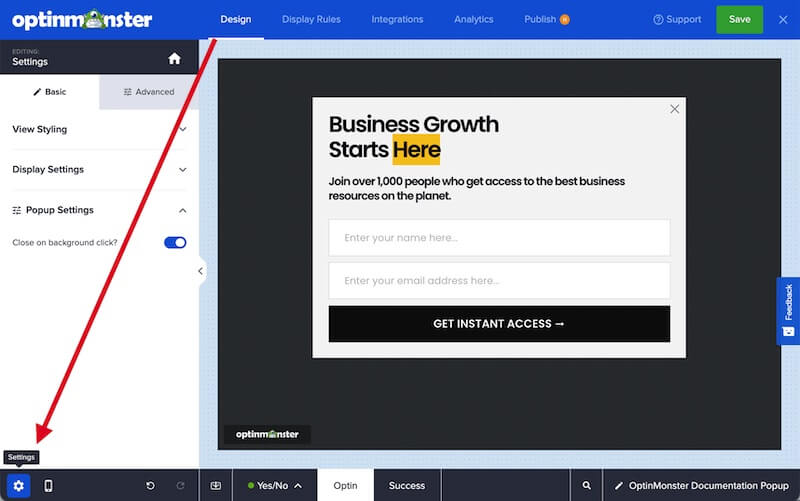
- In the Design view of the campaign builder, select the Settings icon.
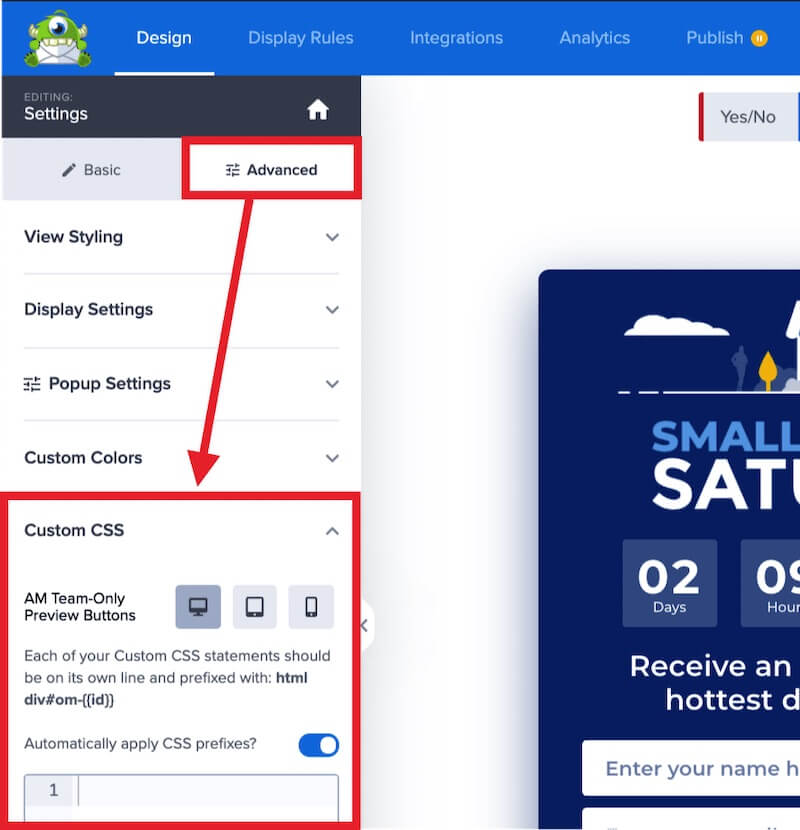
- Next, select the Advanced tab in the sidebar and expand the Custom CSS option.
- Enter your custom CSS into the provided field.
- When you’re finished, Save your campaign.
Using Placeholders
Within the campaign builder you have access to a few placeholders you can use when writing your CSS selectors.
Campaign ID
When writing your CSS, we recommend you prefix each selector using the campaign ID. For example:
html div#om-{{id}}
When the CSS is generated by OptinMonster to show on your site, the {{id}} placeholder will automatically be updated to use the campaign’s unique ID.
In this example, we could change the background color of the buttons in the campaign using CSS like this:
html div#om-{{id}} input[type=submit],
html div#om-{{id}} button {
    background: #ff6600 !important;
}
Campaign Namespace
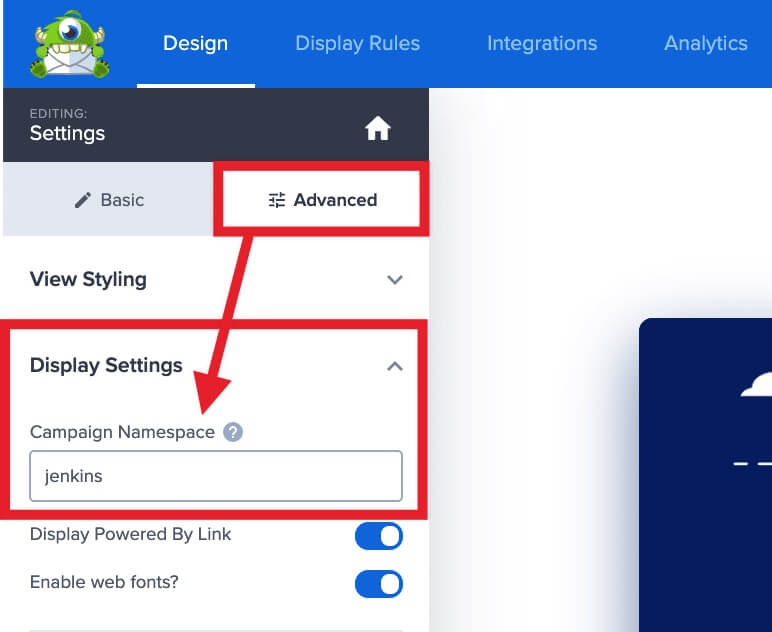
Another important feature of your OptinMonster campaign is the Campaign Namespace. This can be found in the Advanced tab’s Display Settings option.
The HTML namespace prefix is used throughout your campaign template for classes and IDs and can be useful for getting around things like ad blockers.
You can use the Campaign Namespace in your custom CSS with the placeholder {{ns}}, for example:
html div#om-{{id}} .{{ns}}-footer {
    /* Your custom styles */
}
Just like the {{id}} placeholder, the {{ns}} placeholder will automatically be updated to use your campaign’s namespace when the CSS is generated to show the campaign on your site.
CSS Examples
The following examples show some ways you can target CSS to specific elements in a campaign.
Target All Elements
This selector allows you to target all elements within all OptinMonster campaigns appearing on your site:
html div#om-{{id}} * {
/* Anything inside here will be applied to all elements within your OptinMonster campaign */
}
This selector is useful to apply a custom font family or applying “Right-to-Left” styles, etc.
Target Specific Sections
[attribute$=value]. This selector targets the end of a Id’s name. If you’re unfamiliar with that selector, click the link above to learn more.For instance, if you want to apply some CSS changes to the form area of your campaign you could use this selector:
html div#om-{{id}} [class$="-form"] {
	/* Your custom styles */
}
FAQs
How can I learn more about using Chrome’s DevTools or Firefox’s Firebug?
You might find the following helpful to get started using your browser’s dev tools to customize CSS:
Can I use SASS or LESS in the CSS tool?
No, at this time only vanilla CSS can be used. SASS or LESS will not be rendered properly and may corrupt / break your campaign.
Troubleshooting
My CSS isn’t working, why?
If the custom CSS you’ve entered isn’t showing in the builder’s preview of your campaign right away, check the following:
- That your CSS is correctly formatted with all proper semi-colons and curly braces. If any are missing, you may find some styles work as expected but all styles after the missing semi-colon or curly brace aren’t applied to your campaign.
- Your CSS selector may not be specific enough to target the desired element. In this case, it may be helpful to try using the
!importantdeclaration to force the style to be applied. - Still not working? Our support team would be happy to help!
If you’re serious about jumpstarting your website growth, then get started with OptinMonster today!
Our conversion experts will design 1 free campaign for you to get maximum results – absolutely FREE! Click here to get started →


