OptinMonster offers seamless integration with Mailchimp email marketing service. Connecting OptinMonster to your Mailchimp email list is very easy.
In this article, you’ll learn how to connect Mailchimp with OptinMonster.
Before you start, as a best practice we recommend you also connect your campaigns to Monster Leads as a backup.
Connect Mailchimp
When you create a campaign in OptinMonster that you intend to collect leads with you’ll want to integrate with one or more services to send those leads to.
To send leads to Mailchimp, follow these steps:
- Before you start, you’ll need a Mailchimp API Key. You can generate and copy an API Key from your Mailchimp account following this guide.
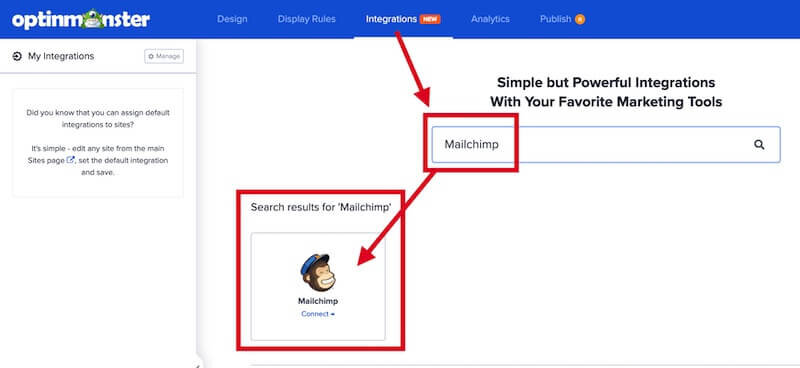
- Navigate to the Integrations view in the campaign builder, search for and select Mailchimp.
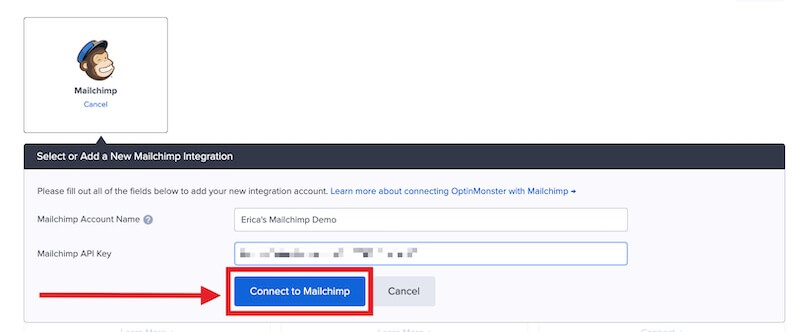
- Enter a Mailchimp Account Name (*internal use only) and your Mailchimp API Key in the appropriate fields, then select the Connect to Mailchimp button.
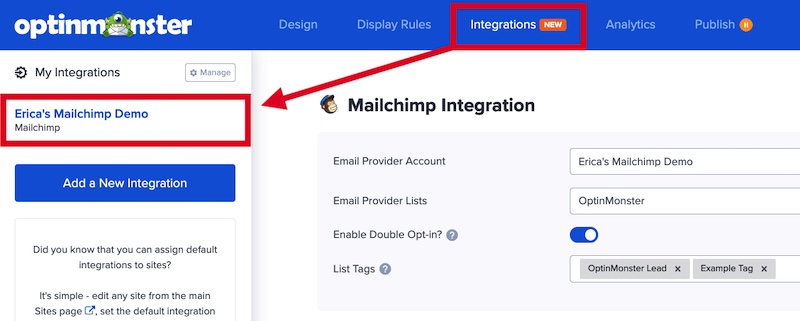
*The Mailchimp Account Name can be anything that helps you identify the specific integration within OptinMonster. It’s possible to add more than one Mailchimp integration to your account and this is an easy way to differentiate between them when assigning integrations to individual campaigns. - Required: Once the Mailchimp integration has been connected select the Mailchimp Audience you wish to send leads to from the Email Provider Lists field.
- Optional: You can also configure Double Opt-in and specify *List Tags to assign to leads.
*Only Tags that you’ve already created through your Mailchimp account will be available to choose from. If you don’t see any tags available be sure to log into Mailchimp and create the desired Tag(s) for the Audience you’ve selected in Step 4 above. - When you’re finished, Save your campaign.
If you’re serious about jumpstarting your email list growth, then get started with OptinMonster today!
Our conversion experts will design 1 free campaign for you to get maximum results – absolutely FREE! Click here to get started →
Enable Single Opt-in
By default, double opt-in is enabled when you integrate with Mailchimp.
To enable single opt-in, follow these steps:
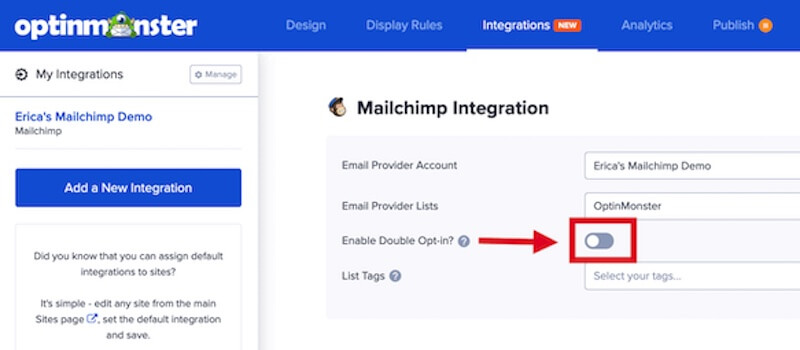
- From the Integrations view in the campaign builder, select your Mailchimp integration.
- Next, toggle the Enable Double Opt-in? option off.
- When you’re finished, Save the campaign.
Using a Custom Mailchimp form added with the Form Embed block? You can enable single opt-in for that form by changing the opt-in preferences for your Mailchimp Audience.
Unsure if you should use double or single opt-in for your campaign? Our double vs. single opt-in guide provides more details to help you decide.
Disabling double opt-in does not automatically add previously captured leads to Mailchimp. Only leads captured after double opt-in has been disabled will be sent directly to your Audience. Previous leads captured while double opt-in was enabled will continue to be held by Mailchimp in a queue until they are confirmed by the user. If you were using Monster Leads as a backup integration at the same time, you can manually export leads from Monster Leads to import into Mailchimp.
Add to Groups
OptinMonster makes it easy to add leads to specific Mailchimp Groups when using our native integration.
Before you begin, make sure the Group(s) you want to assign Leads to already exist in your Mailchimp Account. Learn how to create Mailchimp Groups.
Automatic
You can automatically assign all new Mailchimp leads to one or more specific Groups.
To automatically assign leads, follow these steps:
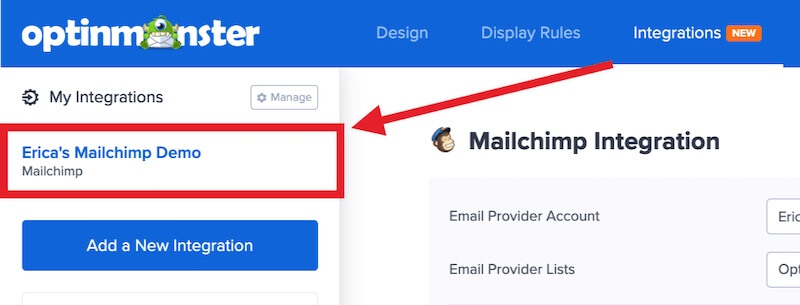
- In the campaign builder, navigate to the Integrations view and select your Mailchimp integration from the sidebar.
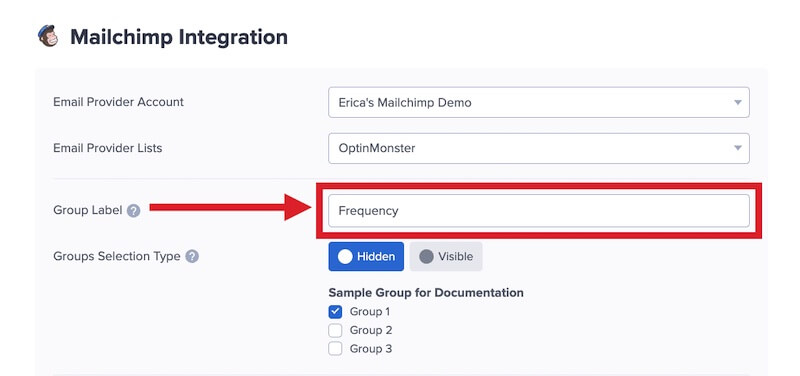
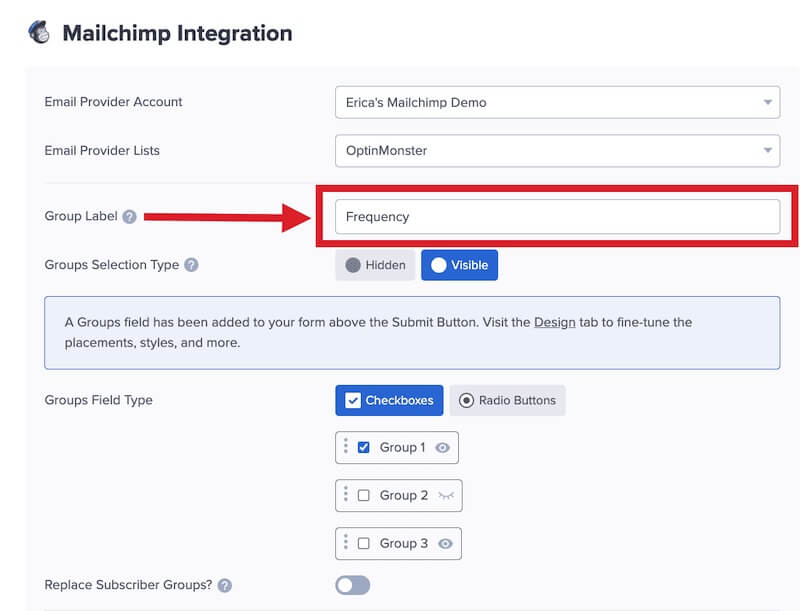
- First, add a Group Label. When using Automatic Group assignment this Label is not visible in the campaign and only for your own reference.
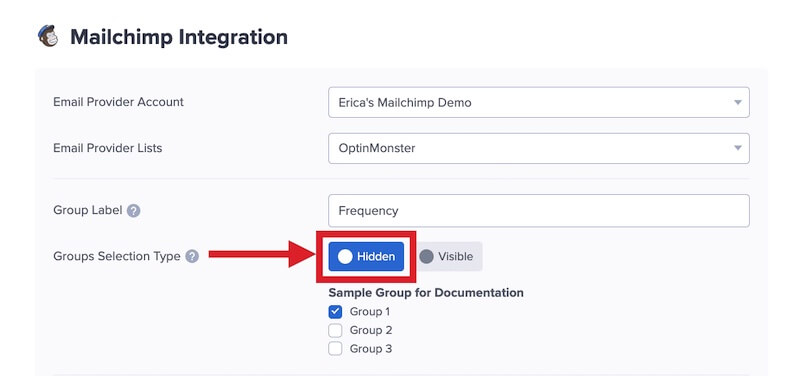
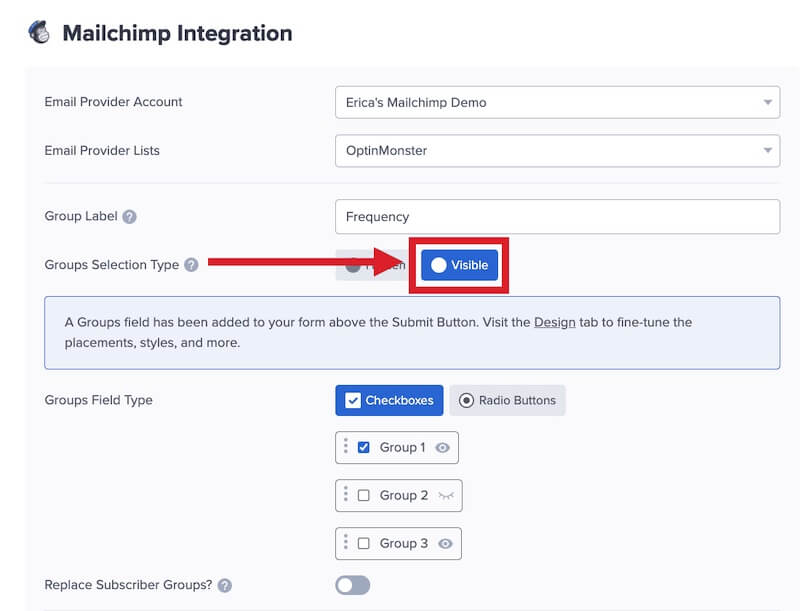
- For the Groups Selection Type option toggle the Hidden button to enable Automatic Group assignment.
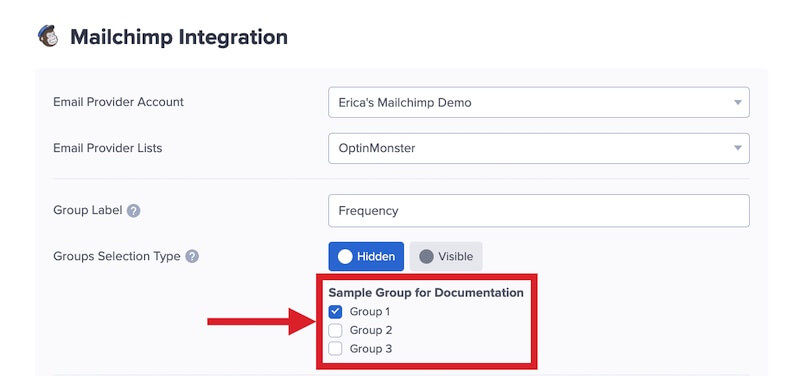
- All available Groups for the Mailchimp Audience you’ve set for this integration will be listed.
Select one or more Groups to automatically assign leads to in Mailchimp.
- When you’re finished, Save the campaign.
Manual
Alternatively, you can let your visitors choose which Group(s) they would like to be added to.
To manually assign leads, follow these steps:
- In the campaign builder, navigate to the Integrations view and select your Mailchimp integration from the sidebar.
- First, add a Group Label. When using Manual Group assignment this Label is visible in the campaign.
- For the Groups Selection Type option toggle the Visible button to enable Manual Group assignment.
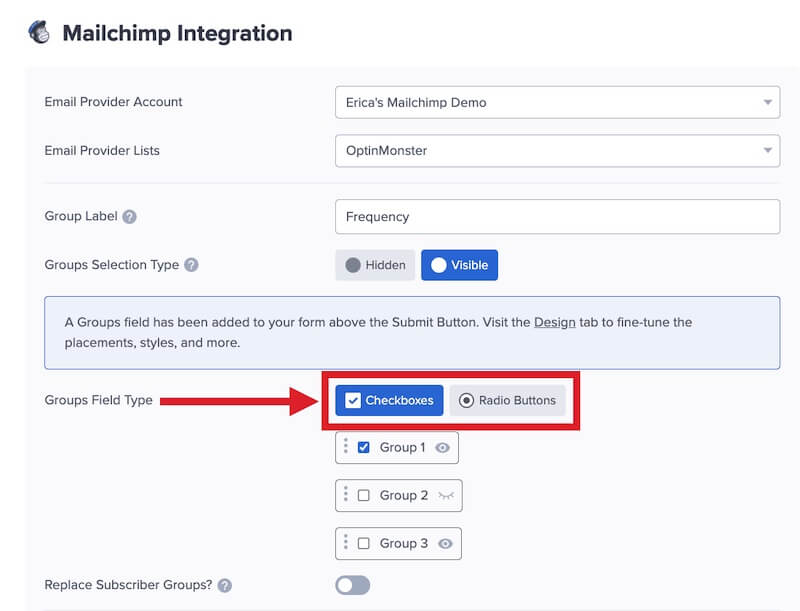
- Next, select whether you wish to use Checkboxes or Radio Buttons for the Group options.
Checkboxes will allow visitors to select multiple options. Radio Buttons allow visitors to choose only a single Group option.
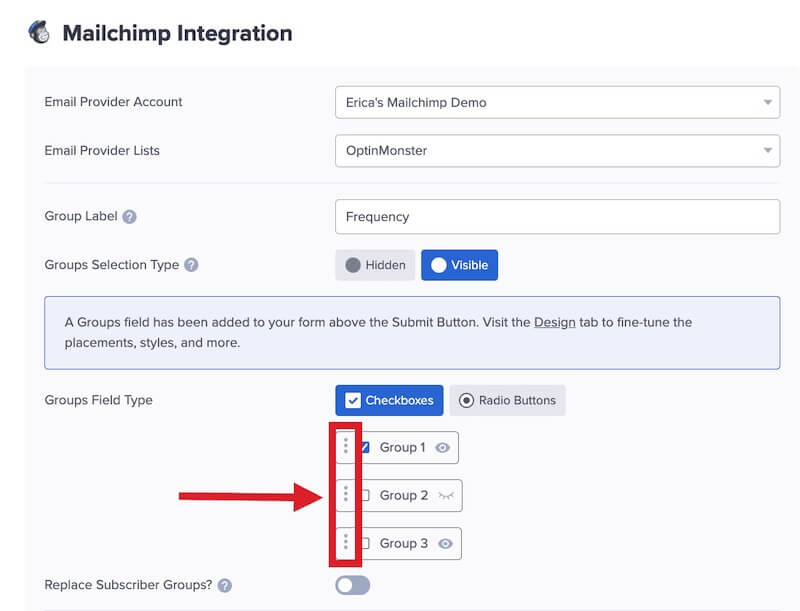
- Optional: You can arrange the order of the Group options by selecting the vertical dots icon and dragging the option to the desired position.
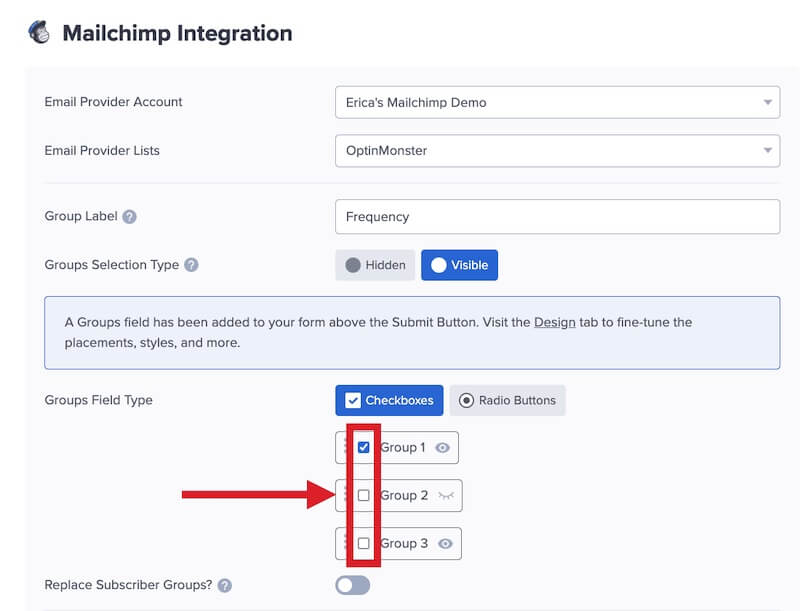
- Optional: You can make some or all Group options checked by default.
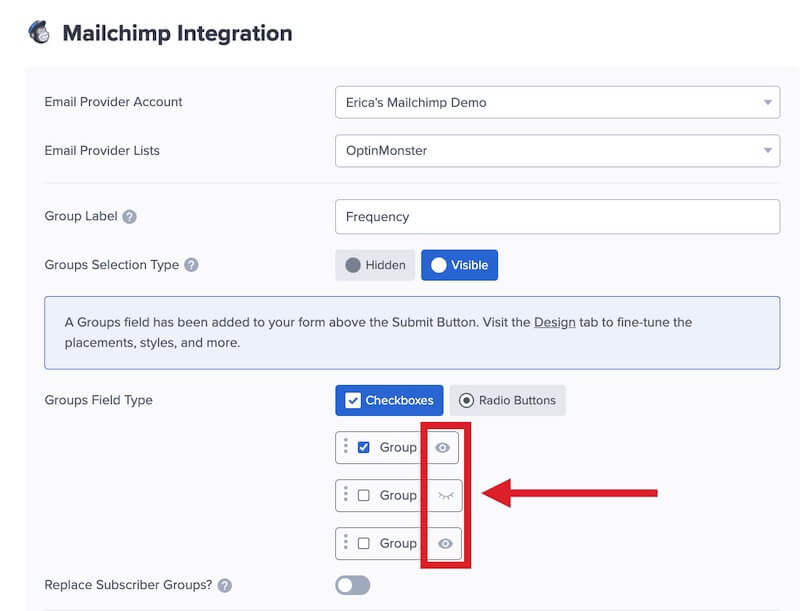
- Optional: You can hide any Group option by toggling the visibility icon.
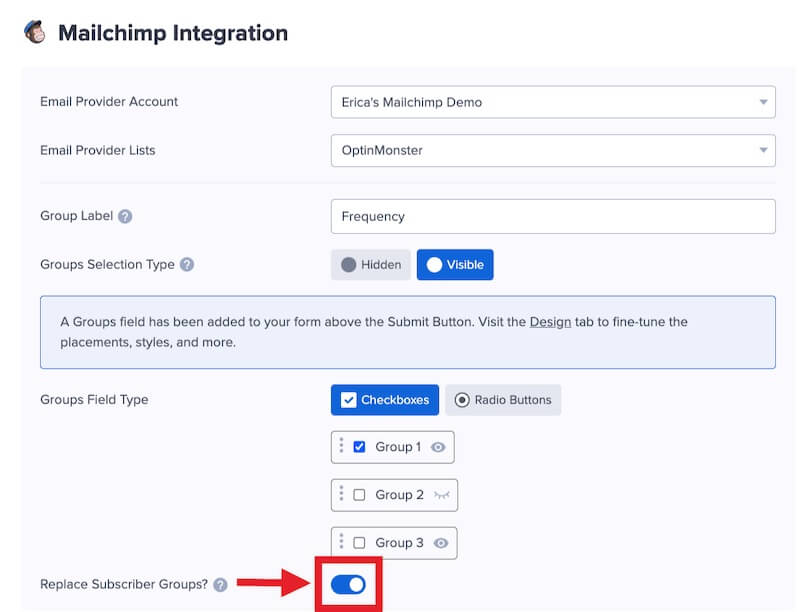
- Optional: You can enable the Replace Subscriber Groups option. This setting is disabled by default.
When enabled, a visitor’s selected Groups will replace any Groups from previous opt-ins.
- When you’re finished, Save the campaign.
To combine automatic and manual Group assignments, select lists on both sides. First, set up automatic groups, then configure manual groups.
If available Groups aren’t showing up in Mailchimp clear your browser’s cookies and cache, then check if the Groups appear available to configure in the Mailchimp integration settings of OptinMonster. Alternatively, use a different browser or a brand new Incognito window.
Add Extra Fields
Field Mapping
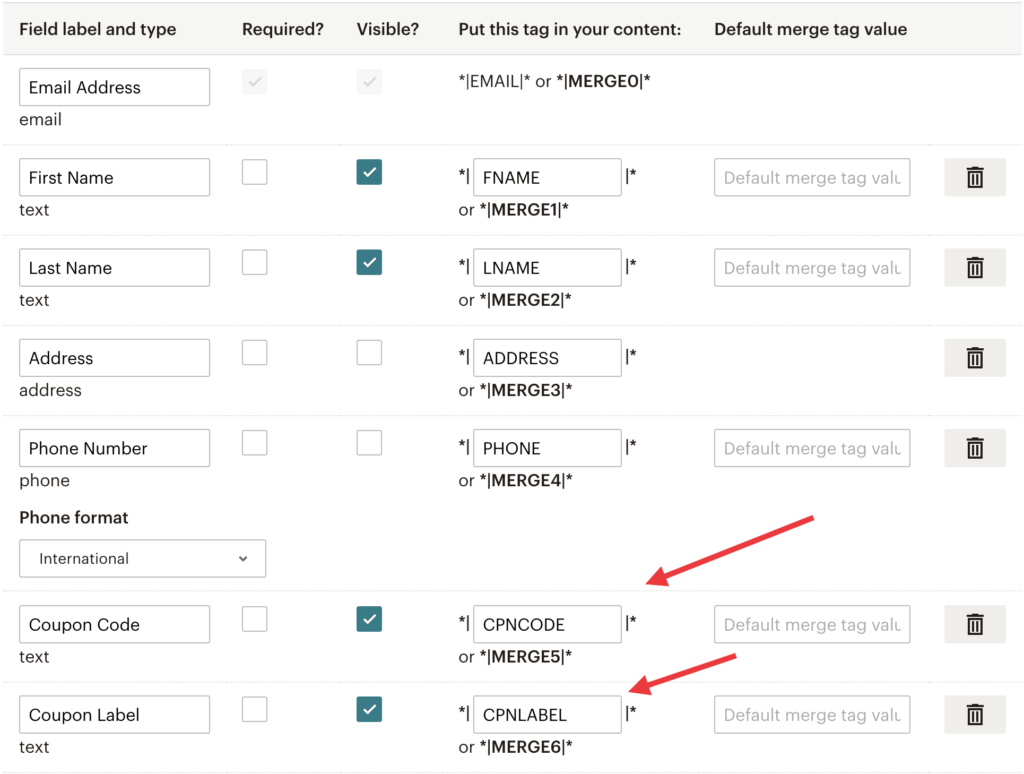
Get started using Field Mapping with Mailchimp. Before you begin using Field Mapping with Mailchimp, please consider the following: Alternatively, you can add any Mailchimp webform to your campaign using our Form Embed block. Get started adding a custom form to your campaign. To send emails automatically to new leads you’ll configure email automations within your Mailchimp account. The following guides from Mailchimp may be helpful to get started: If you are planning to send a welcome email, one of the following must be done: For marketing purposes, most users should use the Mailchimp automation to send a series of emails to new subscribers. We strongly recommend you test the optin form before publishing your campaign to ensure it is working as you expect. Before you begin, please be aware of the following details when testing Mailchimp integrations: Get started testing with the Live Site Inspector tool. If you are configuring a Gamified spin-to-win campaign, spin-a-wheel support is automatically enabled when using our native Pardot integration. The Coupon Label and Coupon Code will be passed as custom fields with each lead. When reviewing your Mailchimp Merge Tag settings you’ll see these custom fields represented as CPNLABEL and CPNCODE. If you’re serious about jumpstarting your website business growth, then get started with OptinMonster today!
NAMEFNAMELNAMESIGNUPPHONE (use the Phone field to send data to this Merge Tag)CPNCODE (the Coupon Code won when creating a Gamified spin-to-win campaign)CPNLABEL (the Coupon Label when creating a Gamified spin-to-win campaign)Form Embed Block
Email Automations
Testing
Spin-a-Wheel Support
Our conversion experts will design 1 free campaign for you to get maximum results – absolutely FREE! Click here to get started →
FAQs
Can I send leads to more than one Audience?
Yes! See our Lead Sharing guide to accomplish this.
How do I configure single or double opt-in?
See our guide on single vs. double opt-in.
Is it possible for me to add a phone field to my campaign?
Yes! You can add a phone field. Learn how to capture phone numbers with OptinMonster.
Can I capture the IP address of my lead in Mailchimp?
Yes, we automatically send the IP Address of leads when using our Mailchimp integration. The IP Address is passed to one or both of these Mailchimp field(s):
- ip_signup
- ip_opt
Troubleshooting
The campaign is capturing leads but shows 0 conversions in analytics.
Confirm that conversion tracking is turned on for the submit button in your campaign. See our guide on How to Enable Conversion Tracking.
Why are there no Tags available to select from when configuring my Mailchimp integration?
If there are no Tags available it means none have been created yet in your Mailchimp account for the Audience assigned.
You can follow this guide to create Tags in your Mailchimp account. Those will then be available to choose from for your Audience.
MailChimp Merge Field Error
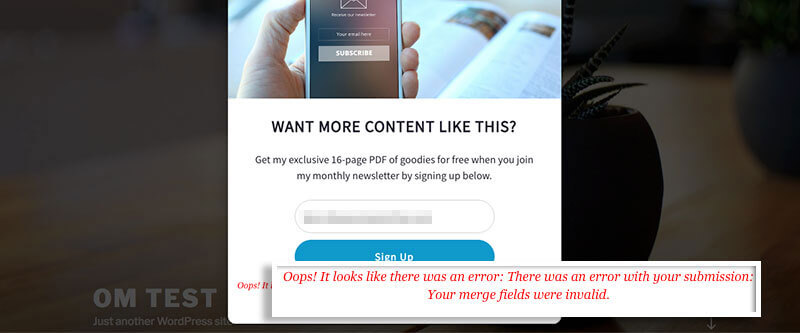
If you’re using MailChimp and receiving the following error:
Oops! It looks like there was an error: There was an error with your submission: Your merge fields were invalid
This error occurs when:
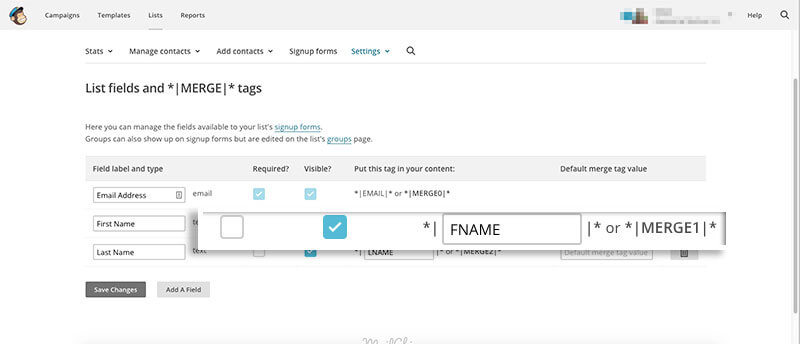
- Your MailChimp’s List settings require a certain field, such as the First Name input field, but you’re not displaying the First Name field in your campaign;
- OR the First Name input field has a name other than FNAME in your MailChimp account’s settings.
To correct the issue:
- Log into your Mailchimp account to edit your Merge tags.
- Locate your required field (such as the First Name field) and disable the required option if you aren’t displaying the First Name field.
- Be sure to Save Changes and your form should be ready to submit!
Why is the phone number not getting saved in my Mailchimp Audience?
To correct the issue:
- Log into your Mailchimp account to edit your Merge tags.
- Make sure your phone field’s Merge tag has the value of PHONE.
- Be sure to Save Changes and your campaign should now capture phone numbers submitted with each lead!
Why am I receiving a “failed to connect” error when trying to connect Mailchimp with OptinMonster?
This can happen if the API Key you’re using has maxed out the number of allowed simultaneous connections.
We recommend creating a new Mailchimp API Key to connect to OptinMonster to resolve this issue. If you’re unable to generate a new API Key for some reason, re-trying every 5 minutes until the connection is accepted should also resolve the issue.

