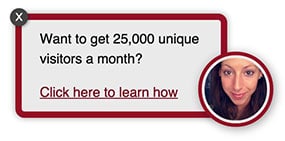
We’re often asked to share some cool use cases of OptinMonster. So, I thought I’d share a really neat solution with you that we recently built for one of our users. It’s a cool 2-step optin form that acts just like a live chat notice.
Similar to a floating live chat notice, we’ll slide in an image and use a MonsterLink to load an optin.
You can click here to view the live demo as well.
Top ToolsWant to add live chat to your site? Check out our roundup of the best live chat plugins and software to make it easy!
Benefits of a 2-Step Optin
Two-step optins are proven to convert higher than automatic optins because they require user initiation. This works on the Ziegarnik effect, which says that people focus more on uncompleted tasks rather than completed tasks. So when the user initiates the optin, they are more likely to follow through by entering their email address.
Case StudyHow Cosmetic Packaging Now Grew Their Email List by 754% with 2-Step Optins
This is why content upgrades convert 5X higher than normal optins: because they require the user to initiate the process of subscribing. (Check out 30 content upgrade ideas here.)
Ready to learn how to create a floating live chat optin for your website? Let’s get started!
NOTE: This tutorial is a great place to get started with more advanced usage of OptinMonster. Be sure to check out all of our other great documentation on Extending OptinMonster for more ideas.
How to Create a Floating Live Chat Optin
Because this is an advanced tutorial, we’ve broken it down for you into 5 sections. Click on the links below to skip to each of the sections:
The HTML — The CSS — The Javascript — Embed the Optin — The PSD Files
The HTML
We’ve created two different styles of floating MonsterLinks. The HTML for both of these is identical except for a single class.
Since the position of the Floating MonsterLink is set to absolute you can add the HTML anywhere in the body of your page.
Style 1 – Right Slide-In
<!-- Floating MonsterLink Style 1 -->
<div class="floating-monsterlink style1">
<div class="floating-avatar">
<span>&nbsp;</span>
</div>
<p class="floating-cta">Want to get 25,000 unique visitors a month?</p>
<p class="floating-cta">
<a href="#" class="manual-optin-trigger" data-optin-slug="oqxhwmovdrq4xzue">Click here to learn how</a>
<!-- Update the data-optin-slug attribute with the slug of your own optin you want to load on click. -->
</p>
<!-- START close icon, remove to make Floating Bar permanent. Use with caution, not recommended to remove if loading on mobile devices. -->
<a href="#" class="float-close">x</a>
<!-- END close icon -->
</div>
Style 2 – Bottom Slide-Up
<!-- Floating MonsterLink Style 2 -->
<div class="floating-monsterlink style2">
<div class="floating-avatar">
<span>&nbsp;</span>
</div>
<p class="floating-cta">Want to get 25,000 unique visitors a month?</p>
<p class="floating-cta">
<a href="#" class="manual-optin-trigger" data-optin-slug="oqxhwmovdrq4xzue">Click here to learn how</a>
<!-- Update the data-optin-slug attribute with the slug of your own optin you want to load on click. -->
</p>
<!-- START close icon, remove to make Floating Bar permanent. Use with caution, not recommended to remove if loading on mobile devices. -->
<a href="#" class="float-close">x</a>
<!-- END close icon -->
</div>
The CSS
Style 1 – Right Slide-In
Our Style 1 Floating MonsterLink is blue and positioned at the bottom-right hand side of the browser window. The avatar image is also larger and positioned to the left of the call-to-action text and MonsterLink.
/* --- Floating MonsterLink Style 1 CSS ---
 ------------------------------------------ */
 .floating-monsterlink.style1.show {
    right: 30px;
 }
 .floating-monsterlink.style1 {
    margin: 0;
    width: auto;
    border-radius: 10px;
    display: inline-block;
    position: absolute;
    bottom: 30px;
    right: -350px;
    width: 160px;
    padding: 10px 10px 10px 60px;
    background-color: #eaeaea;
    border: 5px solid #165c92;
    -webkit-box-shadow: 0 0 10px 0 rgba(0, 0, 0, 0.4);
    -moz-box-shadow: 0 0 10px 0 rgba(0, 0, 0, 0.4);
    box-shadow: 0 0 10px 0 rgba(0, 0, 0, 0.4);
    -webkit-transition: right 3000ms ease-in-out;
    -moz-transition: right 3000ms ease-in-out;
    -o-transition: right 3000ms ease-in-out;
    transition: right 3000ms ease-in-out;
}
.floating-monsterlink.style1 .floating-avatar {
    top: -20px;
    margin: 0;
    padding: 0;
    display: block;
    overflow: hidden;
    width: 120px;
    height: 120px;
    position: absolute;
    margin-left: -150px;
    border-radius: 999em;
    border: 8px solid #165c92;
    background-color: #165c92;
    -webkit-box-shadow: -2px 2px 15px 0 rgba(0, 0, 0, 0.4);
    -moz-box-shadow: -2px 2px 15px 0 rgba(0, 0, 0, 0.4);
    box-shadow: -2px 2px 15px 0 rgba(0, 0, 0, 0.4);
}
.floating-monsterlink.style1 .floating-avatar span {
    width: 106px;
    height: 106px;
    display: block;
    overflow: hidden;
    border-radius: 999em;
    background-size: cover;
    background-color: #eaeaea;
    border: 15px solid #eaeaea;
    margin: -8px auto auto -8px;
    background-image: url('https://cdn.staging.optinmonster.com/wp-content/uploads/2015/09/erica-avatar-200x200.jpg');
}
.floating-monsterlink.style1 .floating-cta {
    padding: 0;
    font-size: 13px;
    text-align: left;
    line-height: 1.5em;
    margin: 0 auto 15px;
    font-family: Helvetica, "Helvetica Neue", Arial, sans-serif;
}
.floating-monsterlink.style1 p.floating-cta:last-of-type {
    margin: 0 auto;
}
.floating-monsterlink.style1 a.manual-optin-trigger {
    color: #043f6c;
    text-decoration: underline;
}
.floating-monsterlink.style1 a.float-close {
    top: -15px;
    right: -15px;
    color: #fff;
    height: 24px;
    width: 24px;
    font-weight: 300;
    line-height: 23px;
    text-align: center;
    position: absolute;
    border-radius: 999em;
    text-decoration: none;
    background-color: #444;
    font-family: sans-serif;
    -webkit-box-shadow: -1px 1px 3px rgba(0, 0, 0, 0.4);
    -moz-box-shadow: -1px 1px 3px rgba(0, 0, 0, 0.4);
    box-shadow: -1px 1px 3px rgba(0, 0, 0, 0.4);
}
Style 2 – Bottom Slide-Up
Our Style 2 Floating MonsterLink is positioned in the bottom left-hand area of the browser window, uses dark red colors and the avatar image is smaller and located to the right of the call-to-action text and MonsterLink.
/* --- Floating MonsterLink Style 2 CSS ---
 ------------------------------------------ */
 .floating-monsterlink.style2.show {
    bottom: 30px;
 }
 .floating-monsterlink.style2 {
    margin: 0;
    width: auto;
    border-radius: 10px;
    display: inline-block;
    position: absolute;
    bottom: -160px;
    left: 30px;
    width: 180px;
    padding: 10px 20px;
    background-color: #eaeaea;
    border: 7px solid #92162d;
    -webkit-box-shadow: 0 0 10px 0 rgba(0, 0, 0, 0.4);
    -moz-box-shadow: 0 0 10px 0 rgba(0, 0, 0, 0.4);
    box-shadow: 0 0 10px 0 rgba(0, 0, 0, 0.4);
    -webkit-transition: bottom 3000ms ease-in-out;
    -moz-transition: bottom 3000ms ease-in-out;
    -o-transition: bottom 3000ms ease-in-out;
    transition: bottom 3000ms ease-in-out;
}
.floating-monsterlink.style2 .floating-avatar {
    top: 35px;
    margin: 0;
    padding: 0;
    display: block;
    overflow: hidden;
    width: 75px;
    height: 75px;
    position: absolute;
    margin-left: 175px;
    border-radius: 999em;
    border: 4px solid #92162d;
    background-color: #92162d;
    -webkit-box-shadow: 2px 2px 15px 0 rgba(0, 0, 0, 0.4);
    -moz-box-shadow: 2px 2px 15px 0 rgba(0, 0, 0, 0.4);
    box-shadow: 2px 2px 15px 0 rgba(0, 0, 0, 0.4);
}
.floating-monsterlink.style2 .floating-avatar span {
    width: 69px;
    height: 69px;
    display: block;
    overflow: hidden;
    border-radius: 999em;
    background-size: cover;
    background-color: #eaeaea;
    border: 15px solid #eaeaea;
    margin: -12px auto auto -12px;
    background-image: url('https://cdn.staging.optinmonster.com/wp-content/uploads/2015/09/erica-avatar-200x200.jpg');
}
.floating-monsterlink.style2 .floating-cta {
    padding: 0;
    font-size: 15px;
    text-align: left;
    line-height: 1.5em;
    margin: 0 auto 15px;
    font-family: Helvetica, "Helvetica Neue", Arial, sans-serif;
}
.floating-monsterlink.style2 p.floating-cta:last-of-type {
    margin: 0 auto;
}
.floating-monsterlink.style2 a.manual-optin-trigger {
    color: #730519;
    text-decoration: underline;
}
.floating-monsterlink.style2 a.float-close {
    top: -13px;
    left: -13px;
    color: #fff;
    height: 20px;
    width: 20px;
    font-weight: 300;
    line-height: 1.2em;
    text-align: center;
    position: absolute;
    border-radius: 999em;
    text-decoration: none;
    background-color: #444;
    font-family: sans-serif;
    -webkit-box-shadow: 1px 1px 3px rgba(0, 0, 0, 0.4);
    -moz-box-shadow: 1px 1px 3px rgba(0, 0, 0, 0.4);
    box-shadow: 1px 1px 3px rgba(0, 0, 0, 0.4);
}
RECOMMENDED: If the site’s body element doesn’t already include overflow: hidden; in its CSS styles we recommend you add this to prevent scrollbars from appearing when the Floating MonsterLink animates into and out of view.
body {
    overflow: hidden !important;
}
The Javascript
We’re going to use some jQuery animations to smoothly transition the Floating MonsterLink into view, and the OptinMonster Javascript Events API to hide the Floating MonsterLink once the visitor selects the MonsterLink to open the optin.
Style 1 – Right Slide-In
// Floating MonsterLink Style 1
jQuery(document).ready(function ($) {

    //* Animate Floating MonsterLink into view on page load
    $(".floating-monsterlink.style1").addClass("show");

    //* Animate out of view function
    function closeFloatingMonsterLink(e) {
        e.preventDefault();
        $(".floating-monsterlink.style1").removeClass("show");
    }

    //* Triggers that run closeFloatingMonsterLink function
    // run closeFloatingMonsterLink when close icon is selected
    $('.floating-monsterlink.style1 .float-close').click(closeFloatingMonsterLink);

    // run closeFloatingMonsterLink when manual trigger optin is successfully loaded
    $(document).on('OptinMonsterManualOptinSuccess').click(closeFloatingMonsterLink);

});
Style 2 – Bottom Slide-Up
// Floating MonsterLink Style 2
jQuery(document).ready(function ($) {

    //* Animate Floating MonsterLink into view on page load
    $(".floating-monsterlink.style2").addClass("show");

    //* Animate out of view function
    function closeFloatingMonsterLink(e) {
        e.preventDefault();
        $(".floating-monsterlink.style2").removeClass("show");
    }

    //* Triggers that run closeFloatingMonsterLink function
    // run closeFloatingMonsterLink when close icon is selected
    $('.floating-monsterlink.style2 .float-close').click(closeFloatingMonsterLink);

    // run closeFloatingMonsterLink when manual trigger optin is successfully loaded
    $(document).on('OptinMonsterManualOptinSuccess').click(closeFloatingMonsterLink);

});
Embed the Optin
Be sure to embed the optin wherever you plan to display the Floating MonsterLink according to our MonsterLinks documentation.
In this demo we created a Lightbox optin, but you can manually trigger the following types of optin with your MonsterLink:
- Lightbox
- Fullscreen — Requires a Pro subscription
- Mobile — Requires a Pro subscription
Download the PSDs (optional)
You can download the original PSDs used to create our demo Floating MonsterLinks from the following links:
Download the Style 1 PSD File — Download the Style 2 PSD File
That’s it! You’ve successfully added a floating live chat optin to your site! Now, check out these live chat best practices to kick your customer service into high gear.
Leveraging proven psychological principles is a really smart way to increase conversions on your website.
When you use the Zeigarnik effect with a 2-step optin form together with a slide-in animation, you’ll dramatically increase your conversions.
Ready to put these psychological principles to use on your website? Get started with OptinMonster today to boost your conversions and make more sales.


Add a Comment