Do you want to turn off popups for the people who have already subscribed to your email list? Popups can start to annoy your visitors if they have opted-in already. In this post, we’ll share 4 methods to hide popups from existing subscribers (step-by-step).
OptinMonster allows you to add highly effective popups, welcome gates, slide-in scroll boxes and other optin forms that significantly increase your subscribers, and our users love us for that.
One of the most common requests that we’ve gotten from our users is for the ability to hide popups from existing subscribers.
All OptinMonster popups are smart, and it will never show the same popup again if the user has subscribed through our campaigns.
But what if the user was already a subscriber before you got OptinMonster, or what if you have multiple campaigns running?
Well, we have 4 solutions for you!
Why Should You Turn Off Popups for Subscribers?
We wanted to give our users the ability to create popups that not only increase their conversions but also facilitate a good user experience on their site and improve sales.
The problem with most popups is that they show up regardless of whether the visitor has already opted in or not. Even if the visitor is a long-time subscriber, the site doesn’t recognize them as such.
It’s akin to if you owned a restaurant, but you could never remember who your regulars were. That would be pretty poor customer service, huh?
Contrast that with a restauranteur who greets his regulars by name and remembers their “usual” order. With OptinMonster, you can be that friendly restauranteur: you can ditch those “dumb” popups and greet your subscribers with intelligent popups instead that know what they’ve already opted in to or rejected.
Especially if you use content marketing to nurture your leads, you’re probably sending out a weekly, or even a daily, email newsletter to your subscribers containing links to your blog posts. To ensure positive user experience for those warm leads and customers, it’s important to hide popups from existing subscribers or popups that visitors have already interacted with.
If you are an OptinMonster user, there are 4 different methods that you can use to hide popups from existing subscribers:
- Method 1. Set Global Success or Interaction Cookies
- Method 2. Use a Specific URL Parameter in Your Email Campaigns
- Method 3. Display a Different Popup with Campaign-Specific Cookies
- Method 4. Prevent Popups with Your Own Cookie
Using these features, you can rest assured that your subscribers won’t get annoyed. You can even take these features one step further to enhance their experience, so they’ll love you even more.
Ready to learn how to do it? Let’s dive into the 4 methods…
Method #1: Set Global Success or Interaction Cookies
The first method is to add a global cookie so that all of your popups will stop appearing once a visitor has either successfully opted in or has interacted with a popup by exiting out of it.
Cookies are text files that are stored in your browser containing information about a specific website visit. You can set these to be stored in your visitor’s browser whenever they interact with one of your popups, so your popups will be intelligently displayed (or not displayed) the next time they visit your site.
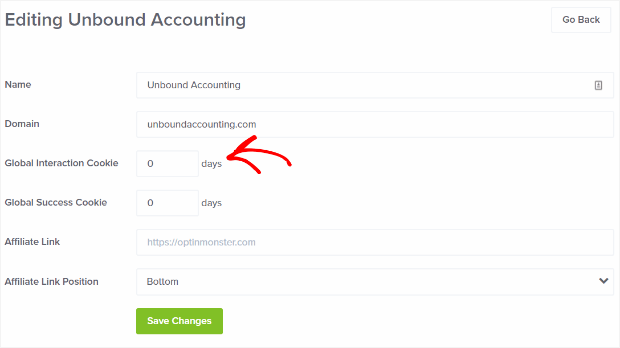
To set your global cookie settings, go to your OptinMonster dashboard and click on Sites.
From there, click on the site you want to edit and set the global success cookie and/or the global interaction cookie.
The global success cookie is the number of days that all optins will be prevented from loading after the visitor has successfully opted into any optin.
The global interaction cookie is the number of days that all optins will be prevented from loading after the visitor has closed out any optin.
Enter your preferred number of days in one or both form fields and hit the Save button.

- It does not cover existing subscribers who opted in before you installed OptinMonster.
- Since this method relies on browser cookies, it doesn’t work if your subscribers view your site from a different device than the one they opted in with.
Let’s proceed to method #2, which will allow you to exclude ALL existing subscribers from seeing your optins, no matter what device they are using, and even if they were on your list before you had OptinMonster…
Method #2: Use a Specific URL Parameter in Your Email Campaigns
This method does not rely on cookies, so it works no matter what desktop, laptop, or mobile device the subscriber is using to view your site.
All you have to do is create a specific URL parameter that you will use when you do not want the popup displayed.
There are two ways you can accomplish this.
First is to use our built-in parameter ?omhide=true.
If you add it at the end of any URL, it would hide all OptinMonster campaigns on that page.
Example: yoursite.com/blog-post/?omhide=true
The second way to do this would be to create your own custom URL parameter and adding them inside OptinMonster’s Display Rules.
To set your URL parameter, so that it prevents your page from loading a popup, simply go to the Display Rules for your optin form and set a condition to if the URL query arg key exactly matches and value exactly matches and enter the query strings you wish to use. Then hit the green Save button in the top right corner of the screen.
You can choose to only show when a user has a specific parameter or when they don’t have that parameter.
Now, you can use this URL parameter in your email campaigns. So whenever you link to a blog post or any page on your site, you can append your query string to the link and your existing subscribers won’t see a popup on that page.
The only downside to this method is that it only works when your subscribers are accessing your site via a specific link. That’s why we’ve also included the global cookies feature (from method #1 above), and the additional features below…
Method #3: Display a Different Popup with Campaign-Specific Cookies
The third method is to display a different popup to those who have already opted in to one of your offers.
For instance, you may have several lead magnets to offer. You may want to prevent your visitors from seeing the same popup over and over, but you still want them to be able to optin to another one of your lead magnets. So once they optin or exit one popup, you can show them a different popup, and so on.
Another practical application of this feature is to create a popup funnel to move your visitors further along the sales process.
For example, the first popup could be an optin form. Once they have successfully opted in, then they would see a different popup that offers a discount code. Once they have successfully grabbed the discount code, they would see a popup that reminds them that they haven’t checked out yet, etc. until finally the sale has been made.
For the purpose of this tutorial, let’s say you want to display Popup B after someone opts into Popup A. Then after someone opts into Popup B, you want to display Popup C.
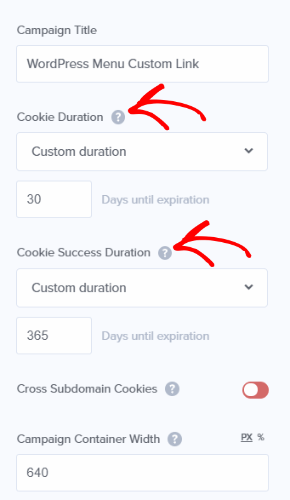
To do this, you’ll need to add a campaign-specific cookie to your popups. Simply go to your OptinMonster dashboard and edit Popup B. From there, click on the Display Rules tab.
Set a condition to visitor has opted in to and choose the optin from the dropdown list (or you can also set it to be displayed for several other options).
In our example from above, you’d select Popup A from the campaign dropdown menu, and hit the green Save button at the top of the page.
Next, edit Popup C and repeat the same steps. This time, set it to be displayed when the visitor has opted into Popup B.
That’s it! You now have a dynamic popup campaign that you can use in so many ways: to enhance the user experience, move your visitors further along your funnel, or anything you can imagine.
Method #4: Prevent Popups with Your Own Cookie
The final method we are going to discuss in this post is using your own, specific cookie to prevent popups from appearing. This feature gives you the ultimate control.
(Consequently, you can also use this feature to display popups with a specific cookie, but that’s a topic for another time.)
First, go to the Display Rules tab for your optin form and set a condition to display your optin if a cookie does not contain (since you’re preventing the optin from loading), and then enter your cookie key and value.
Hit the green Save button. Now you can prevent popups from appearing based on any cookie that you want. The possibilities are endless!
The only downside to this method is that you may need to hire a web developer to help you create the cookie. But that’s why we have the other 3 methods for you to choose from.
That’s it! 4 methods to hide popups from existing subscribers. As you can see, each of these methods has its merits and its shortcomings. There is no single catch-all method for preventing your existing subscribers from seeing popups. However, if you use a combination of these methods, you can be pretty sure that they won’t.
What’s even more exciting, however, is the possibilities that these features afford you for enhancing the user experience on your site. Not only can you use these methods to hide popups from existing subscribers, but you can also use them to display more targeted popups–and even popup funnels–that give your users more value, and move them further along your sales funnel.
Do you have any questions about preventing existing subscribers from seeing your popups, welcome gates, or slide-ins? Let us know in the comments below!


Add a Comment