Do you want to learn how to hide a WordPress site until it’s ready for your audience, but you’d still like to grow your list in the meantime?
A coming soon page helps you do just that.
Anyone that comes to your website will see a stunning page that lets them know your site is coming soon and when they can expect it to be ready.
But if used right, a coming soon page can do more than that. It can help you collect leads, grow your subscriber list, and make sales before your official launch.
Today, we’re going to show you how to use a coming soon page to hide a WordPress site until it’s ready. We’ll also show you how to take a coming soon page to the next level to kickstart your online business before it launches.
Before we dive into the tutorial, though, we want to show you how to plan your pre-launch goals and get the right tools to make the most of your coming soon page.
How to Use a Coming Soon Page the Right Way
For most people, a coming soon page is just a placeholder to hide a website until it’s ready.
However, it can do so much more than that. Here are a few great ways to use a coming soon page:
- Add an optin form to collect emails so you can get a head start on your email marketing campaigns
- Offer visitors a discount on launch dates to get sales leads
- Display a countdown timer to build excitement and momentum for your launch
- Take pre-launch bookings and orders
- Ask visitors what they’d like to see on your site so you can gauge interest and get customer opinions before launch
- Add social icons to build social media likes, followers, and subscribers
- Invite customers to sample upcoming products to get feedback
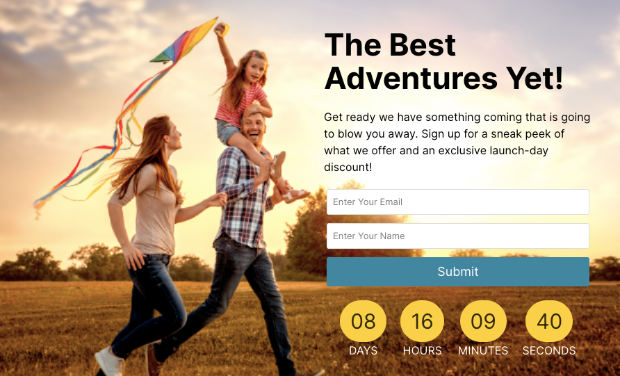
As you can see, you can grow your subscriber list, get customers, generate revenue, and build your brand even before launching your website with a page like this:
You may be thinking this is all great, but it’s going to mean extra time and money to build coming soon pages like the one above.
Thankfully, that’s not the case at all.
With the right page builder, you can create high-converting coming soon pages in minutes.
Selecting the Right Tool to Build a Coming Soon Page
There are plenty of WordPress plugins that let you enable ‘coming soon’ mode on your site, but most of them add a generic message which doesn’t do much for your conversions.
They hide your website, and that’s pretty much it.
To build a coming soon page designed to convert visitors, you need a powerful page builder. And that’s where our favorite page builder comes in – SeedProd.
SeedProd is hands down the best landing page builder for WordPress. It has a built-in coming soon mode that you can switch on at the click of a button.
Plus, it comes with powerful features to boost engagement and drive sales.
This includes optin forms, countdown timers, images and videos, social icons, and animated headlines.
Aside from that, here are a few other features that you’ll love about SeedProd:
- 150+ stunning templates, so you don’t need to start from scratch
- Smart pre-built sections and blocks to build unique pages
- Drag and drop builder that makes it easy to customize templates
- Responsive designs that look great on all devices
- Subscriber management to easily keep track of subscribers without a 3rd-party service
- Premium integrations with email marketing service providers
- Built-in spam protection to block bots and fraud submissions
- Fast-loading and bloat-free pages
Plus, it doesn’t require any coding knowledge, so it’s great for beginners.
At the same time, it comes with powerful features and controls for advanced users making SeedProd the #1 coming soon page builder for anyone to use.
It’s no wonder 1+ million businesses, marketers, and developers love and trust SeedProd.
For this tutorial, we’ll use SeedProd to show you how to create an awesome coming soon page for your website.
Ready to follow along? Sign up for your 100% risk-free SeedProd account today!
How to Hide a WordPress Site
To hide your WordPress site, we’ll be creating a stunning coming soon page that looks like this:
We’ll show you how to choose your own template and fields so that the page matches your brand and looks the way you want it to.
Step 1: Installing SeedProd in WordPress
The first thing you’ll need to install SeedProd on your WordPress site.
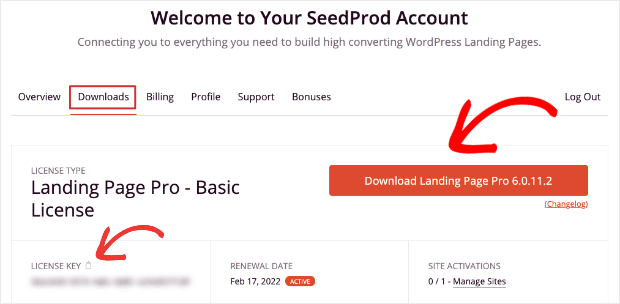
When you sign up for SeedProd, you’ll get a license key and a plugin file to download.
You can install the plugin in your WordPress admin area. For more details, follow this guide on how to install a plugin in WordPress.
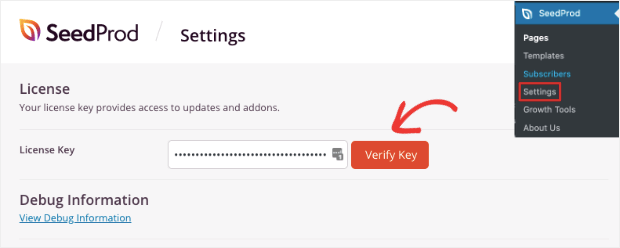
Then access the SeedProd » Settings page to enter and verify the license key.
Now you can get started with creating your coming soon page.
Step 2: Creating a New Coming Soon Page
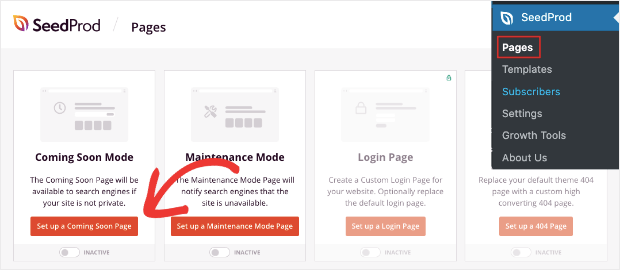
From your WordPress dashboard, head to SeedProd » Pages, where you’ll see 4 page types available:
- Coming soon
- Maintenance
- Login
- 404 pages
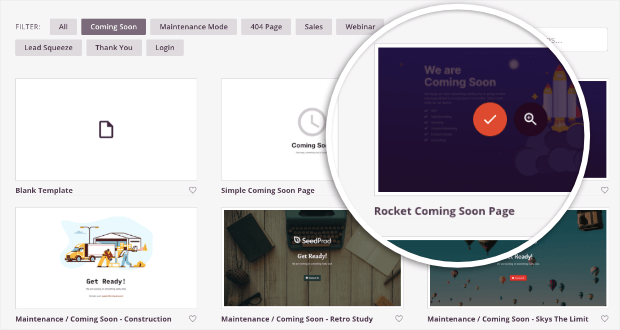
Click on the ‘Set up a Coming Soon Page’ button, and SeedProd will display all the coming soon templates available.
You can preview a template by clicking on the magnifying glass icon and then hit the ‘tick’ icon to select it.
For this tutorial, we’ll choose the ‘Rocket Coming Soon Page’ template.
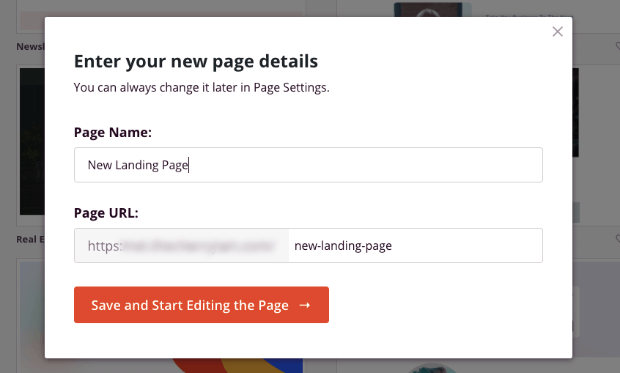
SeedProd will ask you to add a name for your landing page so you can easily find it in your list of pages. Then click the ‘Save and Start Editing the Page’ button.
Next, we’ll show you how easy it is to customize your coming soon page.
Step 3: Customizing the Coming Soon Page Template
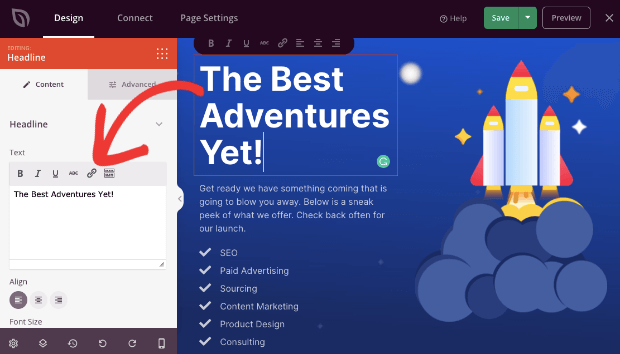
SeedProd has a visual drag and drop builder, which means you’ll see a preview of your page, and you can modify it directly on the page editor.
Simply select an element of the page like the header and then type in your own content.
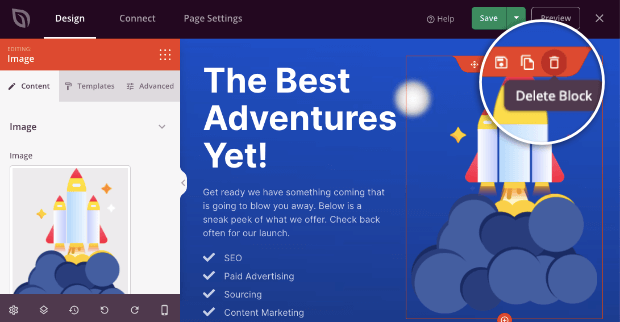
To get rid of elements that you don’t want, select it and use the trashbin icon to delete the block.
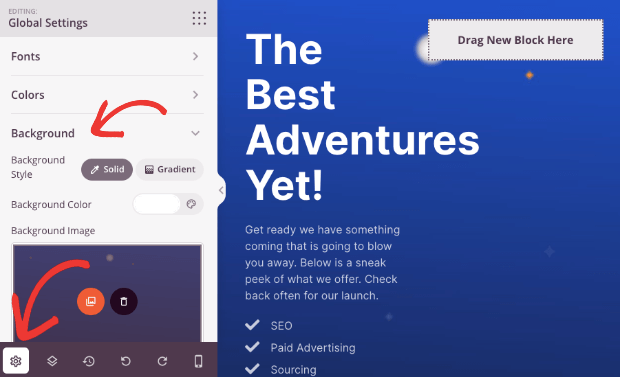
Next, we want to change the blue background to a picture that suits our adventure page. To do this, click on the global settings icon at the bottom left of the page.
Then open the Background tab, and you’ll see an option to upload your own image. You can even choose a solid or gradient background here.
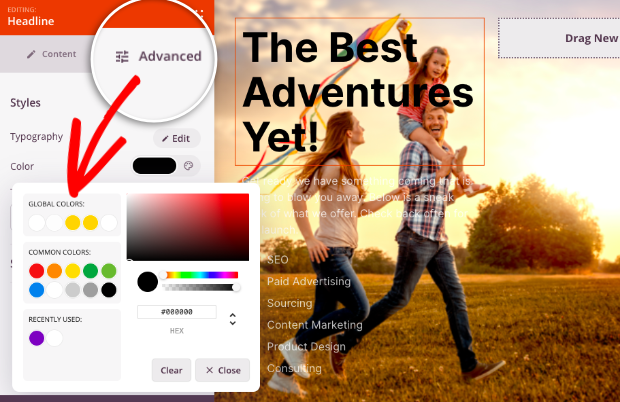
Depending on the image you use, the font color and placement may clash with it. To make adjustments, select the text, and then open the Advanced tab in the left column.
Open the color palette to choose a color. We’ll go with a basic black for our design.
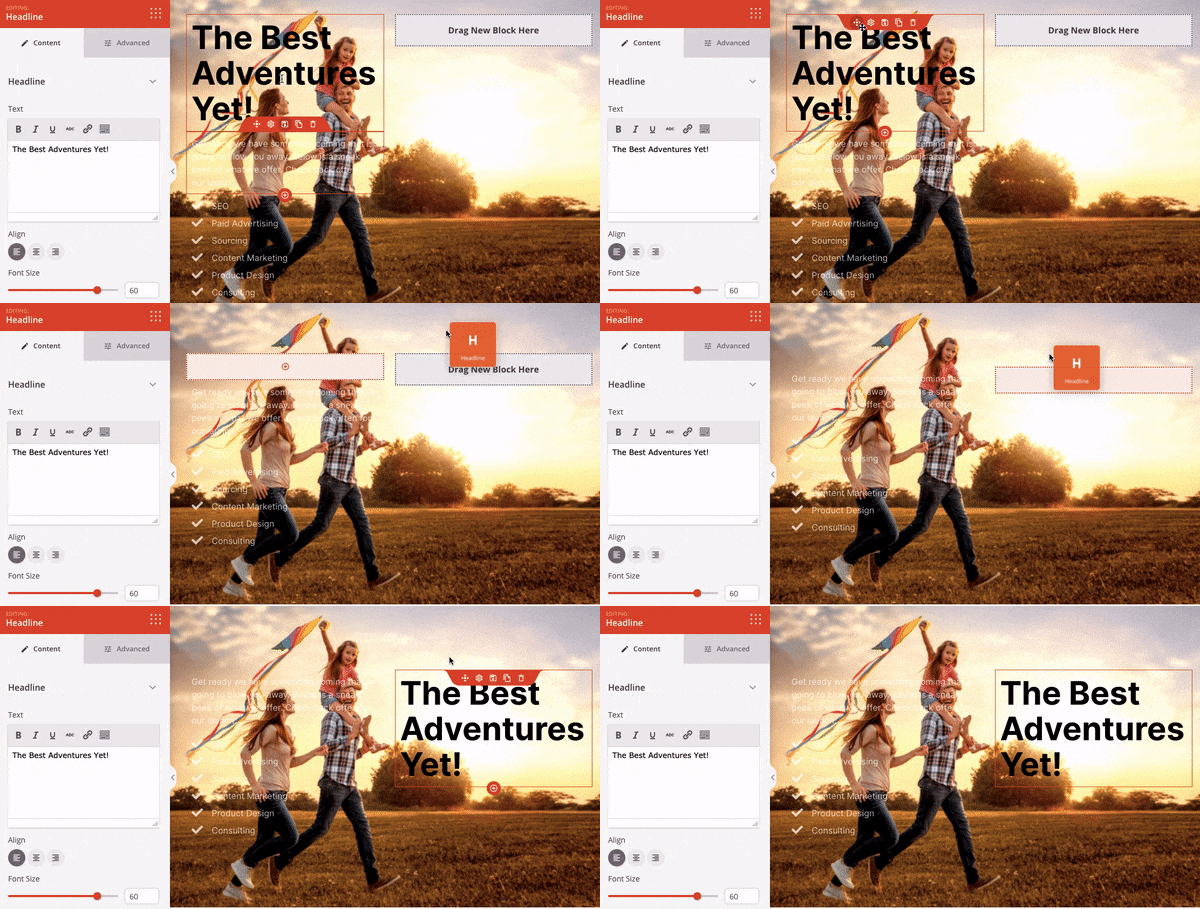
If you want to move elements around, you can simply use the navigation icon to drag and drop them where you want them to appear.
We’ll move the text to the right of the page so it doesn’t conflict with the image.
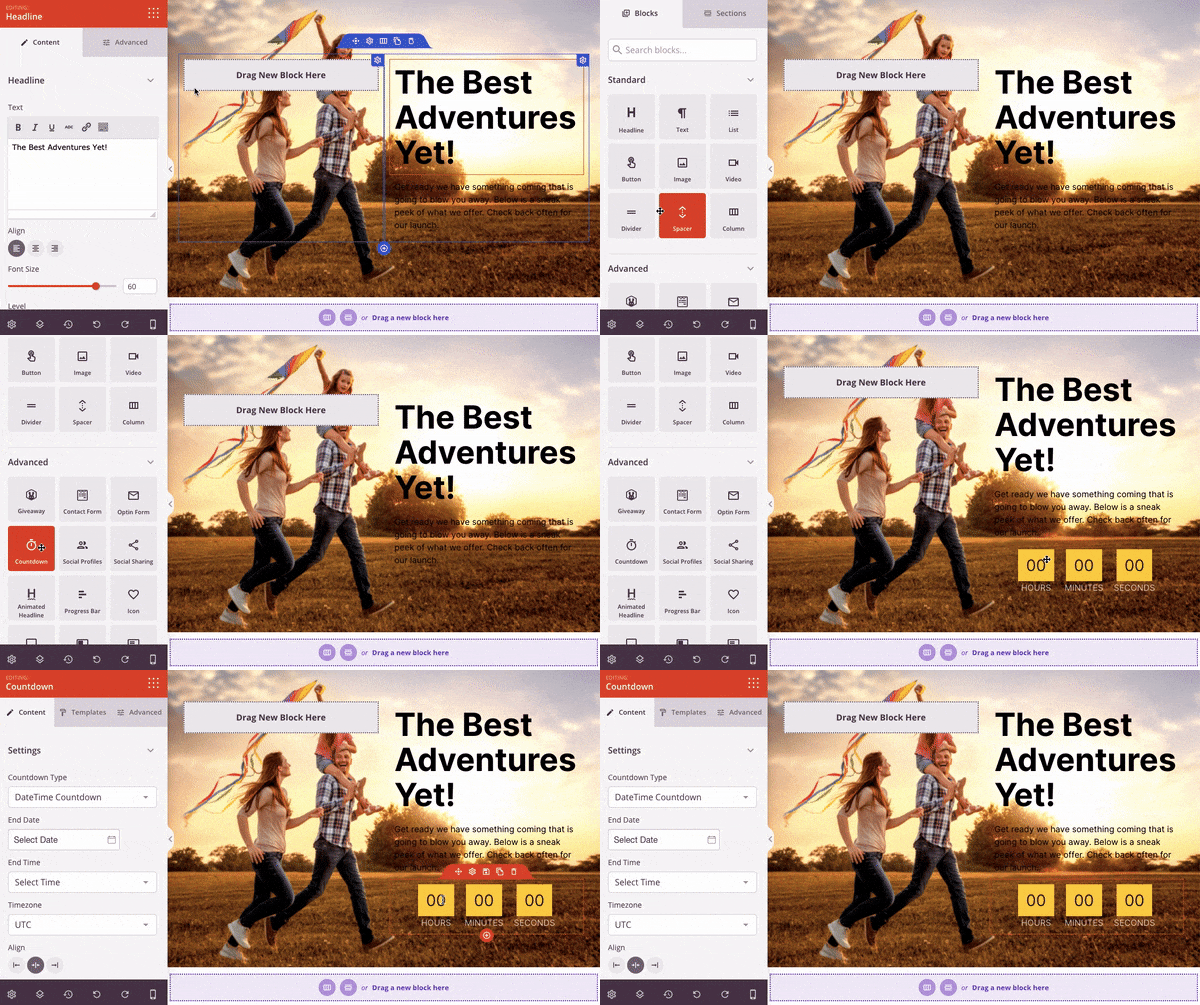
To add a new block, hit the dotted menu icon to see a list of available blocks.
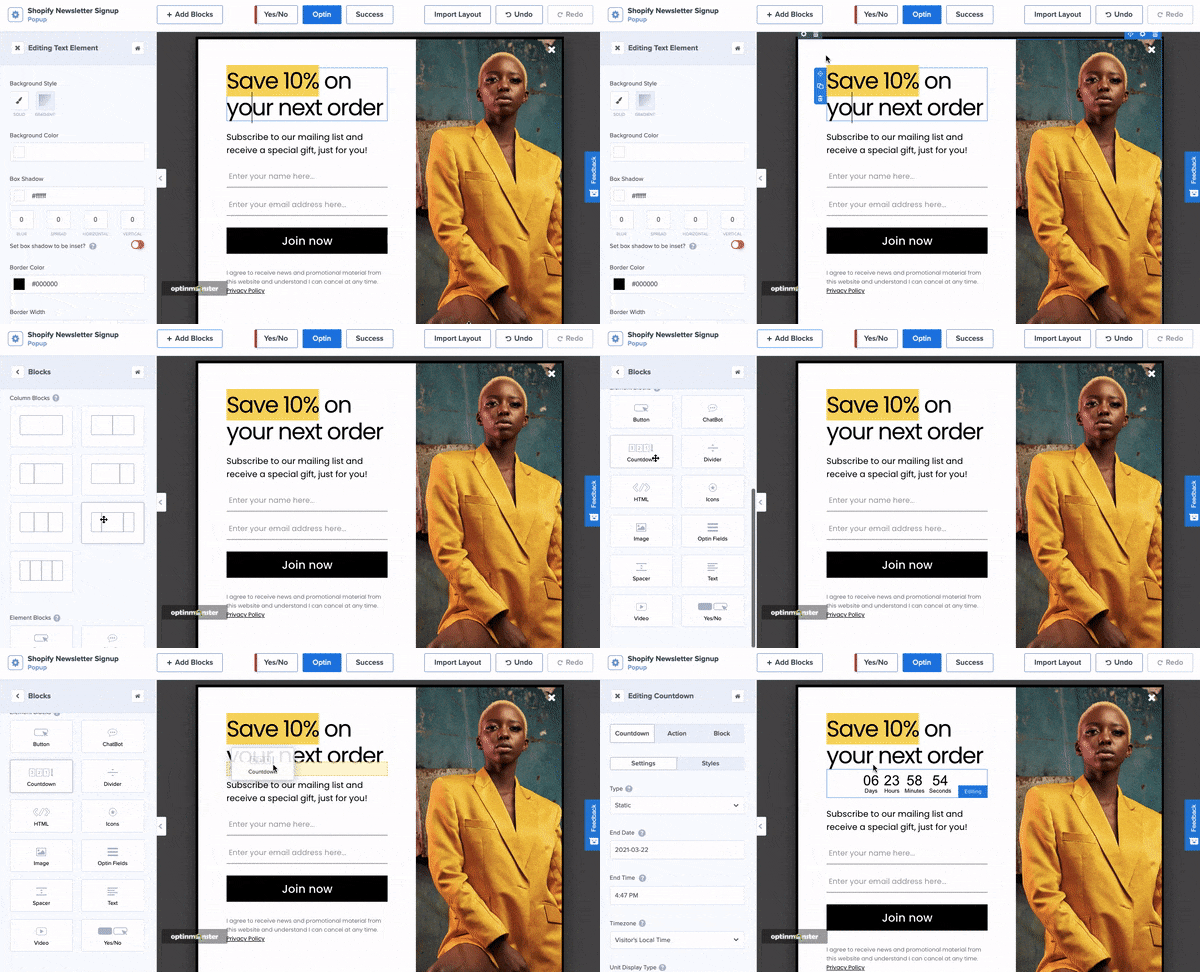
We’re going to add a countdown timer to let visitors know when they can expect the site to go live. To do this, select the countdown timer block and drop it on the page.
In the left column, you’ll get options to set the date and time. You can also change the color and style of the timer.
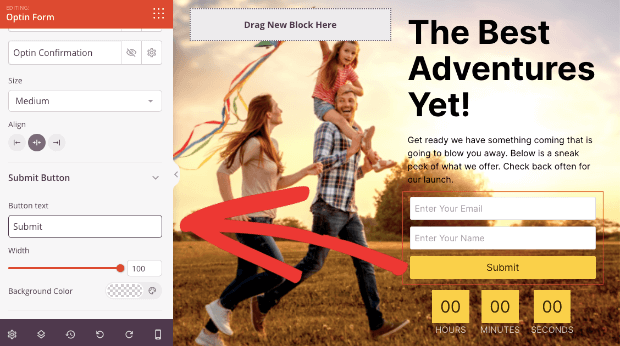
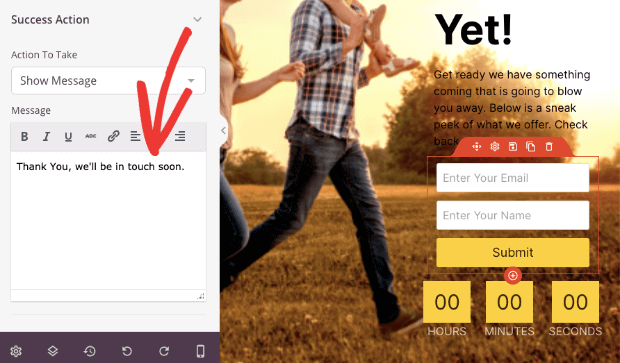
Finally, we’ll add an optin form so visitors can leave their name and email address to join our mailing list. Select the optin field to get options to edit the fields and the ‘Submit’ button.
You can change the text and color of the optin fields in the left-hand side menu. There’s also a ‘Success’ tab where you can change the confirmation message displayed to visitors that sign up.
With that, the coming soon page design is ready. Make sure you save your design to store your customizations.
Next, we’ll show you how to integrate the coming soon page with your email provider.
That way, you can send out automated emails to welcome subscribers. And if you’ve offered a pre-launch discount or early bird special, you can make sure they instantly get their coupon code via email.
Step 4: Connecting Your Page to an Email Provider
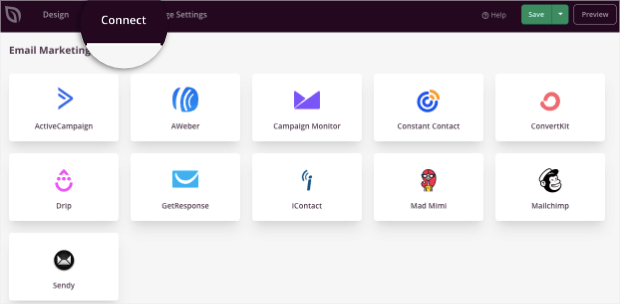
SeedProd lets you connect your coming soon page to all popular email marketing services.
Open the Connect tab and select your email service provider. Then follow the onscreen instructions to log in to your account.
That’s it! Your email marketing is now connected to your page. You can now set up automated emails with your service provider.
When someone signs up on your coming soon page, they’ll automatically be added to your email list and receive any automated emails you set up through your email service provider.
Step 5: Editing Coming Soon Page Settings
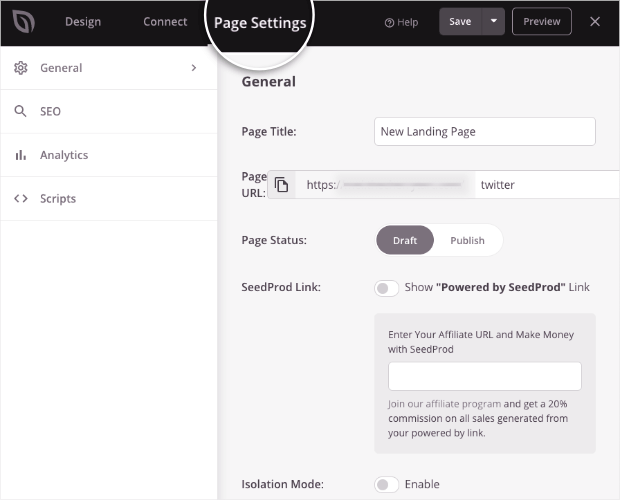
By default, SeedProd’s coming soon page has the recommended settings applied. If you want to tweak these settings, you can do so under the Page Settings tab.
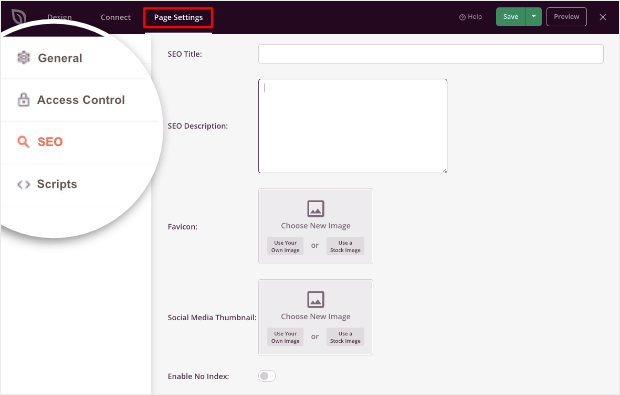
You can change the page title and URL under the General settings tab. And you can also check out the SEO tab to optimize your page for search engines.
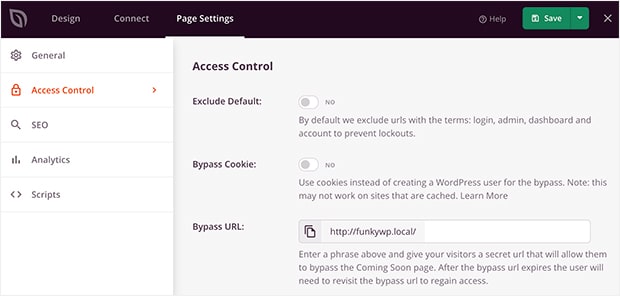
You may want to grant access to specific people to bypass the coming soon barrier so they can see your website. They may be developers, designers, or clients who need to work on or approve the website design.
SeedProd lets you set up these permissions under the Access Control tab.
You can allow IP addresses or WordPress user roles and even set the time period for which they’ll have access.
Now that you’ve configured your page settings, the coming soon page is ready to be published.
Step 6: Publishing the Coming Soon Page
You can preview your page to see how it would look when it’s live. Then use the drop-down menu next to it to Publish your page.
There’s just one more step you need to take to hide your WordPress website and make sure only the coming soon page is available to visitors.
Step 7: Activating Coming Soon Mode
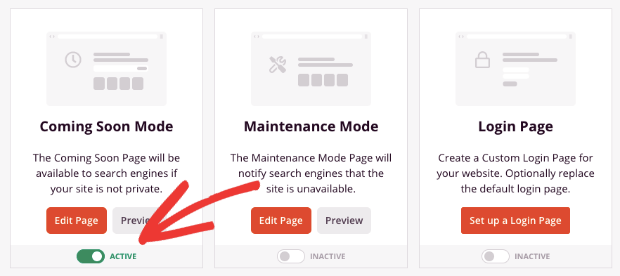
To hide your site, exit the SeedProd page builder and returning to SeedProd’s main menu.
Then activate Coming Soon Mode using the toggle button below it.
Now your WordPress site is hidden, so you can continue building the page without visitors seeing it.
That brings us to the end of the tutorial on how to hide your WordPress site until it’s ready.
Next, we’ll show you how to grow your pre-launch conversions and email subscriptions exponentially way before you even launch your site.
Growing Your Email List Through a Coming Soon Page
SeedProd lets you add a simple optin form to the coming soon page, but you might want to further boost conversions with more targeted optin campaigns.
To make your offers more enticing, you’ll want to use a powerful lead generation tool like OptinMonster.
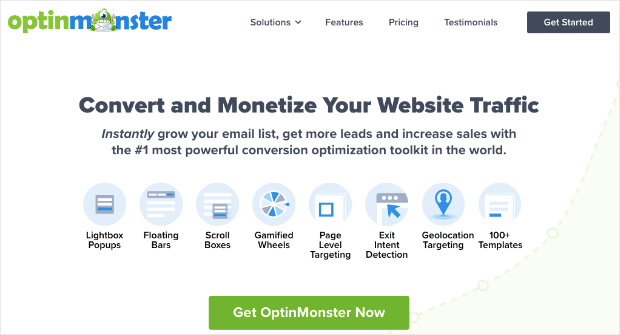
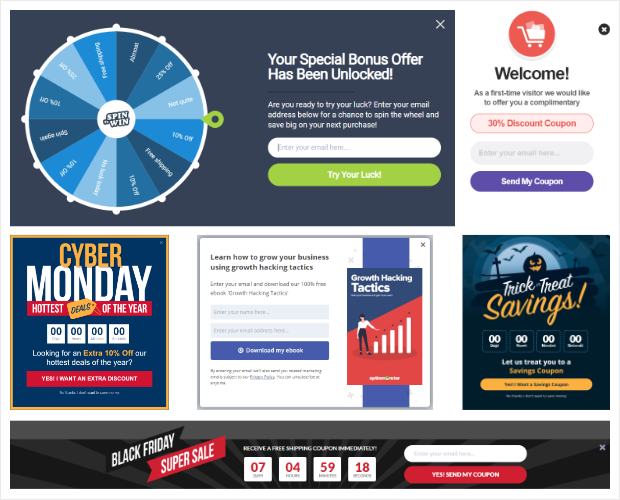
OptinMonster is the #1 conversion optimization tool on the market. It lets you create stunning campaigns like popups, floating bars, slide-ins, gamified wheels, and much more.
It also comes with 50+ beautiful templates that make it easy to create campaigns in minutes.
Plus, OptinMonster comes with a drag and drop builder that’s easy for anyone to use.
It’s beginner-friendly, and at the same time, it gives you access to advanced features at the click of a button.
OptinMonster also has powerful targeting features, so you can show your campaign to the right people, in the right places, and at just the right time in their customer journey.
With OptinMonster campaigns, you can explode your email list, skyrocket conversions, and grow your revenue.
Want to create your own lead generation campaign right away?
If you need proof and examples, check out the tips below to see how OptinMonster can help you kickstart your business before your launch your site.
1. Recover Abandoning Visitors with Exit-Intent® Popups
OptinMonster has a built-in Exit-Intent® trigger to display campaigns before a visitor leaves your site. This gives one more chance to convert them into subscribers before they leave your site for good.
These popups are so powerful that Ryan Robinson increased subscribers by 500% using Exit-Intent® popups.
Even after your website launch, you can continue to use Exit-Intent® campaigns to increase sales and conversions.
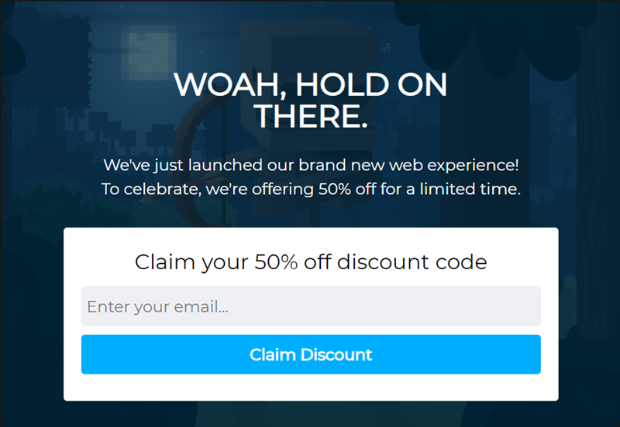
Check out how Shockbyte more than doubled its sales conversion rate with Exit-Intent® Technology. They did that with this simple popup:
Want to add an Exit-Intent® popup to your coming soon page? Learn how to create Exit-Intent® campaigns in OptinMonster.
2. Personalize Campaigns with Referrer Detection
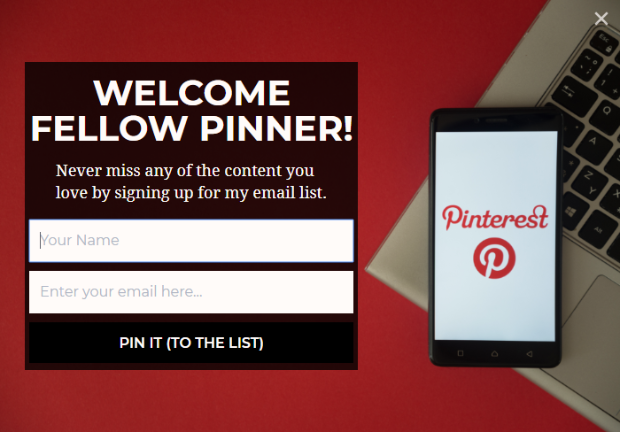
Another excellent feature of OptinMonster is Referrer Detection. It lets you display campaigns depending on where your user is coming from.
If you’re active on Pinterest, for example, and want to direct users to your landing page, you can display a popup that’s personalized just for them.
You can target customers that come to your site through any social media platform, PPC ads, or 3rd-party website.
This lets you continue their shopping journey or marketing experience as they move from one platform to your website.
Learn more about this in our guide to OptinMonster’s Referral Detection for advanced lead targeting.
3. Use Calls to Action to Show Campaigns
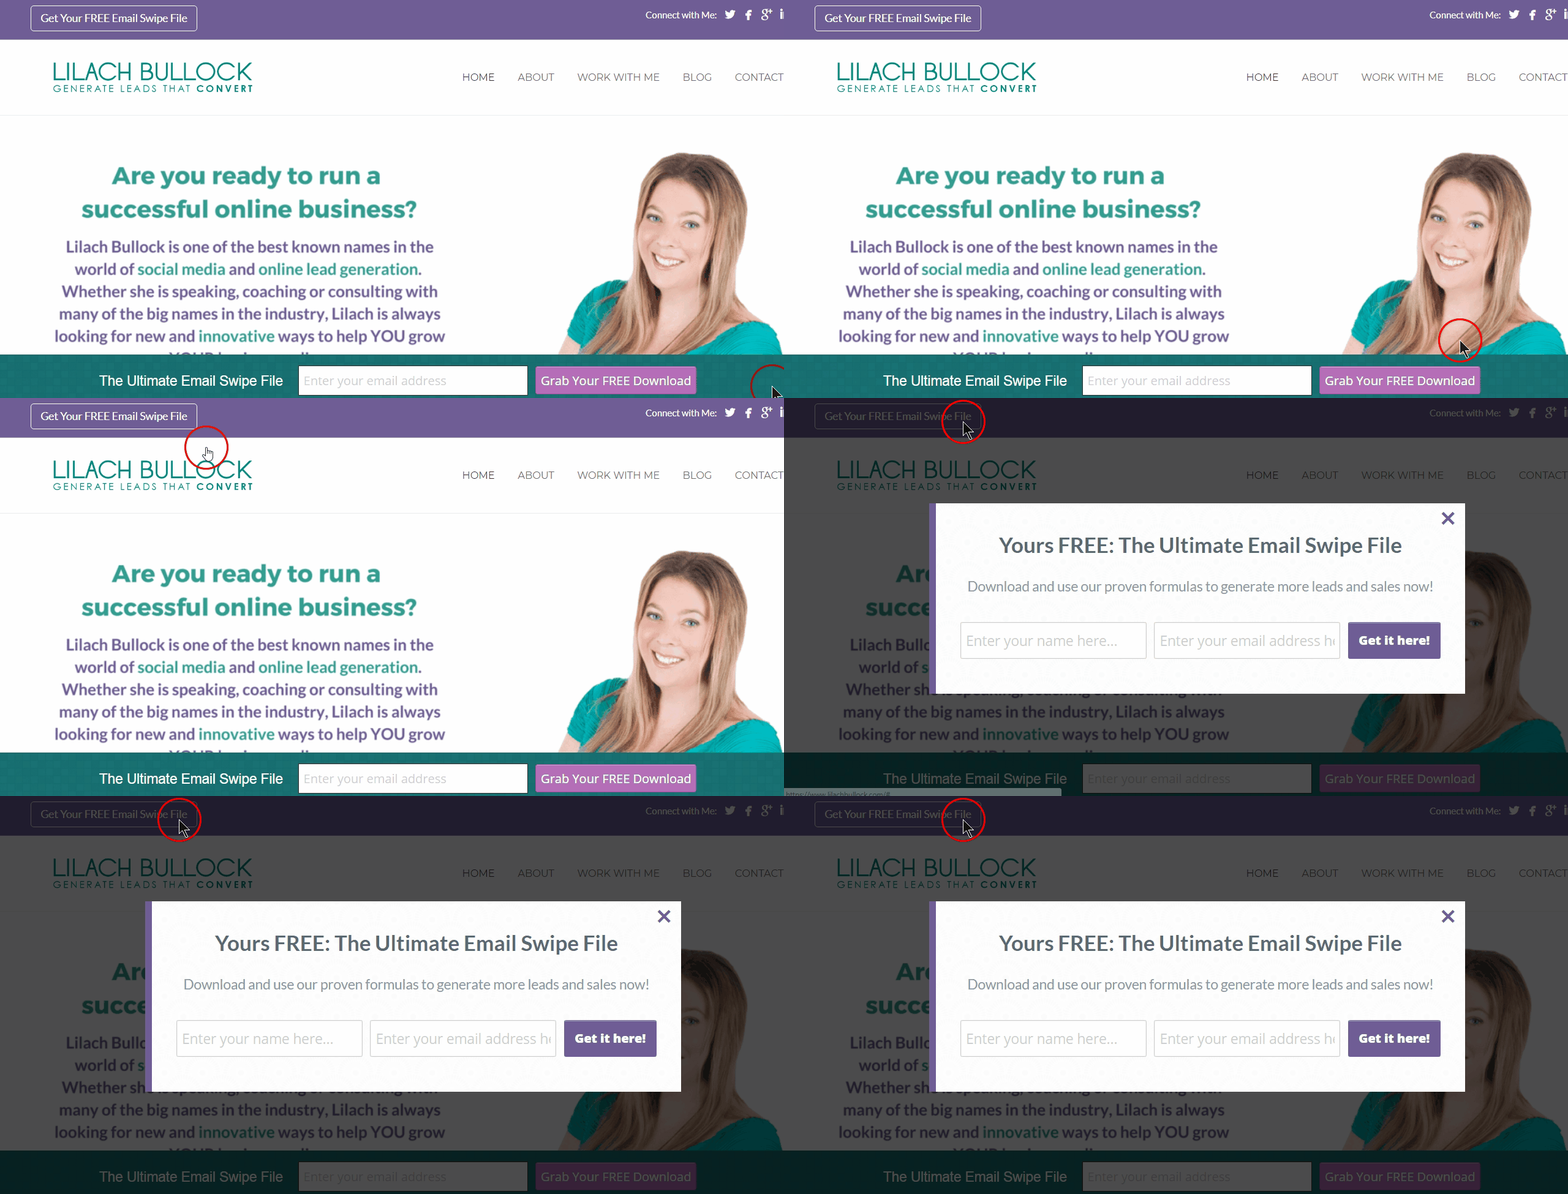
OptinMonster also lets you embed campaigns inside buttons and links. This means when a visitor clicks on a ‘call to action’ on your site, the campaign will appear.
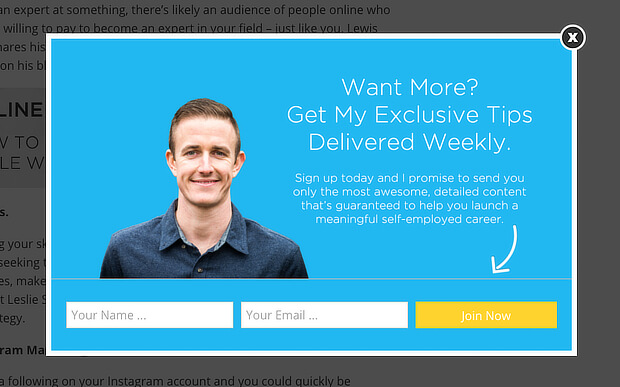
Check out this on-click popup from Lilach Bullock that uses an email swipe file as a lead magnet along with a call to action button that says ‘Get Your FREE Email Swipe File’:
The lead magnet gives users an incentive to sign up. And Lilach Bullock converts 57% of visitors with a combination of OptinMonster campaigns, including this on-click popup.
OptinMonster also lets you embed MonsterLinks™ inside emails, so you can use these campaigns in your email marketing strategy as well.
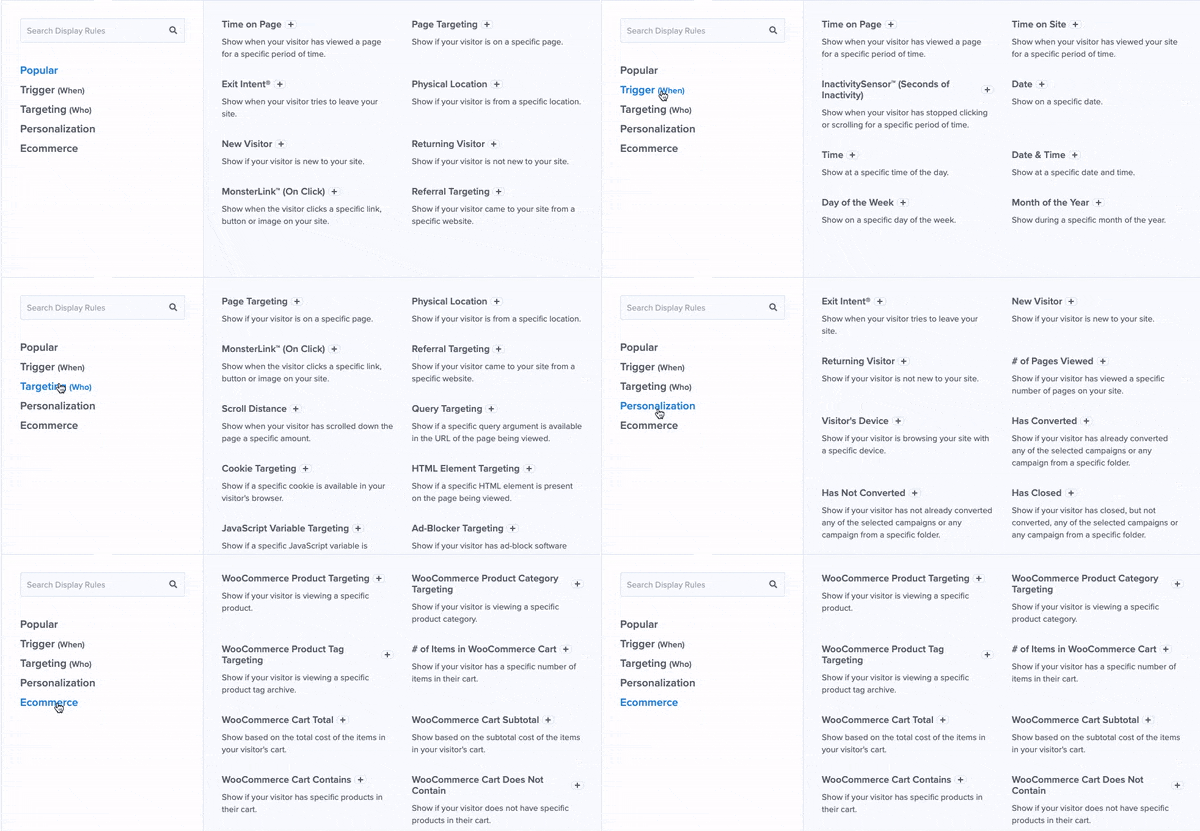
In short, OptinMonster has tons of targeting rules to get more visitors to join your email list. You can target visitors based on:
- Their physical location
- Whether they are new or returning
- Time they’ve spent on the page
- Day or time of the week
- Specific dates and time
- What device they’re using
- How much they’ve scrolled down the page
- Which page they’re viewing
- Whether they have been inactive for a while
With OptinMonster, you can create your own awesome lead generation campaigns to grow your email list before and after you launch your site!
Ready to create your own lead generation campaign?
When you sign up for OptinMonster, you’ll get access to our templates and drag and drop builder to start creating awesome campaigns for your coming soon page.
You can follow our guide to create your first campaign with OptinMonster.
With that, you now have everything you need to create a stunning coming soon page to hide your WordPress site until it’s ready.
And you also know how to add marketing campaigns to your site to give your lead generation efforts a massive boost.
That’s all we have for today. We hope you enjoyed this post.
If you did, you’ll definitely want to go through these resources to get your conversion rates even higher:
- 37 Types of Popups to Use on Your Website (the Ultimate Guide)
- 9 Best WordPress Email Subscription Plugins (Free & Paid)
- How to Easily Create a Landing Page (in Under 5 Minutes)
- The Ultimate Guide to SEO Link Building: Expert Techniques & Tools
These posts are jam-packed with info to help you create an awesome website that’s optimized to draw traffic, conversions, and sales.







Add a Comment