Do you want to follow up with site visitors to improve engagement and conversions?
When you run a marketing campaign, you’ll likely see that some people respond while most of them ignore it.
For those that respond, you need to follow up to keep them engaged. And you also need to try again with the ones that initially ignored the first campaign.
In this tutorial, we’ll show you how to create a profitable follow-up campaign series. This will include the following campaigns:
- Lead magnet campaign to get users to sign up without spending a penny
- Follow-up onsite offer for those who didn’t subscribe
- Follow-up onsite engagement campaign for subscribers
- Follow-up email marketing campaigns for subscribers
Before we get to the tutorial, we want to quickly touch upon why it’s important to run follow-up campaigns.
Why You Need Follow Up Campaigns
Did you know a customer needs to hear an offer 7 times before they take action?
That’s the Marketing Rule of 7 created in the 1930s when movie studios found that they needed to advertise 7 times before a person watched their movie.
This phenomenon works in business marketing as well. And with the overload of promotional offers users see, you may need more than 7.
This is because not all campaigns are equal, and not every user responds the same way.
For people that do subscribe, you need to follow up to keep them engaged. Most business owners rely on email to create follow-up campaigns, but what about showing follow-up offers on your website. You may want to keep subscribers engaged and show better offers for visitors who haven’t subscribed yet.
This is where OptinMonster comes in.
OptinMonster is the #1 lead generation tool on the market. It comes with powerful features like OnSite Retargeting® and OnSite Follow Ups®.
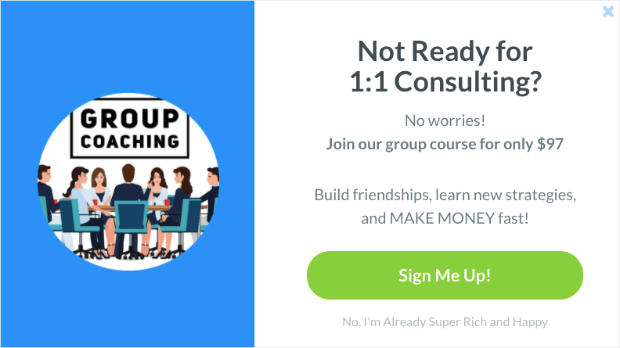
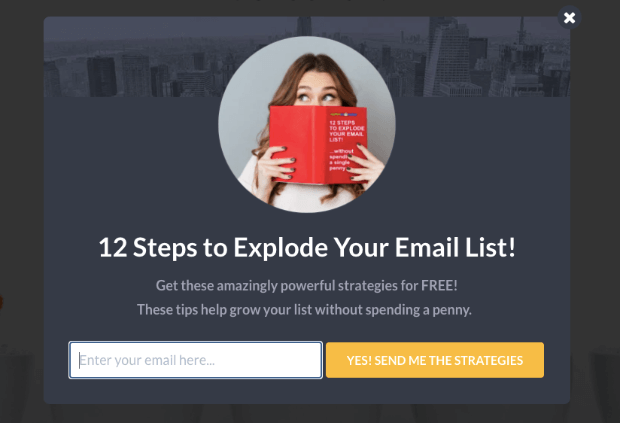
Let’s say, for instance, you showed a visitor this campaign on their first visit to your site:
If they didn’t respond to this, you can display another campaign when they’re just about to leave or even on their next visit:
Retargeting rules let you display different marketing campaigns based on where your user currently is in their customer journey.
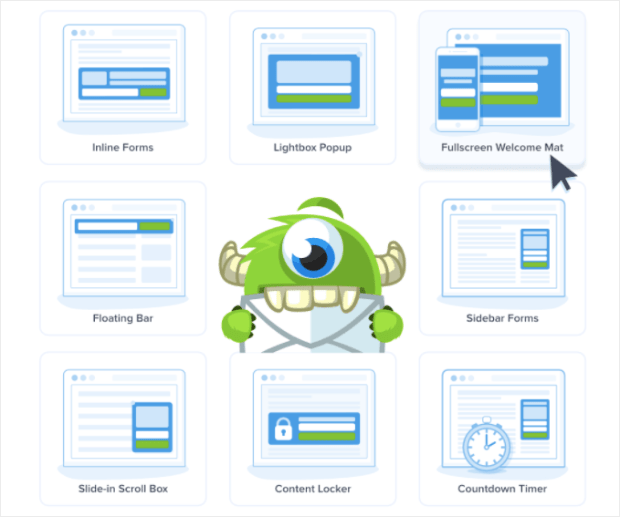
With OptinMonster, you can create 9 different types of campaigns including popups, slide-ins, floating bars, inline forms, and gamified wheels.
OptinMonster comes with 50+ pre-made templates and a drag and drop builder, so you can set up captivating campaigns in minutes. You don’t need any coding knowledge or design skills to use this tool!
OptinMonster comes with powerful targeting and retargeting features. So after you show the user one campaign, you can display follow-up campaigns based on their behavior or actions on your site.
For example, you can show the next campaign based on whether they:
- Did not take any action
- Are an existing newsletter subscriber
- Are a returning visitor
- Have shown interest in specific pages or products
- Have checked out the product/pricing page but didn’t buy
- And more…
These onsite retargeting features are so powerful that DealDoktor increased conversions by over 2100%!
OptinMonster gives you full control over which visitor sees specific marketing campaigns on your site. This means you don’t have to display the same generic offer to every visitor.
Instead, you can take a deep dive into targeting them based on their preferences. This will increase the likelihood of conversions and sales tenfold.
And don’t worry, you won’t need to spend hours researching your audience to figure out what they like. OptinMonster has that covered with built-in targeting options designed to segment your audience and cater to them accordingly.
Ready to create OnSite Follow Up® campaigns?
How to Make a Profitable Follow Up Campaign
There are 2 ways to use follow up campaigns to drive more revenue:
- OptinMonster’s Onsite Follow Up Campaigns
- Email Marketing Follow Ups
Both options work great together and can maximize conversions and revenue.
First, OptinMonster targets website visitors and helps you grow your email list. Once you have them as a subscriber, you can show them different OptinMonster campaigns and connect with them through email campaigns.
In this tutorial, we’ll show you how to set up OnSite Follow Up® campaigns as well as email follow-ups.
Let’s get started.
How To Create an Onsite Follow Up® Campaign
The first thing you’ll need to do is sign up for OptinMonster. To get access to the Onsite Follow Up® feature, you’ll want to subscribe to the Growth plan.
On this plan, you’ll also get access to a ton of cool features like behavior automation, adblock detection, chat integrations, geo-targeting, coupon wheels, and real-time personalization, to name a few!
Once you’re signed up, you can install OptinMonster on your site. There are plugins available for WordPress and apps for platforms like BigCommerce and Shopify.
For all other websites, you can follow our guide to add OptinMonster to any website.
Up next, we’ll show you how to create a follow-up campaign series that includes 3 campaigns:
- Lead magnet campaign – To get users to sign up without spending a penny
- Follow-up offer campaign – For users who did not sign up, we’ll offer a discount as a stronger incentive to subscribe
- Follow-up engagement campaign – For users who subscribed to both campaigns, we’ll offer them a free webinar to keep them engaged
OptinMonster Follow Up Series #1: Lead Magnet
In this section, you’ll learn how to create a stunning lead generation campaign with OptinMonster.
This campaign contains a lead magnet which is basically a freebie to get people to sign up to your list. It costs you nothing but adds value to the user.
Lead magnets can include a free eBook, checklist, cheatsheet, planner, or tutorial.
For more ideas on lead magnets, check out 69 Highly Effective Lead Magnet Ideas to Grow Your Email List.
Step 1: Create a Campaign
In your OptinMonster account, click on the ‘Create New Campaign’ button to get started.
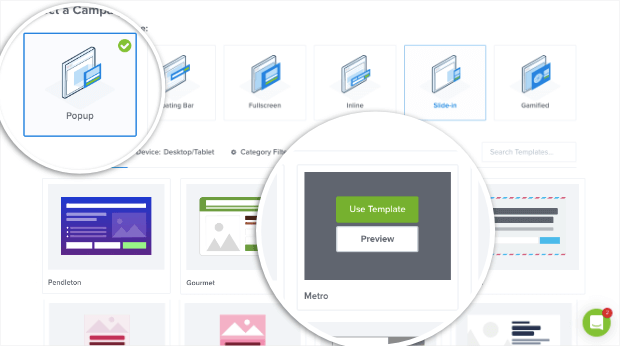
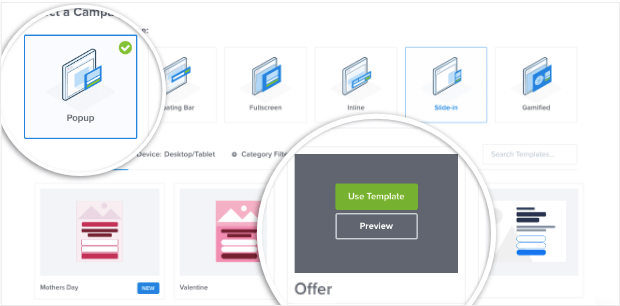
This will open up a page where you can choose a campaign type and template.
Here, you can hover over any template to get the ‘Preview’ option. When you’ve made your selection, hit the ‘Use Template’ button.
For this tutorial, we’ll select the Popup type and the Metro template.
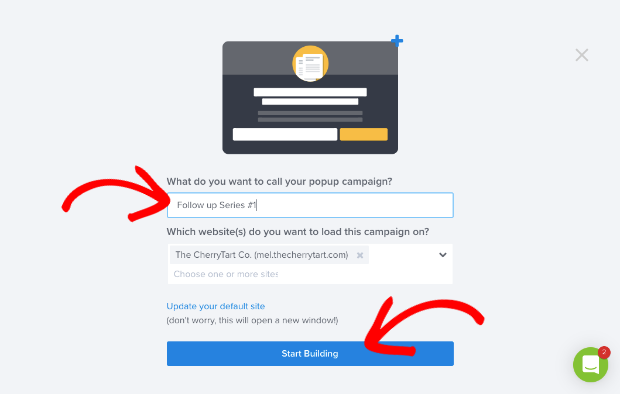
Next, you’ll need to enter a name for your campaign so that you can identify it once you create multiple campaigns.
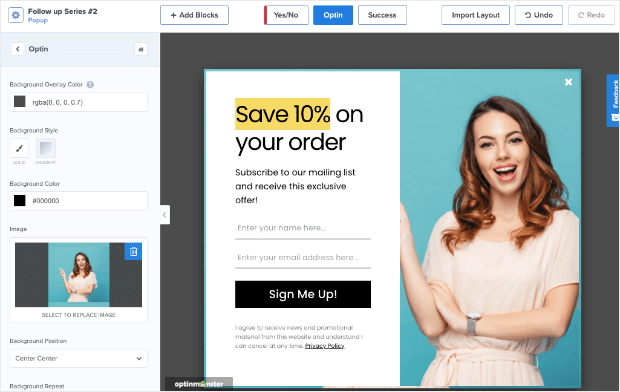
When you hit the ‘Start Building’ button, OptinMonster’s campaign builder will open. Here, you’ll see a preview of your template on the right and options to customize it on the left.
OptinMonster uses a visual builder, so you can select any element here and simply edit it.
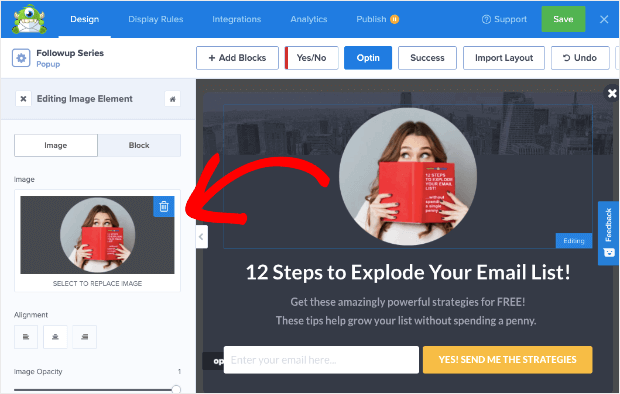
First, select the image and replace it with your own. You can upload an image from your computer or use one that’s already in your OptinMonster media library.
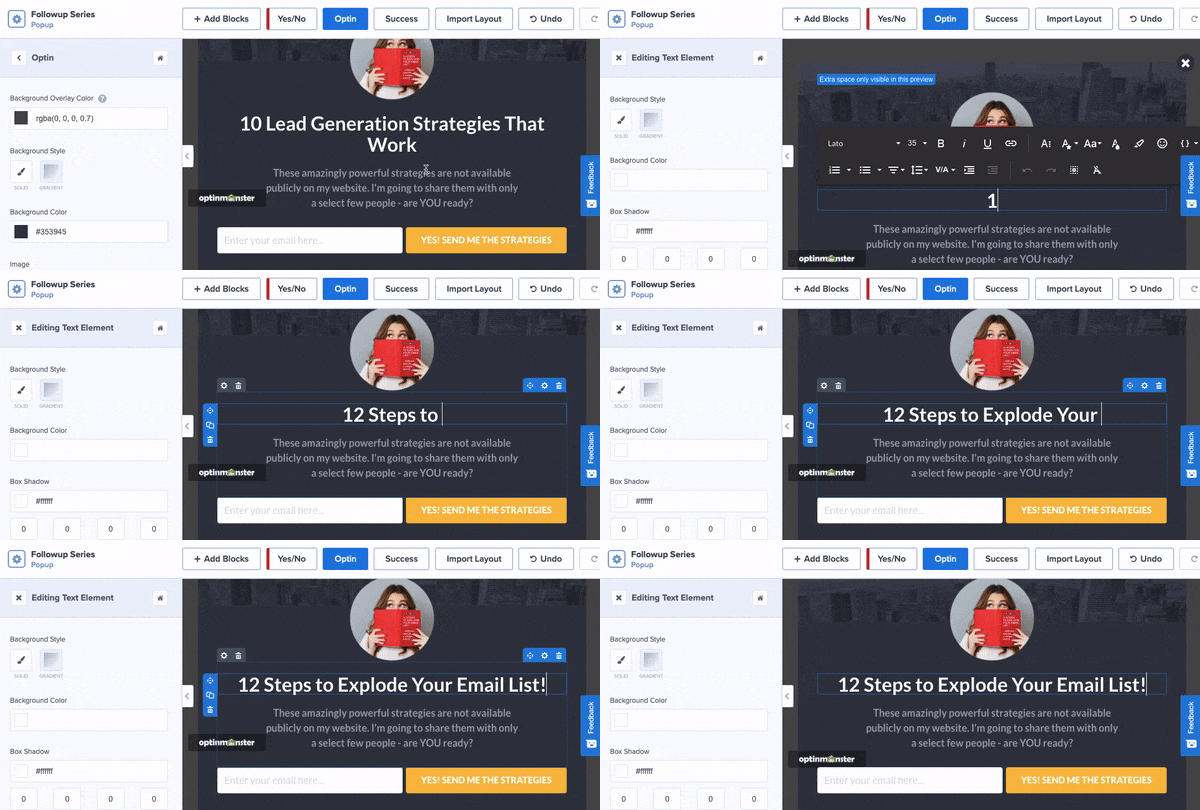
Next, select the text and replace it with your own offer.
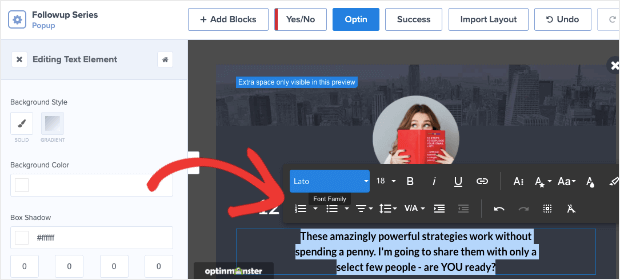
You’ll also see a text editor menu appear that lets you change the font, size, alignment, and more.
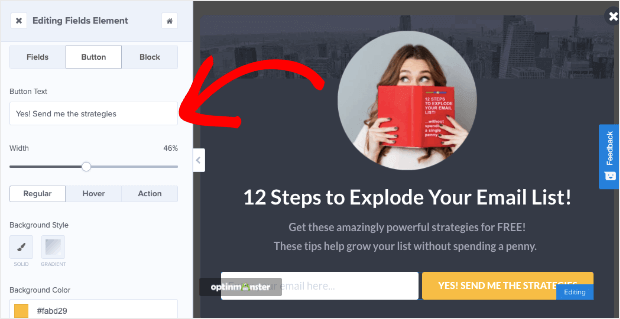
After that, select the button to edit it. You can change the text and color in the settings menu.
And if you want more advanced editing options, scroll down in the left column.
Now your campaign design is ready. Hit the ‘Save’ button at the top to store your customizations.
Next we’re ready to create the ‘Thank You’ or Success message.
Step 2: Create a Success Message
Once a visitor subscribes to the campaign, OptinMonster will display a confirmation or success message.
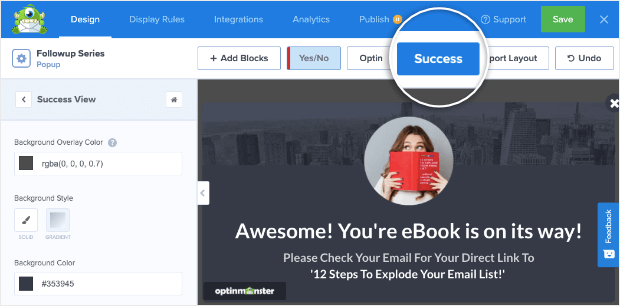
To create this message, switch to the Success tab. You’ll see that the default message matches the template.
You can customize this message the same way you created your campaign.
With that, your campaign design is complete. Now, you can decide where and when it will appear on your site.
Step 3: Set Up Display Rules
To control who sees your popup and where it appears, OptinMonster gives you a ton of display rules.
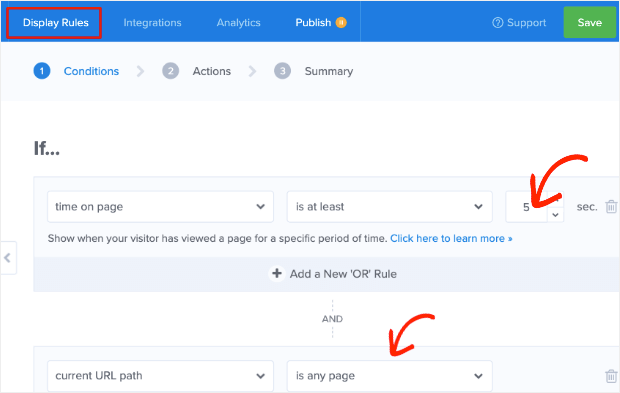
Switch over to the Display Rules tab in your OptinMonster builder.
You’ll see that by default, OptinMonster displays the campaign if a user spends at least 5 seconds on any page.
To change this, open the ‘time on page’ drop down menu.
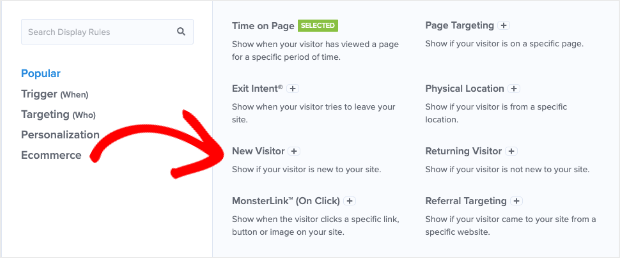
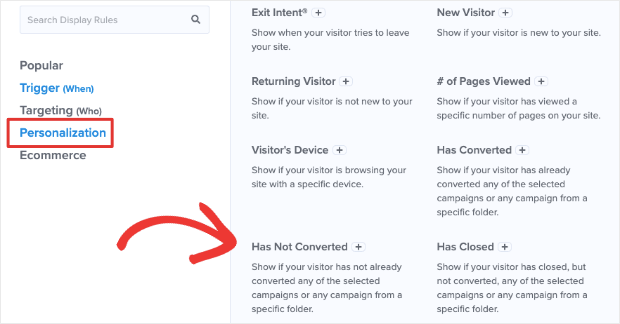
You’ll see display rules categorized into:
- Popular
- Trigger
- Targeting
- Personalization
- eCommerce
This makes it easier to find the rule you want for your campaign.
Since this is the first campaign in the series, we’ll use the ‘New Visitor’ rule.
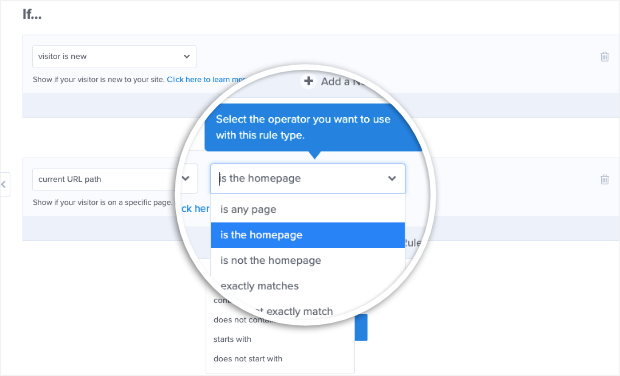
Next, we’ll edit the second default rule that says ‘current URL path’. This targeting rule lets you display the campaign on all pages or specific pages, and you can exclude pages as well.
This allows you to personalize your offers by the content on the page your user is looking at. In the end, this can drastically boost your conversion rates.
To keep things simple for this tutorial, we’ll display this campaign only on the homepage.
Now that your campaign rules are set up, you can connect them to your email service provider (ESP).
Step 4: Integrate with Email Marketing
You can sync your OptinMonster campaign to your email service provider. This will let you send automated emails when a person subscribes, so you can welcome them and start their email marketing journey.
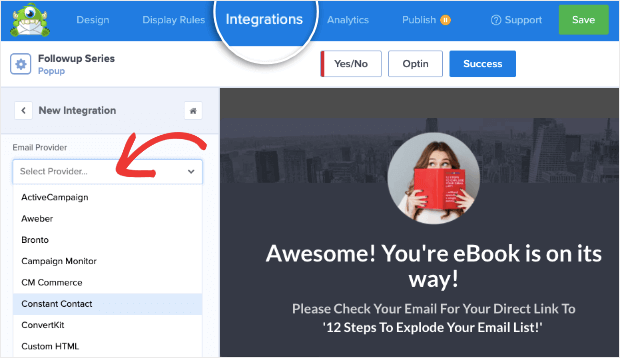
To integrate your campaign with your email provider, open the Integrations tab.
Here, you can add a new integration and select the email service provider you’re using.
Follow the instructions to log into your email provider account.
And that’s it! Your first campaign is connected and ready to be published.
Step 5: Publish Lead Magnet Campaign
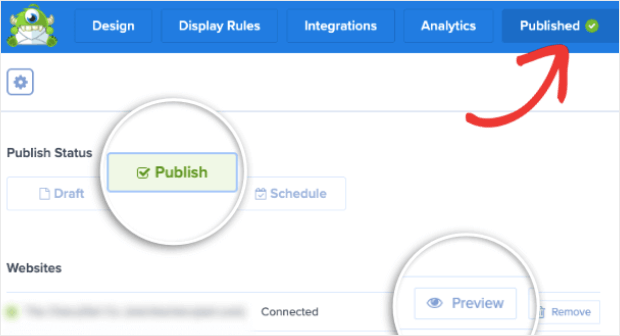
To publish your campaign, open the Publish tab. Here, you can preview a sample of your campaign.
Then, simply set the campaign status to Publish.
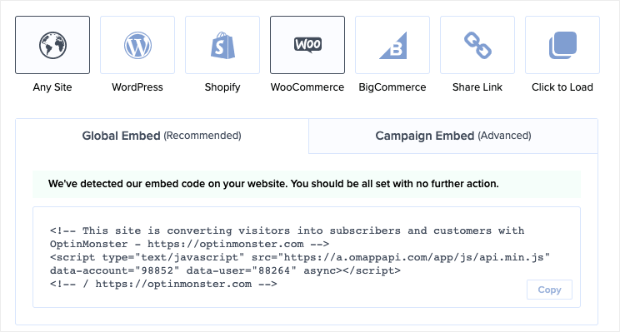
If you haven’t connected your website to OptinMonster yet, you can follow the instructions given on this page.
Global Embed will connect OptinMonster to your site. That way, any campaigns you create will automatically show up on your site when you publish them here.
You can also do a Campaign Embed that will work only for this campaign. No other campaigns will show up on your site.
If you’re using WordPress, there’s one more step you’ll need to take. In your wp-admin area, access the OptinMonster » Campaigns page. Make sure your campaign is set to ‘Published’ here.
After you’ve published your campaign, you can visit your website and you’ll see that it appear according to the rules you created.
Now you can create the follow up campaign to target visitors who don’t subscribe to this campaign.
OptinMonster Follow Up Series #2: Discount Offer
In this section, we’ll create a follow-up campaign to retarget visitors who didn’t subscribe the first time.
Since the offer of a free eBook didn’t interest them, we’ll offer them a discount when they make a purchase.
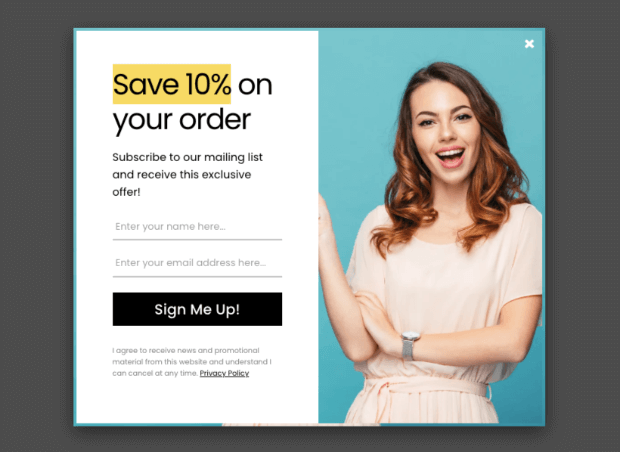
Here’s the campaign we’ll be creating:
Let’s check out how to create a campaign just like that.
Step 1: Create an Offer Campaign
To get started, create a new campaign from the OptinMonster dashboard. This time we’ll create a popup with the Offer template.
When the campaign builder opens, you can customize the campaign the same way you did for campaign #1.
We’re going to change the image and tweak the text to offer a 10% discount to those who sign up for our newsletter.
Don’t forget to create your confirmation message as well under the Success tab.
When your campaign design is ready, you can set the follow-up display rules.
Step 2: Set Up Display Rules
For this campaign, we want to target visitors who didn’t convert when they say Campaign #1.
In the campaign editor, open the ‘Display Rules’ tab and edit the existing default rule.
Open the Personalization tab and select the ‘Has Not Converted’ rule.
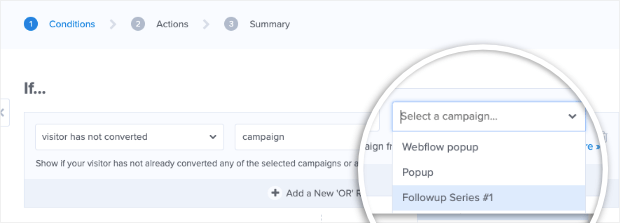
Once selected, you’ll get an option to select the campaign that’s not converted.
The campaign we created in the first section is ‘Followup Series #1’, so we’ll select that.
Next, using the + AND button, you can add more targeting rules.
We want to offer the 10% discount only to shoppers who didn’t take us up on our first offer but are showing interest in our products.
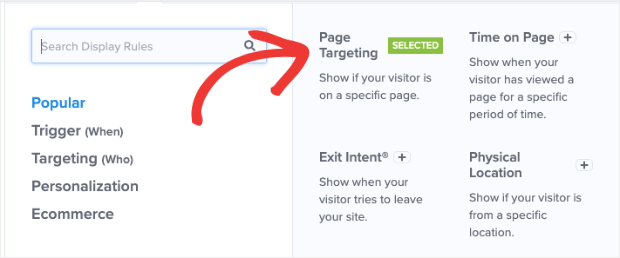
To do this, hit the + AND button and then select the Page Targeting rule.
Then in the next dropdown menu, select ‘contains’, and in the third field option, type in ‘product’.
This means the popup will show up on every page that has the word ‘product’ in the URL.
With that, visitors who did not convert with Campaign #1 and are viewing a product will see the 10% discount popup.
Like this, you can link the campaign to your pricing page or any other page you like. You can also exclude pages where you don’t want the popup to appear.
Using the ‘+ AND‘ button, you can add more rules to narrow down your target audience and display different campaigns to them.
Now that your display rules are set up, you can integrate this campaign with your email service provider using the same steps in Campaign #1.
When you’re done with that, you’re ready to publish your discount popup.
Don’t forget to integrate your campaign with your email provider, if necessary.
Step 3: Publish Discount Offer Campaign
To make your campaign live, switch over to the Publish tab and set the status to ‘Publish’.
Now both your campaigns will be active on your site.
Let’s create the final campaign in our Follow Up Series to target visitors who HAVE converted from one of the first 2 campaigns.
OptinMonster Follow Up Series #3: Webinar Engagement
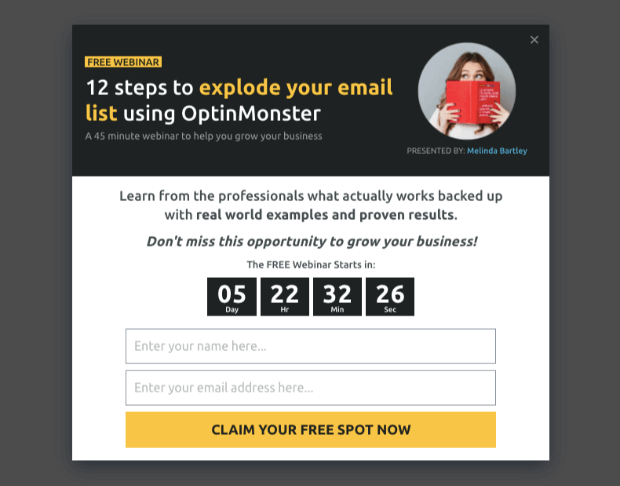
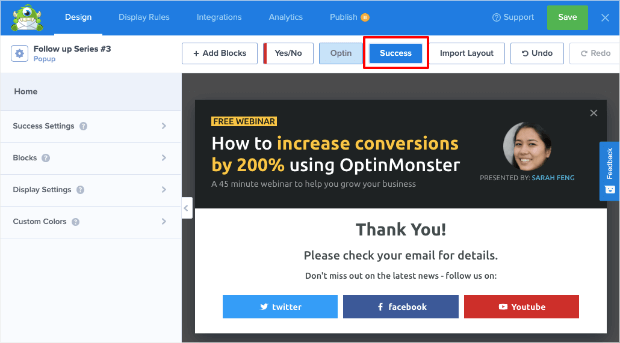
For the third campaign, we want to keep subscribers engaged on our site. For this, we’ll offer them limited-time access to our webinar for free by creating the following campaign:
Step 1: Create an Event Campaign
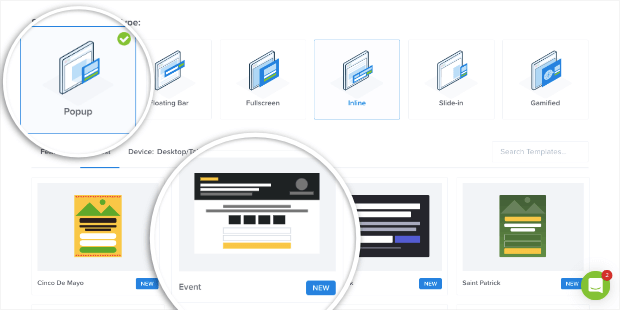
To get started, create a new campaign from the OptinMonster dashboard. This time, we’ll select a Fullscreen mat to grab their full attention.
Next, select the Event template because it’s already set up to offer a webinar.
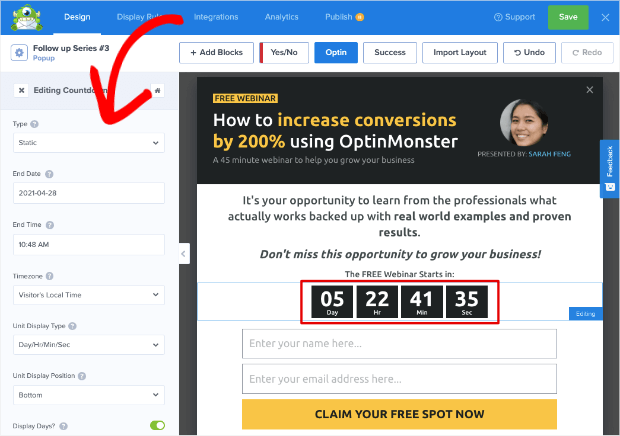
Once the campaign builder opens, you can customize the images, text, and buttons. Then, select the countdown timer and set the date and time for when you’ve scheduled your webinar to start.
Don’t forget to create your confirmation message under the Success tab.
When your campaign design is ready, save it to store your changes.
Step 2: Set Follow Up Display Rules
We want to display this campaign to every visitor who has subscribed to either Campaign #1 or Campaign #2.
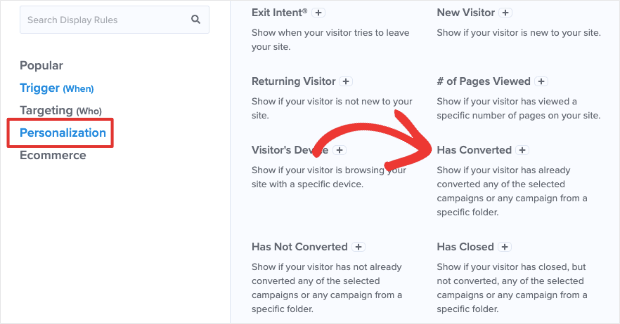
To create this rule, head over to the Display Rules tab. Here, edit the default rule and open the Personalization tab.
Now, choose the Has Converted rule.
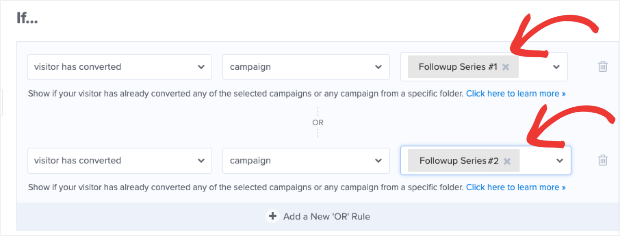
Then, we’ll select the ‘Follow Up Series #1’ campaign that we first created.
Next, we also want to display this offer to those who converted from the second campaign.
For that, you need to click on Add a new ‘OR’ rule.
Then select the Has Converted rule again and choose the ‘Follow Up Series #2’ campaign.
With these two rules in place, the new webinar campaign will appear to a user if they subscribe to either campaign #1 or #2.
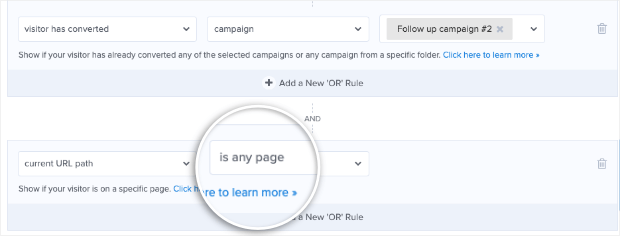
In this instance, we wouldn’t use the + AND rule.
If you add the AND rule here, the visitor would need to subscribe to both campaigns. And that’s not possible since we show the second campaign only if they haven’t converted from the first one.
It’s a small difference between the ‘OR’ and ‘AND’ rules which can have a BIG impact on the success of your campaign series.
OR rules will take either condition into account, while AND rules mean both conditions need to be met.
For this campaign, we’ll leave the default page targeting rule as is. That means the viewer’s current URL path will be set to any page.
The campaign will now appear to all converted visitors no matter which page they’re viewing.
Step 3: Configure Display Settings
OptinMonster lets you control when this campaign will appear again to visitors. So if they have converted, you can make sure it never appears to them again. And if they closed the campaign, you can show it after a few days or on their next visit to the site.
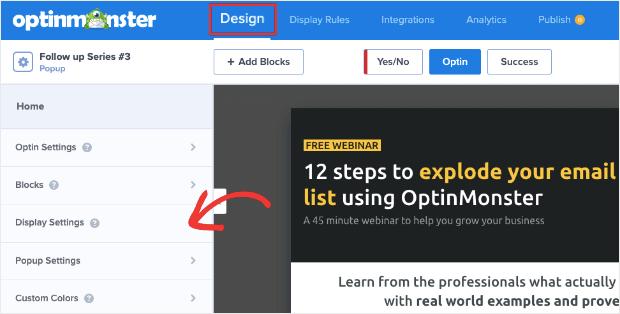
To configure these settings, go to the Design tab. From the Home menu, select the Display Settings tab.
Now, you’ll see options to show the campaign again.
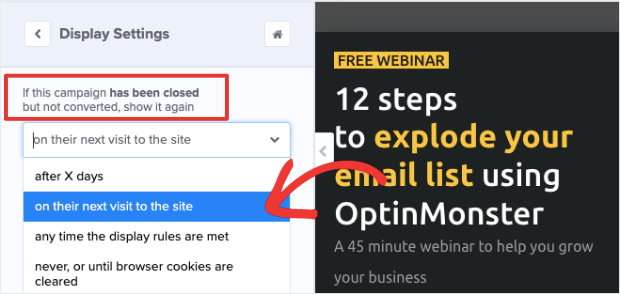
First, you can decide when the campaign reappears if it has been closed but not converted.
You can choose to show it:
- After X number of days
- On their next visit
- Any time the display rules are met
- Never or until browser cookies are cleared
For this campaign, we’ll choose to show it on their next visit to the site.
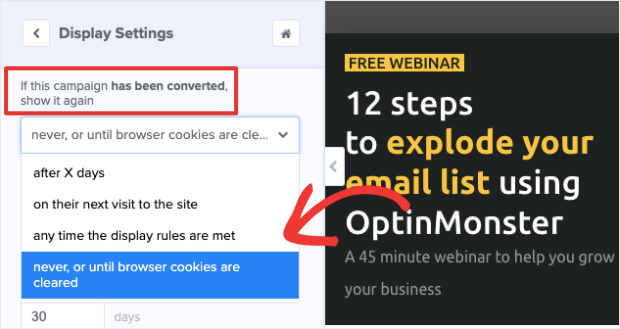
After this, OptinMonster lets you display campaigns again to subscribers even if they have converted. We don’t want that since this is a one-time offer.
So from the drop-down menu, we’ll select ‘never or till browser cookies are cleared‘.
With these 2 settings in place, OptinMonster will make sure that visitors who convert don’t see this campaign again. And those who close it and don’t convert, will see it when they revisit your site.
You can also integrate the campaign with your email service provider like you did for Campaign #1 and #2.
Once you’re done, it’s time to publish your webinar fullscreen campaign.
Step 4: Publish Event Campaign
To make the campaign live, under the Publish tab, you can preview your campaign and then set the status to ‘Publish’.
With that, all three campaigns are now active on your site. You’ve learned how to set up a lead generation series with follow up campaigns that include:
- Lead magnet campaign
- Followup offer campaign for non-subscribers
- Engagement campaign for subscribers
Ready to try it for yourself?
Using OptinMonster’s display rules and settings, you can create all sorts of lead generation series and follow-up campaigns.
Check out 12 Ways to Use OptinMonster Follow Ups to Boost Engagement and Sales.
Once you’ve set up awesome lead generation campaigns with OnSite Follow Ups®, you need to be ready to send emails once they subscribe.
We’ll show you the best way to do that next.
How to Send Follow Up Marketing Emails
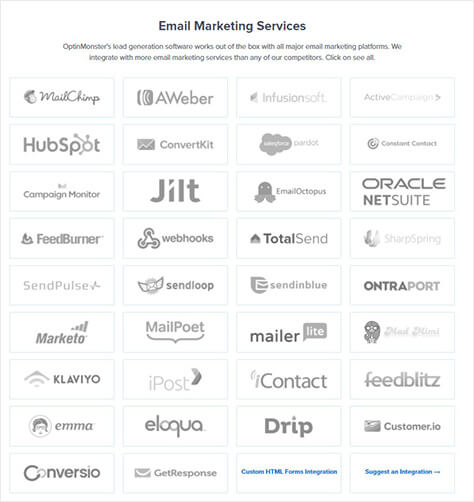
OptinMonster integrates seamlessly with popular email marketing services including Constant Contact, MailChimp, Aweber, and 30+ more.
From the popular email services, our go-to favorite is Constant Contact.
Constant Contact has a high deliverability rate so you can make sure your marketing emails reach subscribers.
With Constant Contact, you can easily set up an automated email series. So as soon as a person subscribes to an OptinMonster campaign, you can trigger a series of emails that will be sent to them according to your schedule.
For instance, you can set up an email series that contains:
- Welcome email with coupon, eBook download link, or the offer you promised in the OptinMonster campaign
- Introductory messages to let them know more about you and your brand
- Engagement offers to get them to come back to your site
- Helpful blog articles to establish a stronger relationship with them
Plus, you can follow up with subscribers that opened your email. That way, you can send them different emails to keep them engaged.
You can also automatically resend emails to those who didn’t open them. This lets you rewrite your subject line and send it again. It also increases your chances of higher open rates.
If you need inspiration for writing follow-up emails, check out these 7 killer sales follow-up emails.
With that, you have everything you need to follow up with visitors, subscribers, and customers. We hope you found this tutorial helpful.
If you want to learn more about retargeting and how it can help you drive sales and conversions, check out:
- How to Use Onsite Behavioral Retargeting to Boost Your Bottom Line
- How to Use Onsite Retargeting to Boost Conversions
- Retargeting Best Practices + What It Is and Why You Need It
These posts will show you the best way to use retargeting and follow-up campaigns to grow your business.












Add a Comment