Do you want to learn how to create a Facebook landing page to drive more conversions from your social posts or paid ads?
Facebook is one of the most popular resources for any new marketer or business owner. It allows you to quickly expand your network and gives you direct access to potential leads.
Plus, Facebook has become one of the best paid advertising platforms at your disposal.
And while you can send Facebook traffic to a generic page on your site, wouldn’t it be even better to create a landing page that gets you even higher conversions?
That’s exactly what we’ll be showing you how to do today. Because, in this post, we’re going to teach you step-by-step how to build a Facebook landing page.
Then we’ll teach you 3 ways to optimize that page to get more leads and drive more revenue.
But first, let’s clarify why you should take the time to create a landing page for your Facebook traffic.
Why You Need a Facebook Landing Page
In the past, we’ve written extensively about the importance of creating high-converting landing pages to grow your business.
That’s because the right landing page allows you to highlight specific aspects of your products or offers to make them as enticing as possible.
It’s also a great place to boost your brand’s credibility by showing off reviews, testimonials, and other forms of social proof.
And while there are many benefits to creating a landing page for your Facebook traffic, here are the top 3 reasons you should:
1) Personalize Messaging for Higher Conversions
One of the best ways to get higher conversions is by personalizing your messaging.
You can sync your Facebook landing page with the language in your organic post or your paid ads. This is helpful because it’s the same language that brought users to the page in the first place.
It also lets visitors instantly know they’re in the right place once they’ve landed on the new page.
As a result, you’ll see higher conversions from your personalized messaging.
2) Capture Leads Who Aren’t Ready to Buy
While landing pages should be designed with 1 call to action (CTA) in mind, you can always have a backup to capture your visitors’ email addresses.
Using a tool like OptinMonster, you can create new campaigns to capture contact information from leads who aren’t ready to buy. But more on that later…
3) Build Trust in Your Brand
Finally, we already mentioned that landing pages are a great place to showcase all of your social proof.
This can be in the form of brands you’ve worked with, popular testimonials, high-profile quotes or reviews, social proof notifications, and more.
This helps new visitors trust your brand and take you up on your CTA.
For more information on the value of landing pages, check out this post: The Anatomy of the Perfect Optin Landing Page (Tips & Best Practices).
With those benefits in mind, let’s dive into our tutorial on how to create a Facebook landing page.
How to Create a Facebook Landing Page
In today’s tutorial, we’ll be using SeedProd:
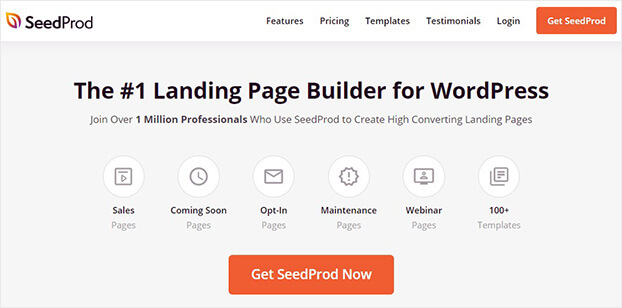
SeedProd is the #1 landing page builder plugin for WordPress. It allows you to create all kinds of landing pages, include:
- Sales
- Pre-sales
- Coming soon
- Optin
- Maintenance
- Webinar
- And more…
But the best part about SeedProd is how easy it is to use. That’s because this plugin comes with tons of pre-built templates for any kind of landing page you want.
From there, you can modify your page using SeedProd’s inline text editor or drag and drop builder.
This allows anyone to quickly personalize their Facebook landing page to match their brand’s voice, style, and messaging–even if they don’t have any coding skills or technical experience.
Ready to give it a try? Sign up for your 100% risk-free SeedProd account today!
Or you can follow these instructions to get started with SeedProd totally FREE.
Let’s dive into the tutorial.
Step 1: Download and Install the Plugin
The first thing you need to do is download and install the SeedProd plugin.
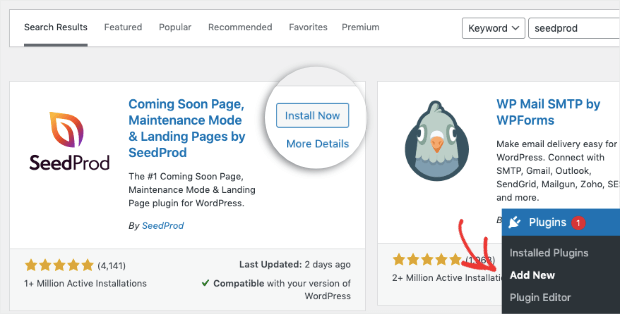
Go to your WordPress admin dashboard and click Plugins » Add New. Then type “SeedProd” in the search bar to find the plugin.
When you find it, click Install Now:
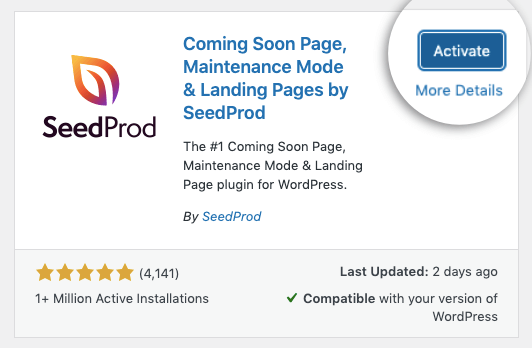
Then click Activate (this will be in the same position the Install Now button was just on):
Once the SeedProd plugin is installed on your WordPress site, you’ll be taken to an introductory page.
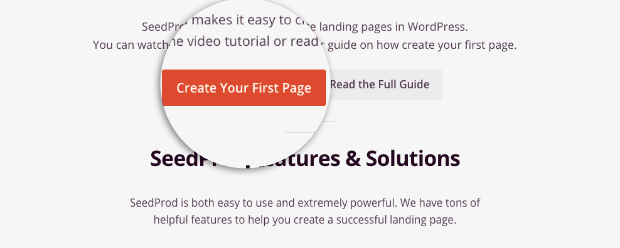
Again, the best part about SeedProd is you can get started totally free. All you need to do is scroll down and click Create Your First Page:
Then you’ll be ready to design your Facebook landing page.
Step 2) Select Your Template
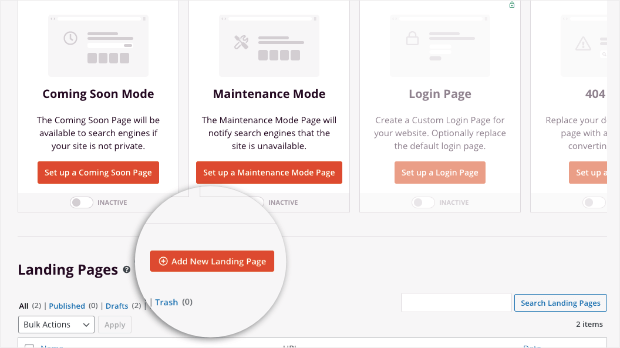
On the SeedProd dashboard, scroll down and click Add New Landing Page:
Since we’re using the free version of the plugin for this tutorial, your landing page templates will be limited.
For full access to SeedProd’s template library, you’ll need one of their paid plans.
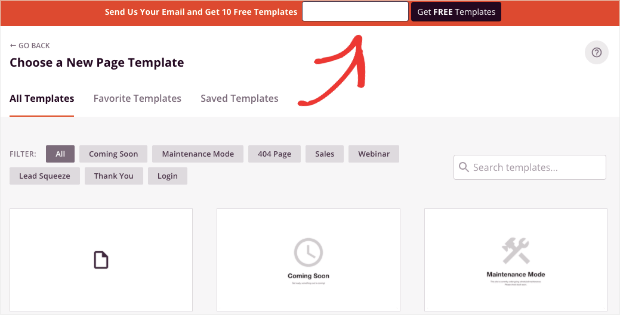
But there’s another way to get started. By simply adding your email address to the template page, you can unlock 10 landing page templates:
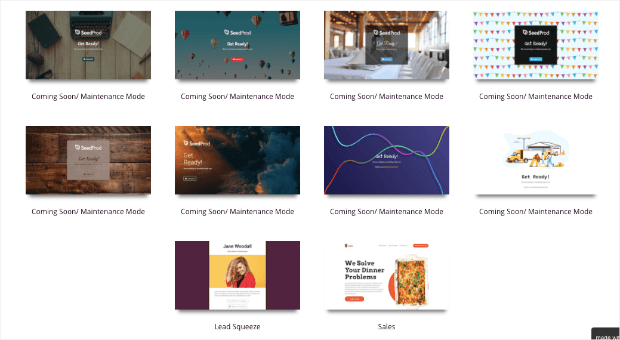
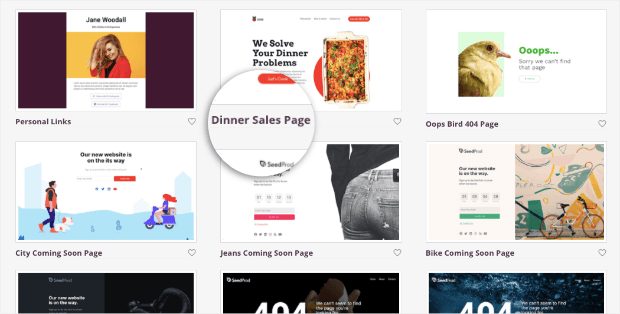
Now you have access to the following 10 templates:
For this tutorial, we’ll select the Dinner Sales template:
Note: The image above shows other premium version templates that are available with the paid plan. Though this tutorial uses one of the free options, we highly recommend upgrading to unlock even more template options.
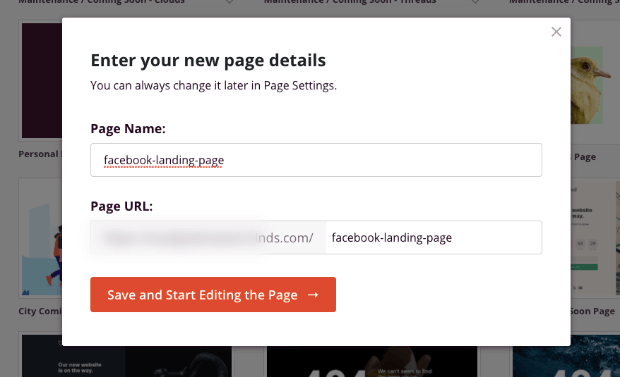
Now you’ll simply need to give your landing page a name, which will generate a URL:
And you’ll be ready to customize your landing page.
Step 3) Design Your Facebook Landing Page
At this point, you’ve selected your template, and you’re ready to design your page.
This step of the tutorial will change for each reader depending on the goal they want to accomplish. But for all users, modifying your SeedProd page couldn’t be easier.
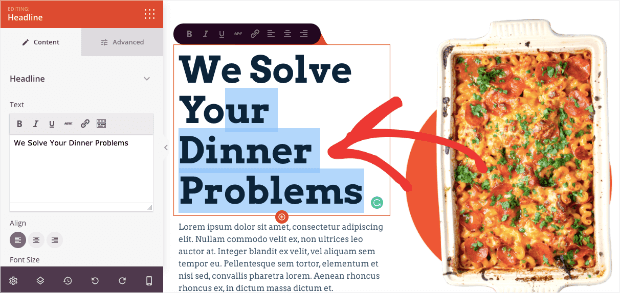
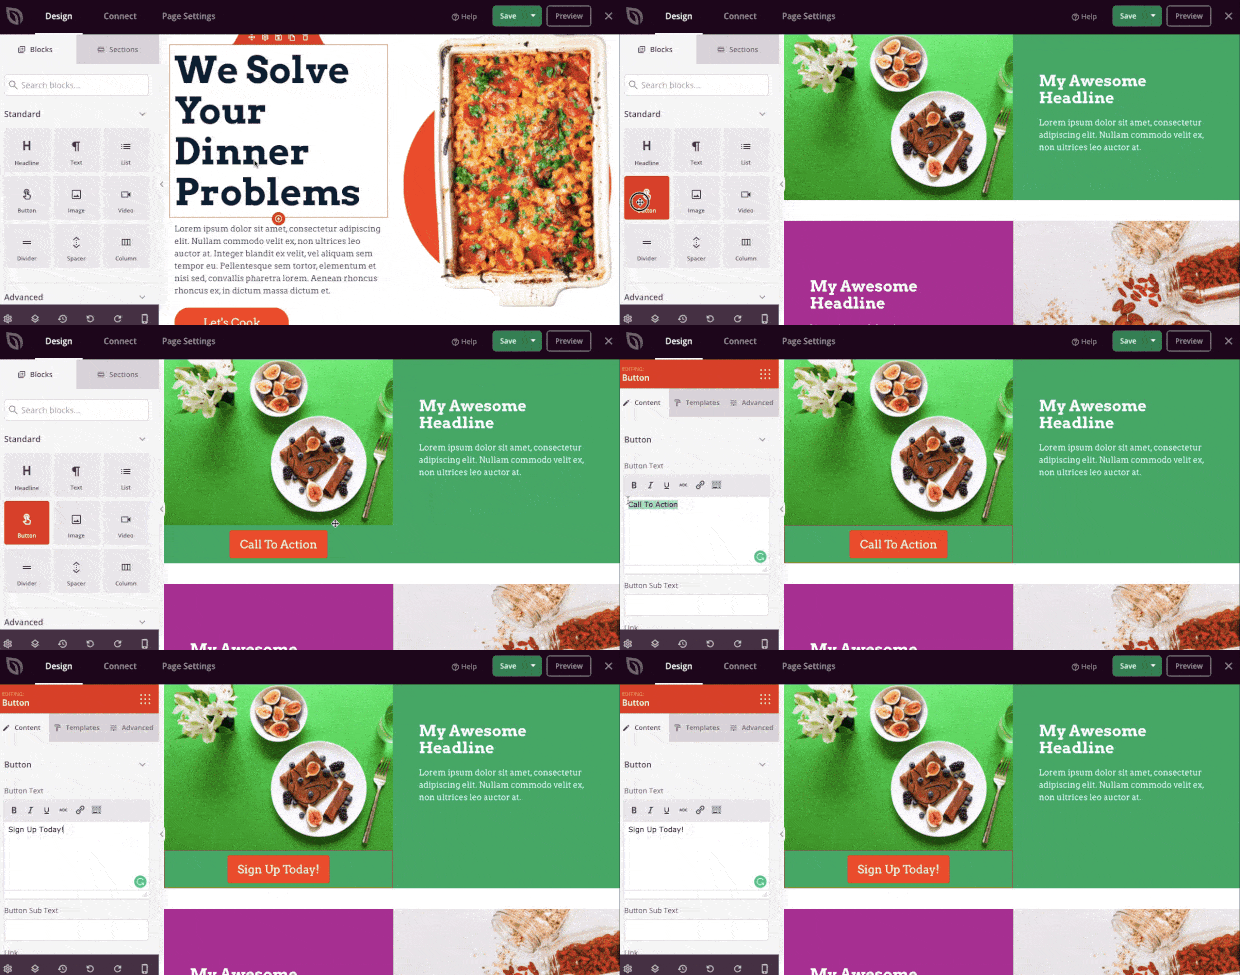
To start, you can modify all the text directly in the SeedProd editor:
This gives you full control over your landing page’s messaging.
That means you can personalize your headline to match your Facebook ad copy or the language you used in your organic post to drive traffic to the page.
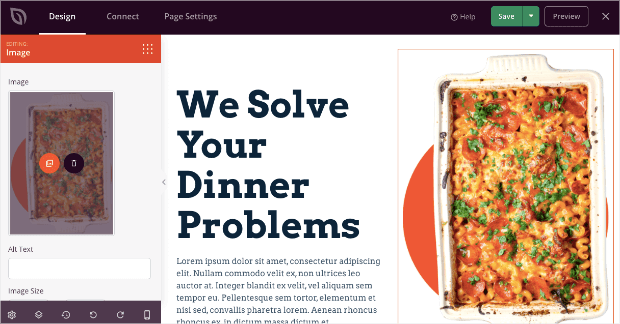
And images are just as easy to modify, too. Simply click on the image you want to change and select or upload a new image from the media library on the left-hand side menu:
Finally, you can add new features in the form of drag and droppable blocks:
These drag and droppable elements allow you to quickly add new features to your Facebook landing page, such as:
- Headings
- Images
- Videos
- Columns (to structure the page’s layout)
- Call to action (CTA) buttons
- Spacers
- Dividers
And so much more.
With SeedProd, literally anyone can build professional landing pages in a matter of minutes. Plus, when you upgrade to a higher plan, you unlock even more elements like:
- Countdown timers
- Social profiles
- Social sharing
- Progress bars
- Icons
- Testimonials
- And more…
But now that you know how to create a basic Facebook landing page, let’s kick things up a notch by looking at 3 concrete ways you can optimize your landing page for even higher conversions.
Optimize Your Facebook Landing Page
1) Create an Exit-Intent Popup
Earlier in this article, we mentioned that you might have people visiting your landing page who aren’t ready to buy.
And since people who leave your site tend to never come back, it’s important to capture their email address so you can nurture the relationship.
For that, there’s no better tool than an exit-intent popup with OptinMonster:
OptinMonster is a premium WordPress plugin that converts visitors into leads. With this tool, anyone can create an exit-intent popup in a matter of minutes.
This is important because your popup will be triggered by people actively leaving your Facebook landing page.
This gives you one last chance to grab your user’s attention and capture their email address.
And since OptinMonster syncs with popular email service providers like Constant Contact, Brevo (formerly Sendinblue), Drip, and more, all of your new leads can go into your automated email series.
Then you can nurture your new leads into paying customers (even though they didn’t buy directly from your Facebook landing page).
In the end, this leads to higher conversions from your landing page and more sales for you!
Want to learn how exit-intent popups work? Start by reading this post: 40 Exit Popup Hacks to Boost Subscribers and Revenue.
Otherwise, click below to get started with your 100% risk-free OptinMonster account today:
2) Add Social Proof Notifications
Another aspect of making any landing page great is using social proof. And while SeedProd has tons of ways to add testimonials and reviews to your site, there’s another option that’s a bit more dynamic:
Social proof notifications.
You’ve probably seen these before. They look something like this:
These small messages track real-time sales across your site. So when someone converts from your landing page, you’ll be able to display a notification to let other people know about it.
This creates a sense of FOMO (“fear of missing out”), one of the largest motivators for online consumers.
And the best tool to make these notifications is TrustPulse:
TrustPulse is the best social proof plugin for WordPress. It lets you create all types of social proof notifications in a matter of minutes.
And the best part is that you don’t need any coding skills or technical experience to design high-converting social proof messages.
In fact, all of your notifications can be designed with drop-down menu options, simple text field inputs, or selecting colors from a color wheel.
This allows you to create notifications that match your brand’s voice, style, and message as you optimize your Facebook landing page.
But the big question is, “Do they work?”
In short, YES! TrustPulse users have seen an instant boost in sales by up to 15% from these small notifications.
Ready to see for yourself? Try out TrustPulse today!
3) Track Everything to Make Improvements
Our last recommendation is great for your Facebook landing page but even better for your entire site.
We’re big believers in using data to optimize your marketing efforts. And to get that data, you need a powerful analytics plugin like MonsterInsights:
MonsterInsights is hands down the best Google Analytics plugin for WordPress. It delivers all the data you need to learn about your audience and what kinds of content they respond to.
Plus, all the data is conveniently in your WordPress dashboard and in an easily digestible format.
How does this help improve your Facebook landing page?
With MonsterInsights, you can get detailed information about how users are interacting with your landing page. That includes things like:
- Bounce rate
- Time on page
- Conversions
These metrics allow you to track and measure any changes you make to your landing page.
Over time, this data will guide you toward a stronger landing page that gets you more leads and sales.
Check out MonsterInsights today!
And that’s it! This has been your in-depth guide on how to create (and optimize) a Facebook landing page.
We hope you found this tutorial helpful. If you did, you might enjoy the following resources:
- How to Optimize Facebook Ads to Skyrocket Results
- How to Greet Visitors from Facebook With a Popup
- Create a Custom “Like Us on Facebook” Popup to Get More Fans
These articles will have everything you need to create a better Facebook marketing strategy. Plus, these tips will also give you more ideas on how to improve your Facebook landing page.




Add a Comment