Do you want to add a modal popup form to your WordPress site easily?
Modal popups are the best solution if you want visitors to engage with the popup before getting back to their original browser.
In this article, we’ll show you the best way to create a modal popup form in WordPress that will increase engagement and conversions.
Should You Use a Modal Popup Form?
Popups help draw the attention of a visitor to prompt them to take action on your site. This could be creating an account, signing up for email alerts, purchasing a product, and other such actions.
Usually, popups have a close button or an ‘X’ icon that gives the visitor an option to exit the popup without taking any action.
However, sometimes you may want the user to interact with the popup, and only then let them exit the popup and proceed. This is where modal popup forms come in.
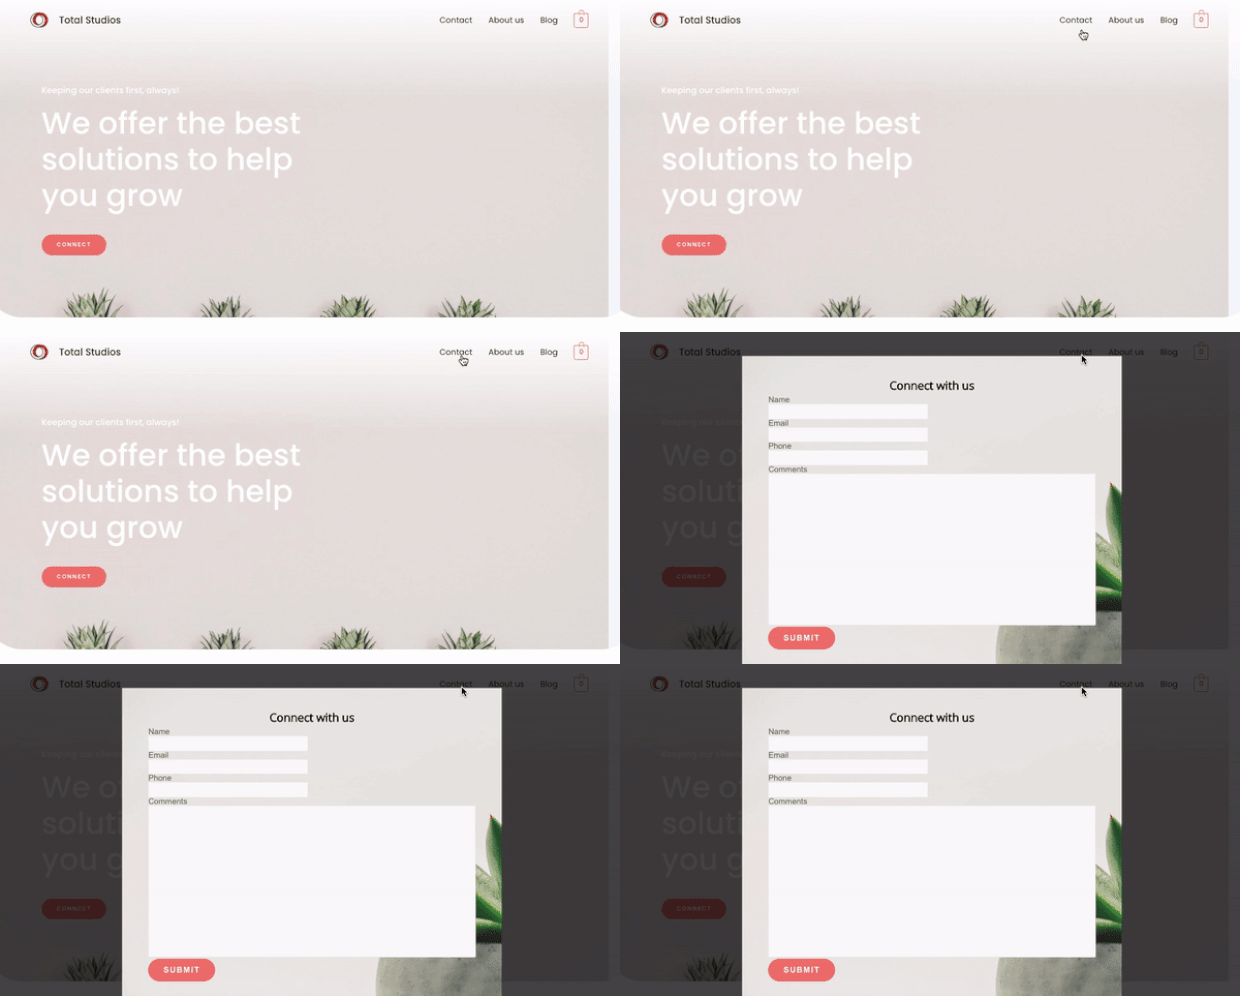
With a modal popup, you can show stunning offers as the background fades out in order to grab your visitors’ attention. The visitor will need to enter details after which the popup will close and they can get back to what they were doing.
Some of the things you can use the modal popup form for include:
- Subscriptions – Collect email addresses to grow your email list.
- Feedback and surveys – Gather feedback from your visitors to improve your user experience, product, or service.
- Requests and complaints – Get details of what the customer needs or any complaints they need to be resolved.
- Contact info – Collect details of your visitors so you can contact them later.
The possibilities are plenty but since the modal popup form can’t be closed without action from the visitor, it needs to be used at the right place and at the right time in order to be successful in serving its purpose.
Today, we’re going to show you how to create a well-designed and well-placed modal popup form that can help increase conversions and sales at incredible rates.
For the sake of this tutorial, let’s create a Gravity Forms popup that displays when someone clicks on a button or a link.
Creating a Modal Popup Form
There are many ways to create a modal popup form, but we’re covering the easiest way to get it done. To get started, you’ll need to install and activate two WordPress plugins:
Gravity Forms is one of the best WordPress form builders that you let you create all sorts of forms for your site. It has an easy drag and drop builder to design the form. You can also preview and test the form as you create it.
We’ll use this plugin to first create the form. If you’re using another form maker like WPForms, you can use that too.
OptinMonster is hands down the best popup maker and lead generation tool. It lets you capture more leads and increase conversions through stunning modal popups, lightbox popups, slide ins, banners, and floating bars.
Plus, it comes with over 100+ templates that you can use to create a popup in 5 minutes without any technical knowledge needed.
Once the two plugins are activated on your site, we can get started.
Step 1: Create a Form With Gravity Forms
The first thing you need to do is create the form that you’ll add to the modal popup.
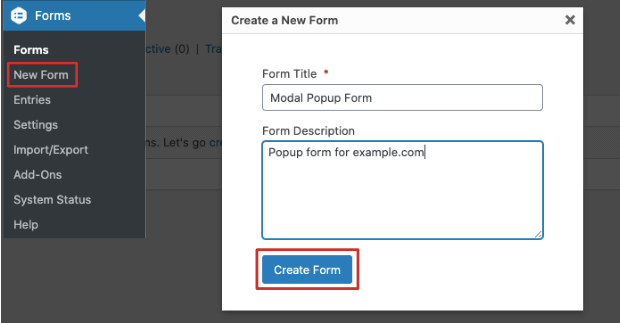
From your WordPress dashboard menu, visit Gravity forms by selecting Forms » New Form and you’ll see a popup that prompts you to enter a title and description for your form.
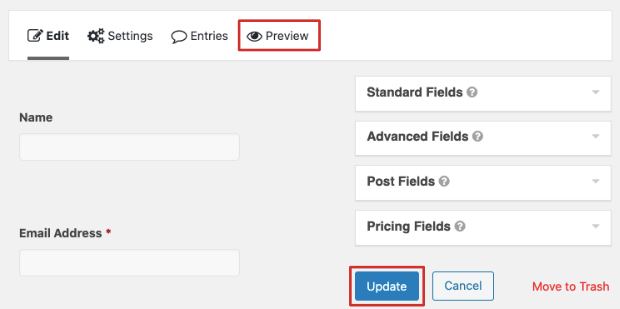
Once you’ve filled in the details, hit the ‘Create Form’ button to open up the form editor page. Here, you can build your form by dragging and dropping fields from the menu on the right.
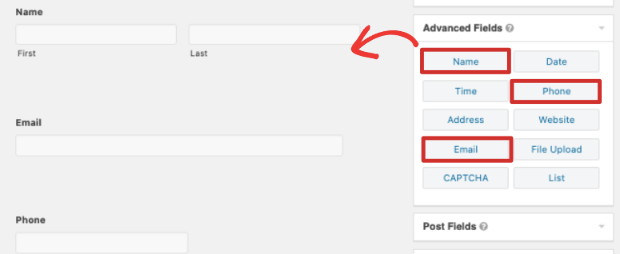
For this tutorial, we’ll create a simple contact form. From the ‘Advanced Fields’ menu, we’ll add name, email address, and phone fields.
We’ll also add a comments section so the visitor can enter any extra details like what they are looking for.
To do this, from the ‘Standard Fields’ menu, drag and drop the Paragaph Text field into your form editor. This will open a field editor where you can add a title for the field such as ‘Comments’.
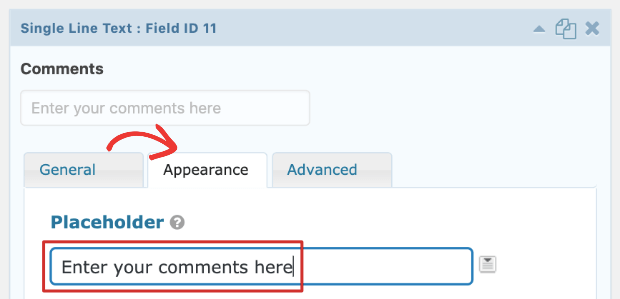
If you want to add placeholder text inside the field such as ‘Enter your comments here’, switch over to the Appearance tab. Here, you can enter the placeholder text and also change the field size if you want to increase or decrease the box provided.
Like this, you can add and customize as many fields as you like to create your own form. And you can use the ‘Preview’ button from the top menu to see what the form will look like when it’s live.
When you’re happy with your form, hit the ‘Update’ button to store your changes.
Change Confirmation of Form Submission
Since you’re creating a modal form, you’ll need to set what happens after the user submits the form.
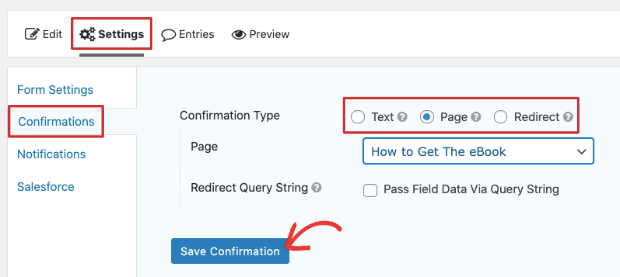
Gravity Forms lets you display a text message, take the user to a new page, or redirect them to a specific URL once they submit the form.
To customize what happens after form submission, you’ll need to visit the Settings » Confirmations tab. Here, you can add a text message, select a page on your site, or enter a specific URL of your choice.
When you’re ready, click on the ‘Save Confirmation’ button and then preview your form. You can test out your form by filling and submitting it to see if your settings work fine.
Change Notifications of Form Entries
While you’re on Gravity Forms, you can also change how you want to receive the form submissions. You’ll need to switch to the Notifications tab, and here, you can change the email address, as well as the subject name and message to be sent.
This is especially helpful if you want the emails to go to a separate email address or a certain member of your team.
Copy Form ID
After you’ve updated the notifications, you need to fetch your form ID. While editing or previewing your form, the form ID is always displayed at the top of the page.
You can also find the ID in the Forms » Forms tab. Here, you’ll see a list of the forms you’ve created using Gravity Forms. Next to the title of your form, you’ll see a column called ‘ID’ with the ID number.
Copy this ID and keep it ready as you’ll need it in the next step. Now, you’re ready to move on to OptinMonster to add the form to a modal popup.
Step 2: Create a Modal Popup With OptinMonster
OptinMonster has a drag and drop visual builder that makes it easy for anyone to create a modal popup.
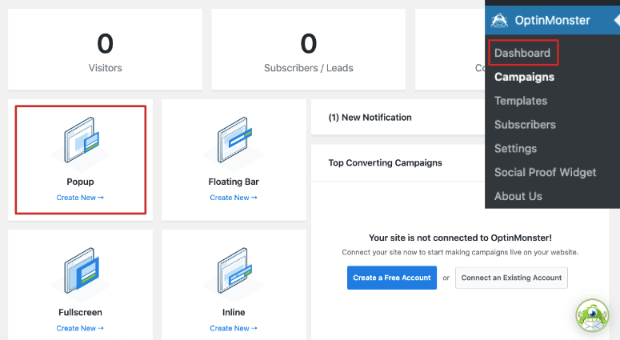
To get started, open OptinMonster from your WordPress dashboard and create a new popup.
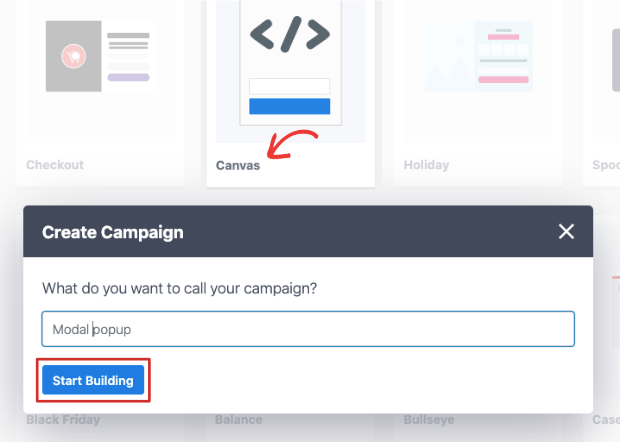
You’ll see a list of all the templates available. Since we already have a form we want to embed, we’ll select the Canvas template which lets you start from scratch.
Next, you need to enter a name for your campaign, then select the ‘Start Building’ button and a popup editor will open.
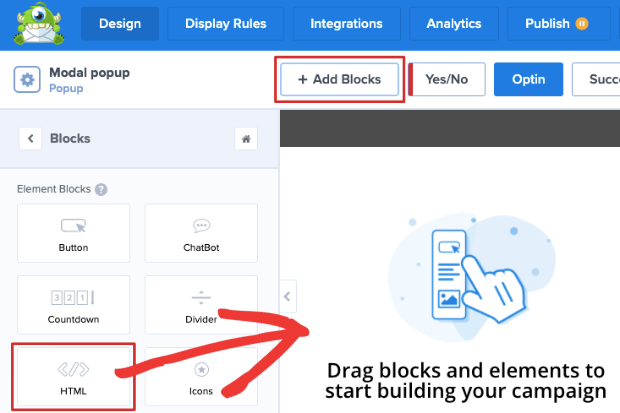
In the popup edit screen, you’ll need to click on the ‘Add Blocks’ button to get a menu of blocks. From here, drag and drop the HTML block into your popup.
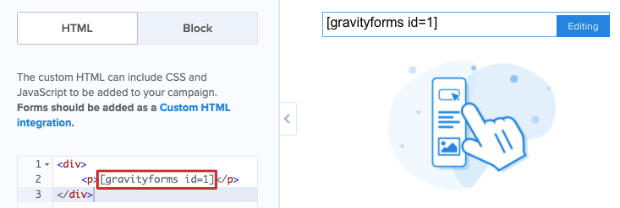
Now, you’ll need to use this shortcode with the form ID you noted down earlier from Gravity Forms.
[gravityforms id=”1″]In the HTML editor on the left panel, delete the text ‘Add HTML here.’ and paste the shortcode in its place. Remember to replace the number 1 with your form ID.
You can also customize the shortcode further to include or exclude the title and description.
[gravityforms id=”1″ title=”true” description=”false”]To translate the code, ‘true’ tells it to display while ‘false’ means do not display. So in the shortcode example above, the form title will appear while the description will be hidden.
After this, clean up the popup design by selecting the other default blocks in the popup and use the trashbin icon to delete them.
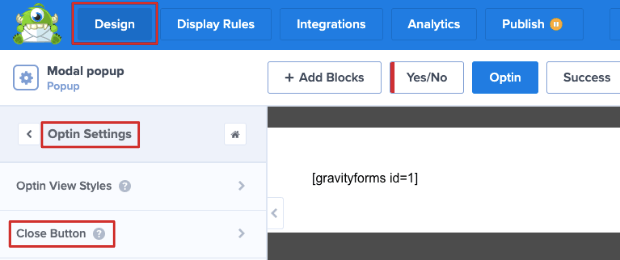
Now, you’ll need to convert this regular popup into a modal popup. To do so, exit the block settings menu by clicking on the Design tab and go back to the main menu.
Now, select Optin Settings » Close button tab and use the toggle switch to hide the close button on the popup.
Once again, go back to the previous menu and select Popup Settings and turn off the ‘Close on background click’ option.
Once that’s done, we recommend using the Save button to store your changes. Now, the modal popup is set up and ready to be customized.
Step 3: Customize the Popup
If you’d like to make your modal popup form more interesting, you can add more blocks such as a title and an image.
Using the ‘Add Blocks’ option, you can drag and drop more blocks into your popup. First, we’ll add a text block to give our popup a title.
When you enter and select the text, you’ll see a text editor bar appear above the block that lets you customize the font size, color, and format.
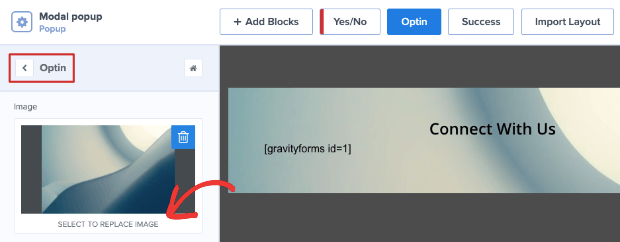
Next, we’ll also add a background image just to give it some color. Select the popup and it will open the ‘Optin Settings’ menu on the left panel. Here, you can add an image from your media library or upload a new one.
OptinMonster has a ton of customization options so you can build a stunning modal popup.
Once you’re happy with the popup design, you can move on to the next step where you’ll control when and where the popup is displayed.
Step 4: Set Display Rules for the Modal Popup
The timing and placement of your modal popup can make a huge difference in how well it performs.
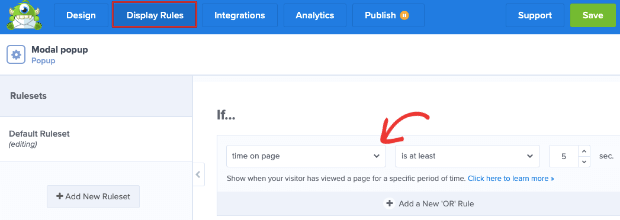
By default, the popup you created will appear on any page if the visitor spends at least 5 seconds on the page.
To change this, go to the OptinMonster » Display Rules tab. Here, you can set new conditions for your popup by selecting the dropdown menu that says ‘time on page’.
Now, you’ll get different options such as:
-
-
- Exit Intent® – Displays the popup when a visitor is leaving your site.
- New visitor – Displays the popup only to people visiting your site for the first time.
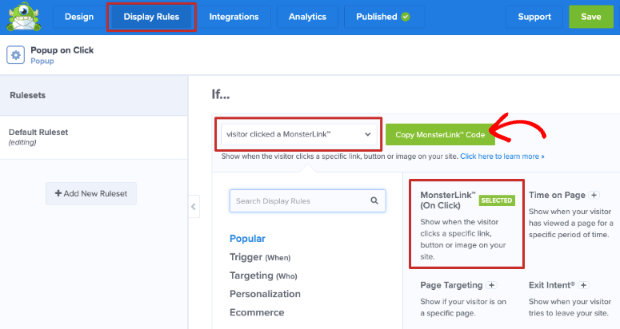
- MonsterLink™ – Lets you open the popup when the visitor clicks on a link, button, or image.
- Returning visitor – Shows the popup only if they are not new to your site.
- Physical Location – Lets you show the popup to people from a specific area.
- Page Targeting – Makes the popup appears only if the visitor lands on a specific page.
- Referral Targeting – Shows the popup if a visitor is coming from a specific site.
-
There are other options that you can explore or you can use the default settings, but since modal popups usually appear on click, we’ll select the MonsterLink™ option.
When you choose this option, a MonsterLink™ code will be generated for you. You need to copy it by clicking on the green ‘Copy MonsterLink™ Code’ button and keep this link ready for the next step.
Now your display rules are set and your popup is ready to be published.
Step 5: Publish the Modal Popup Form
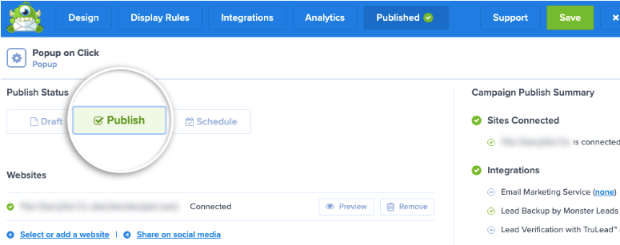
To make your form live, on the OptinMonster dashboard, you’ll need to switch to the ‘Publish’ tab.
You’ll see three statuses available which are ‘draft’, ‘publish’, and ‘schedule’. You can change the status to ‘Publish’ and then save your changes.
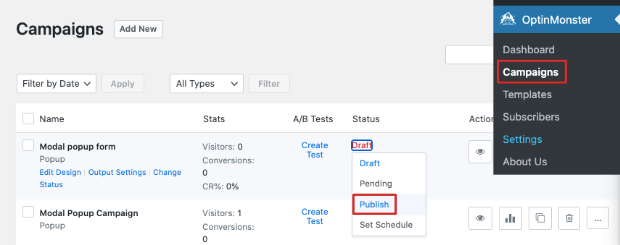
To make sure your campaign has been published, visit OptinMonster » Campaigns tab from your WordPress dashboard.
The status should show that it’s ‘Published’ in green text. If you see that the status is in ‘Draft’ or ‘Pending’ mode, click on it to get a dropdown menu and then select ‘Publish’ to make the modal popup live.
Step 6: Add the Popup Form to Your Site
You can easily add the modal popup form to any text or button in WordPress. We’ll show you how to add it to a button, link, and WordPress menu.
Add MonsterLink™ to a Button and Link
If you want the popup to appear when a visitor clicks on a button or a link on your site, first, you need to edit the page or post where you want to add the popup.
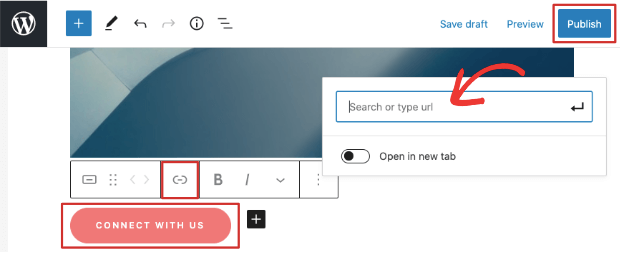
In the block editor, you can choose the button and you’ll see a block settings menu bar appear above it. Here, click on the link icon to open up the URL field and you can paste the MonsterLink™ inside.
In the same way, you can highlight any text in the page or post, and then use the link icon to open up the URL field where you can paste the MonsterLink™.
After you’ve done this, you can preview your post to see how the popup appears on click. Once you’re happy with it, publish or update your page or post to make it live.
Add MonsterLink™ to a WordPress Menu
Modal popups work well when added to WordPress menu bars. Since we created a contact form, we’ll add it to the ‘contact’ menu item.
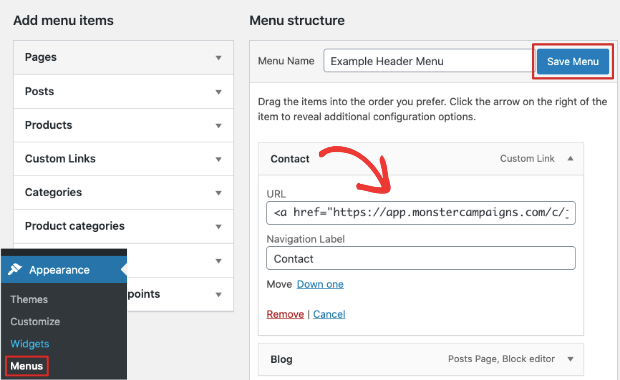
First, you need to visit the Appearance » Menus tab. Then, select ‘Custom Links’ and a dropdown menu will appear where you can enter a URL and link text.
You’ll need to paste the MonsterLink™ inside here and add link text according to your popup campaign. We’ve added ‘Contact’ as that’s the purpose of our modal popup form.
Once you’ve filled out the fields, select the ‘Add to Menu’ button at the bottom of the editor, and then Save your menu.
Now, you can visit your homepage and click on the ‘Contact’ menu item and the modal popup form will appear.
View Your Modal Popup Form Submissions
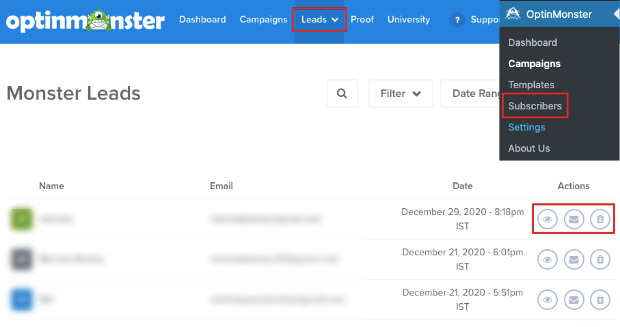
Every form submission is recorded and stored as Monster Leads in your OptinMonster dashboard.
To view these entries, go to the OptinMonster » Subscribers tab. From here, you’ll be redirected to the Leads tab on the OptinMonster dashboard.
In this tab, you’ll get a list of the subscribers’ names, email addresses, and dates. If you want to view more details of each entry, you can use the Actions menu to access that.
Optimize Your Modal Popup Campaign
Modal popup forms can be tricky as there’s no option to exit without filling out the form. How do you know if the popup is performing well or not?
Since you’re using OptinMonster, you don’t have to run your campaign in the dark. It’s loaded with data analytics that shows you how your campaign is performing.
To view your campaign’s performance, first, go to OptinMonster » Campaigns tab and you’ll see a list of the campaigns you’ve created.
Now, select the analytics icon under the Actions menu and you’ll see your campaign’s statistics.
It shows you how many people have interacted with your popup. You can also check which pages or links lead to the highest conversions.
This way, you can find out where the popup works and where visitors are not interested.
With that, you have everything you need for a successful modal popup form!
We hope this article showed you how to create and use a modal popup form on your site.
If you liked this post, then you may also be interested in learning more about








Add a Comment