Do you want to increase your revenue and web traffic with SMS marketing?
Then you need a simple yet effective strategy to collect phone numbers on your website.
Enter popups.
With popups, you’ll be able to consistently:
- Drive SMS subscribers to your site for promotions and product launches
- Share exclusive SMS offers and coupons to build customer loyalty
- Collect detailed feedback through surveys sent straight to your customers’ smartphones
By the end of this article, you’ll learn exactly how to use popups to get mobile phone numbers for your SMS marketing campaigns.
What is SMS marketing?
SMS marketing is a strategy that allows businesses to send messages to customers via text.
Businesses can send text messages to prospects and customers to increase brand awareness, boost engagement, and even generate sales.
Like most of us, you’ve probably received your share of annoying SMS marketing messages.
Of course, the last thing you want to do is irritate your customers with irrelevant texts they never asked for. That’s called spam.
Too often, SMS marketing campaigns go wrong because business owners don’t:
- Ask for permission to send their messages
- Provide value to customers
- Personalize their messages
But when you do it right, SMS marketing becomes an important part of your lead generation strategy.
Here’s why it works so well:
- Speed: your customers get your messages immediately
- Best open rates: SMS has higher open rates than any other marketing channels
- High response rates: customers are more likely to respond to text messages
If you’re looking for campaign inspiration, check out this article for real-world examples and proven SMS marketing tips.
Now, you might be wondering, “How do I collect mobile phone numbers for SMS marketing?”
OptinMonster is the best lead generation tool for your website. Whether you want to collect phone numbers or build an email list, OptinMonster makes it easy for you to do just that.
OptinMonster comes with tons of different targeting options, so you can personalize the offer you show to your users based on their intent, the source traffic, geographical location, and so on.
Using OptinMonster, Biddyco tripled their conversions in just 30 days!
And it’s just so easy to use. You can create stunning popups without any coding or design experience.
Now, we’ll build a popup in OptinMonster that collects phone numbers on your website.
Collect Phone Numbers With a Popup
We understand that everyone learns a little differently. That’s why we created this helpful video tutorial for our visual learners:
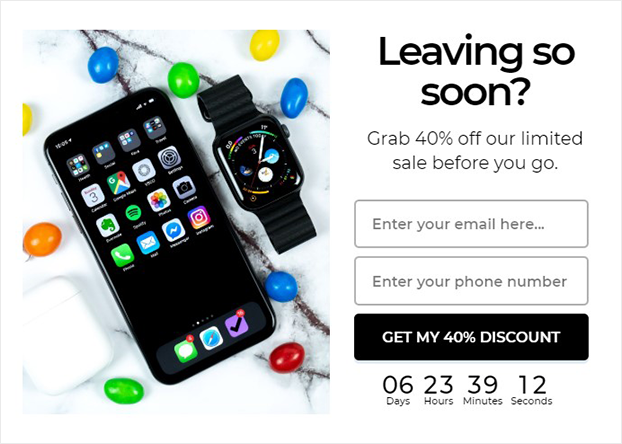
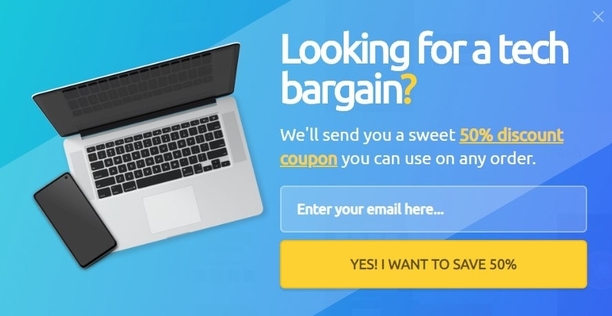
Otherwise, feel free to read our in-depth tutorial below. Here’s a sneak peek at the popup we’ll be creating today:
As we go through the process, we’ll take a closer look at why this popup will help us achieve our goal of collecting phone numbers.
We’ll build our popup based on these popup best practices:
- Offer a valuable incentive
- Create a clear call to action
- Use eye-catching design
Let’s get started.
Step 1: Create a Campaign to Collect Phone Numbers
First, log into your OptinMonster dashboard, and choose Create New Campaign.
Next, choose your campaign type. Today, we’ll select Popup.
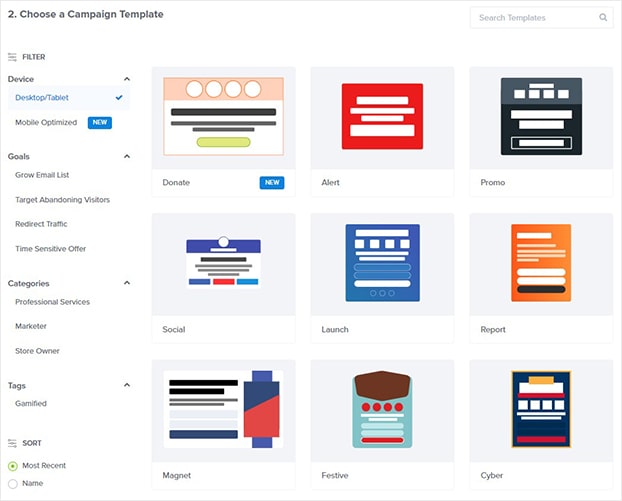
Now, we’ll select from OptinMonster’s 50 pre-built templates. There’s something here for any kind of campaign.
You can even choose a template based on the device you want to target: Mobile or Desktop.
Today, we’ll go with the Tech template because it already has almost everything we need to create a compelling discount offer.
There’s space for an image, attention-grabbing headline, and our offer.
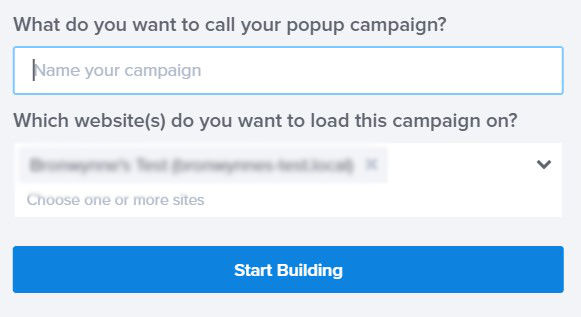
Now, name your campaign.
Finally, click Start Building to customize your popup.
Step 2: Design a Popup to Collect Phone Numbers
Now, you’ll be in the editor where you can design your popup, and here you have absolute freedom to customize the design on your own.
All these options give you the power to create popups that reflect your brand and speak to your customers.
With that said, we won’t get into too much detail on how to customize every aspect of your campaign because there are too many options to cover in just one post.
If you’re just getting started with OptinMonster, check out this guide on how to create and design your first OptinMonster campaign.
For today’s tutorial, you only need to know the basic principle of customizing your template.
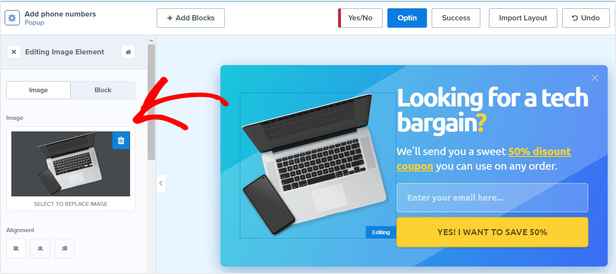
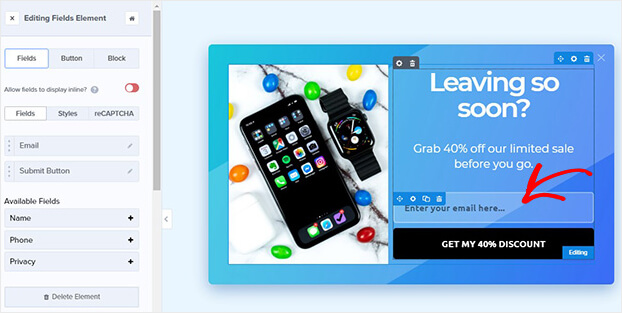
OptinMonster campaigns are built with design elements called blocks. To change an element, all you need to do is click on the block in your editor. Then, you’ll see the editing tools appear on the left side of the editor.
So, for example, if you want to change the image, click on the image on the right hand side and you’ll see the editing panel on the left:
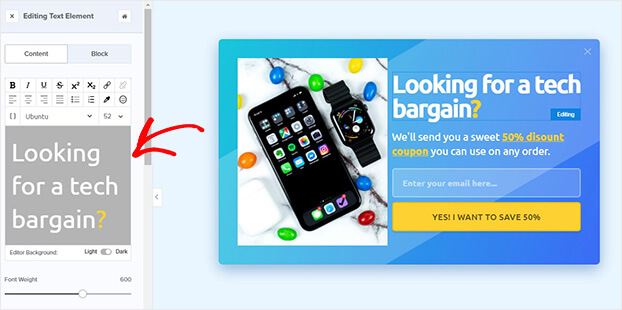
Similarly, we can change the copy by clicking on the text element in the builder.
On the left, you’ll see options to change the font, font size, alignment, and color of your copy.
All these options make it easy to match your optin field to the rest of your form’s style.
And that’s not all.
To add any element to your popup, all you need to do is click Add Blocks at the top of the editor.
You’ll see there are so many elements available to you, like:
- Images
- Text
- Video
- HTML
- Additional optin fields
Then you can simply drag and drop those block elements where you want them. For now, let’s focus on adding the phone field.
Let’s click on the optin field again.
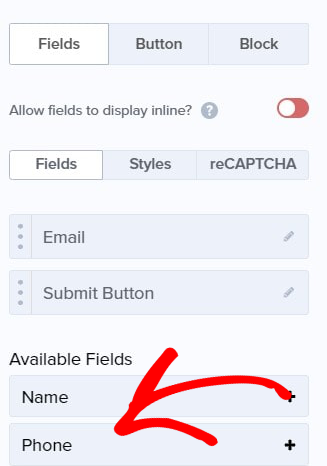
On the left, you’ll see the options in the Editing Fields Element panel. Find Available Fields and click on the plus sign to add a phone field.
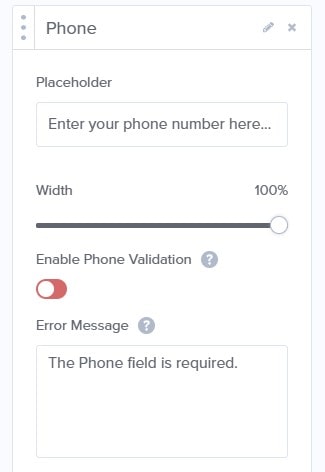
Next, you can click on the pencil icon to edit the field text.
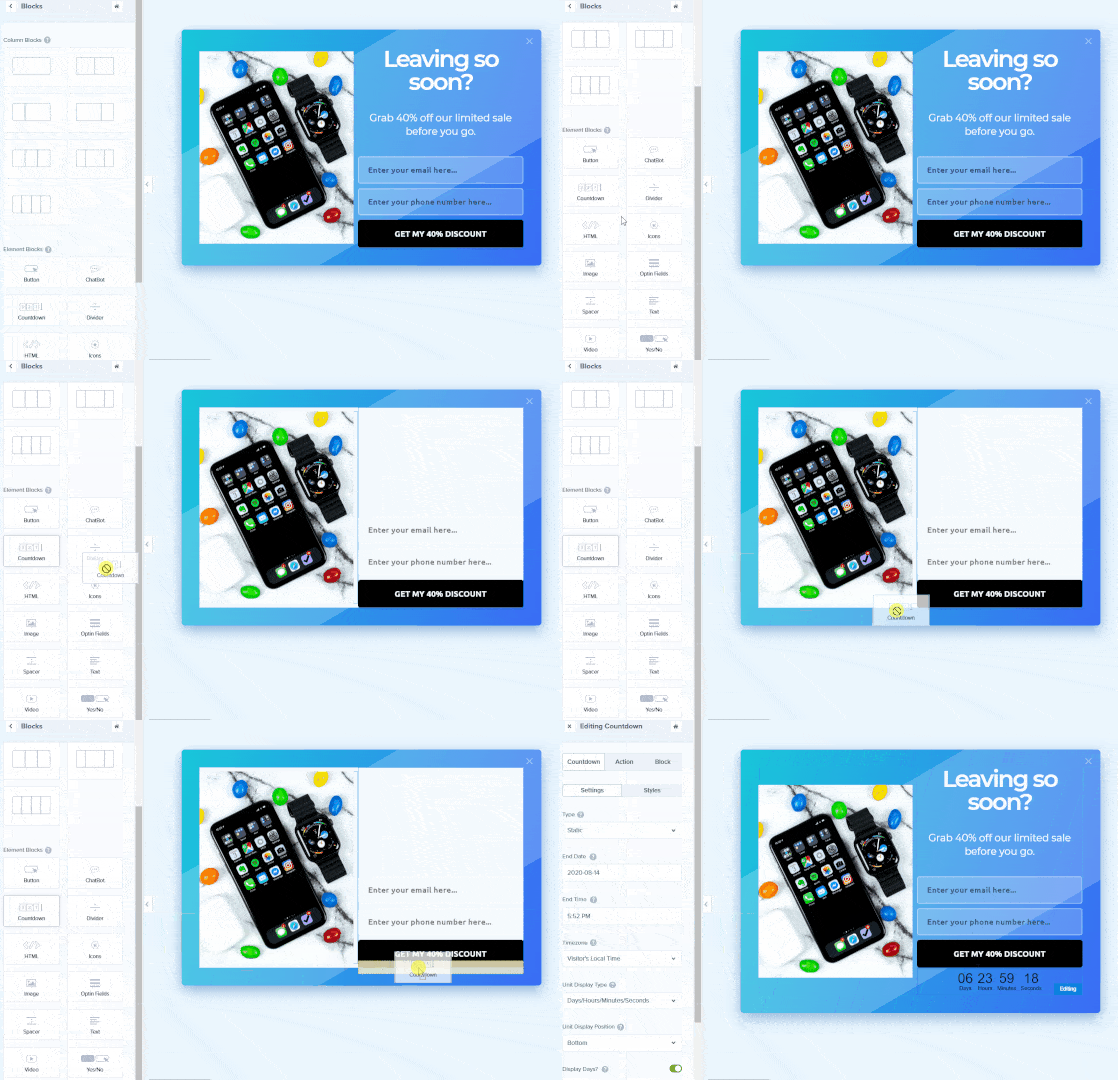
Now, we want to add a countdown timer to bring a sense of urgency to our limited sale.
Head over to the top of your editor and click Add Blocks.
Select Countdown Timer and drag it onto your form.
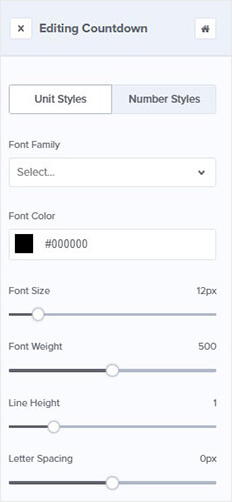
Like with the other blocks, you can click on the Countdown Timer to pull up its editing tools.
Finally, let’s change the background.
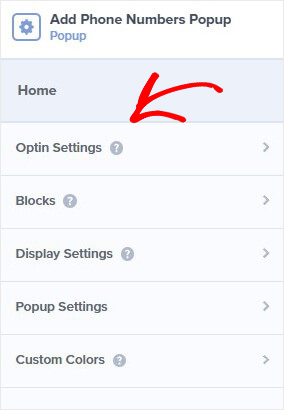
Head over to the editing panel on the left, and click on Optin Settings.
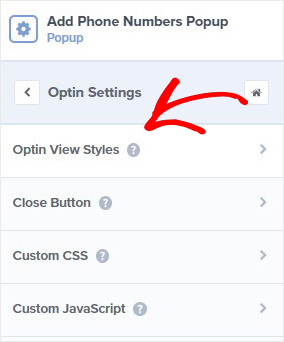
Next, select Optin View Styles.
Now, you’ll be able to customize the background of your popup.
That’s it. Now your form is ready to capture your visitor’s phone number:
Step 3: Display Your Campaign
Now, you need to decide where and when you want to display your campaign.
OptinMonster offers several ways to display your campaigns. Our targeting rules are designed to show the right offer to the right person at the right time.
Our targeting rules let you display campaigns based on:
- Referrer detection: show messages based on where the visitor is coming from, like a referral website
- Page-level targeting: campaigns based on the specific page
- Geo-location targeting: based on the visitor’s location
And there’s so much more.
Then, you’ll also have campaign triggers, like:
- Scroll triggers: appear after the visitor has scrolled down a certain section of the page
- InactivitySensor ™: shown when visitors have been inactive
What this means is you can decide to show a campaign to a reader right when they’re most engaged.
Flywheel used page-level targeting to increase engagement by 660%. When visitors read articles in Flyhweel’s Design Inspiration category, they’d see a campaign offering an email course on design trends.
For this tutorial, we’re going to focus on one of the most powerful campaign triggers, exit intent®.
Exit intent is when a popup appears as the visitor is about to leave your site. On desktop, it tracks the movement of the visitor’s mouse. On mobile, it kicks in when the user scrolls up the page or clicks the back button.
Shockbtye combined exit intent with an irresistible discount offer to double their sales conversion rate.
To enable exit intent, head over to Display Rules at the top of your editor.
Find and select Exit Intent.
Now, your popup will appear as your visitor leaves your site, capturing their attention just as they’re about to leave for good.
Great. You’re almost ready to collect phone numbers on your website. All that’s left is to sync OptinMonster with a SMS service provider that will send your text messages.
In addition, we’ll add a Page-Level Targeting rule to display our popup on our only our highest-converting pages.
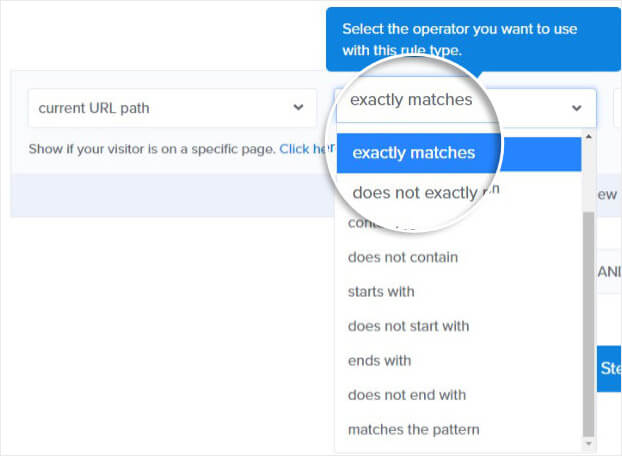
So, we’ll select exactly matches under current URL path.
Then, add the URL of your highest converting page.
Now, your offer will be displayed to visitors as they move to leave the page.
Step 4: Integrating With an SMS Marketing Tool
In this tutorial, we’ll integrate with Brevo (formerly Sendinblue).
With Brevo, you can easily segment your audience to share personalized messages with your subscribers at the right time.
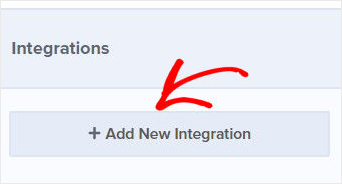
First, head over to Integrations in your editor.
Select Add New Integration.
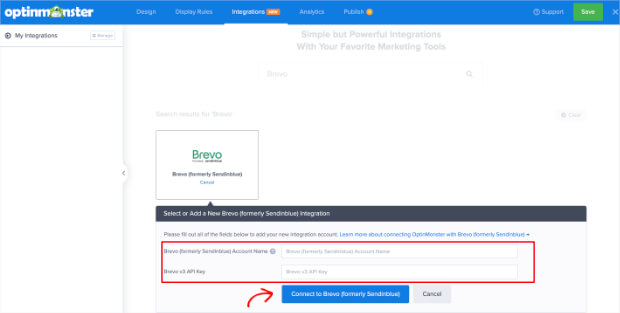
Type Brevo in the search bar and click Connect. In the next step, you’ll need to add two things:
- Your Brevo account label
- Your API key
For your account label, choose anything that will help you to keep your integrations organized. This is an internal label for your use.
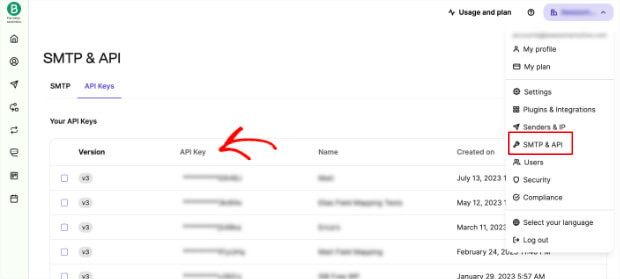
To get your API key, you’ll need to log into your Brevo account. Head over to the account dropdown from the top-right corner and choose SMTP & API.
Copy the API key.
Paste your API key into the API Key field and select Connect to Brevo (formerly Sendinblue).
It’s that simple. Now, your OptinMonster account is synced with Brevo.
All that you need to do now is Save and Publish your campaign.
That’s it! You’re on your way to collecting phone numbers using a popup on your website.
Once you start collecting more phone numbers, we recommend looking into a business phone system that offers SMS marketing and other tools to grow your business.
For more practical strategies to build your subscriber list, we recommend checking out the following articles:
Ready to create popups that convert your site visitors? Get your OptinMonster account today.










Add a Comment