We’ve all been there before. You’re singing your favorite song in the shower and then…
BOOM. ?
That new product idea hits you like a ton of bricks. It’s go time. Your audience research shows a strong market need, and the factories are in full-force production mode.
But even now, you’re still at Point A.
What you want to know is, how do you get to Point B?
In other words, how do you run a successful product launch to make sure that your million dollar idea actually makes that million dollars?
Fortunately, we’ve got everything you need right here.
We’re going to give you the 5 step guide to launching your product. In this article, we’ll also provide you with 4 separate product launch funnels for each of your marketing strategies, including:
- Paid advertising
- Content marketing
- Social media
- Email marketing
By the end of this 5 step product launching guide, you’ll be ready to have your most successful launch yet!
5 Steps for a Wildly Successful Product Launch
Many blogs include market research and product creation as part of the product launching process.
But this post will keep things simple. The following 5 step guide assumes you’ve already done your market research and have a concrete product in mind.
Hot TipThe best and easiest way to get your product launch started off on the right foot is with SeedProd. SeedProd lets you create stunning coming soon pages that work perfectly to generate buzz around a product launch.
Step 1. Get Your Team on the Same Page
If you’re a solopreneur, this will be the easiest step on the list.
But if you do have a team, make sure that everyone is on the same page and understands the project.
As your team discusses the product launch, keep the conversation efficient, structured, and on point.
Ask your team a few guided questions like:
- What problems do we foresee with this particular product launch?
- Does anyone have any pressing concerns they’d like to address?
- What benefits do we see for our customers from this product?
- What’s a realistic timeline for us, as a team, to launch this product?
Questions like these serve two purposes.
First, they allow you to prepare for any setbacks you may encounter along the way. Even though you have a clear vision for the product, someone else on the team may see the obstacles in your blind spots.
Second, these types of guided questions can get your team amped up. They’ll be able to see the tangible benefits this product provides for customers and start realizing that a simple idea will soon be a profitable reality.
Once everyone has spoken their piece and gotten excited about the product launch, it’s time to set a date and start planning.
Step 2. Create a Content Roadmap for Promotion
Now it’s time for your marketing team to get to work.
And they’ve got plenty of work to do.
But remember, right now you’re simply deciding which strategy (or strategies) will work best for your product launch.
So before your blogger starts blogging and your video-er starts video-ing, you need to make a solid plan of action. One thing to remember, though, is that your plan will be dependent on which marketing strategy you intend to use.
There are 4 types of marketing strategies that work particularly well for product launches.
4 Product Launch Funnels Broken Down
Paid Advertising Funnel
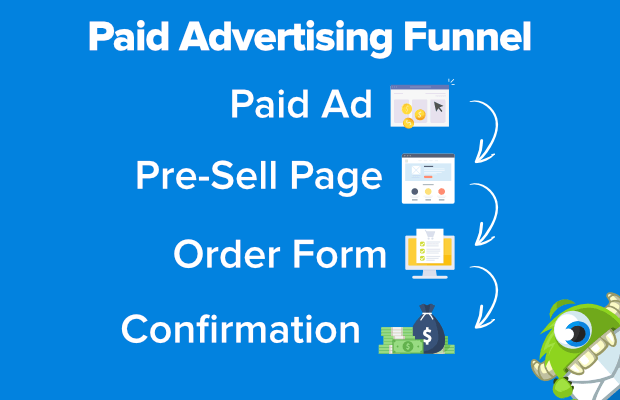
This method will be best for businesses with larger budgets for ad spending. Here is what your paid ad product launch funnel will look like:
This funnel works with paid ads coming from Google Ads, Facebook Ads, Instagram Ads, or just about any other advertising platform online.
The secret to this funnel’s success is the pre-sell page. That’s because traffic coming from ads is usually cold and needs to be warmed up before a purchase is made.
In fact, 96% of your consumers aren’t ready to buy after first clicking an advertisement.
Pre-sell pages help with this.
They’re a specific type of landing page that educates the user about your brand, the problem they’re facing, and how your product is a good solution to that product.
In the pre-sell page for your product launch, you’ll want to highlight the newness of whatever you’re releasing. You may also want to have your pre-sell page offer a “limited time only” discount for your launch to create urgency. Finally, you’ll want to have one clear call to action embedded in your pre-sell page.
We’ll break down the anatomy of pre-sell pages more closely a little later in the post.
As the pre-sell page starts warming up your leads, they’ll get directed to the order form. Once someone has made a purchase, they’ll receive a confirmation message either detailing their order or letting them know how to access their product.
Organic Content Funnel
Building an audience with content marketing is an incredibly powerful strategy. That said, it takes time.
So if you haven’t done any content marketing in the past, start as early as possible (even if you’re months away from a product launch).
But if you’re already using organic content to drive traffic and convert leads, why not take advantage of all that traffic when it’s time to launch?
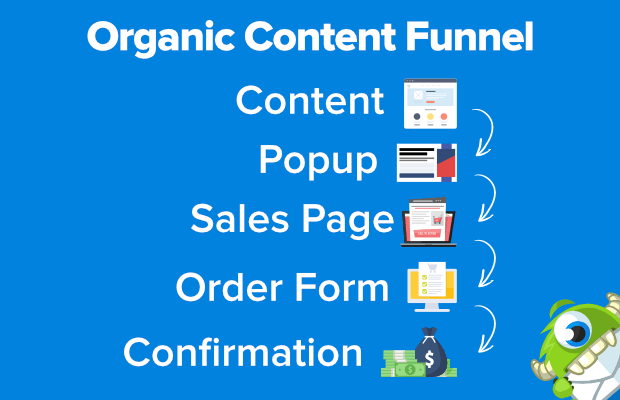
A typical funnel for using organic content to launch your product looks like this:
You’ll notice that once your visitor sees your content, the next step is a popup. We suggest going with a popup that creates a sense of urgency around your offer. In many cases, a countdown timer is an excellent tool for that:
The goal of the popup is to introduce your visitor to the product, further educate them about the problem your product solves, and take them to a sales page to learn more.
When they arrive at your sales page, all of the web copy should be geared to converting your visitor. You should have a killer value proposition, strong headlines, handle objections, and everything else that goes into a good sales page.
Again, we’ll also be analyzing what specifically makes a good sales page later in this post.
Finally, your visitor will fill out your order form and receive a confirmation message.
Social Media Funnel
When it comes to building hype around your product launch, social media can be one of your strongest tools.
You may already be connected to a large base of loyal followers who would make perfect clients for your new product. As you use social media for a product launch, you need to write several posts in four different categories:
- Teaser posts
- Pre-launch post offers (optional)
- Launch date countdown to build urgency
- Launch post
Your teaser posts should hint at the product your team is developing. But don’t give out too much information here. Think about a time when a friend texted you something like, “Hey, I’ve got huge news. Can’t wait to share.”
Chances are your curiosity was peaked until you finally got to connect with them. Teaser posts are great for building excitement around your upcoming product launch.
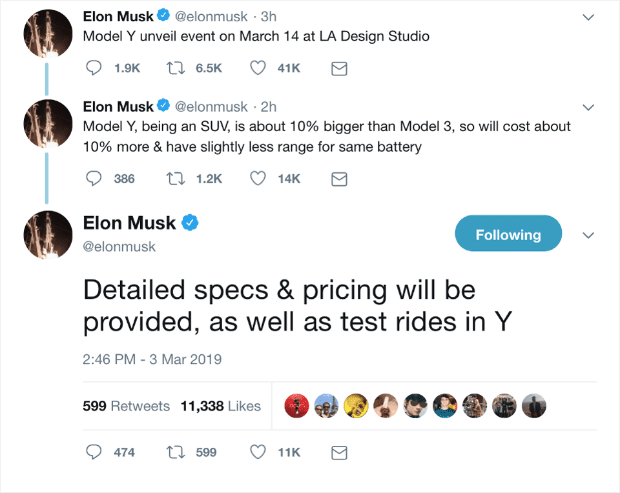
Here’s a good example of a product launch teaser by Elon Musk for the Model Y Tesla:
No photos and not much in the way of details. Just enough information to start stirring up interest.
Next comes your pre-launch post offers, which are optional but encouraged if you already have a loyal audience base. Pre-launch offers are when you allow a limited amount of customers to pay and wait for a product before it’s even been launched.
Usually, you offer a discount for clients who pre-order your product.
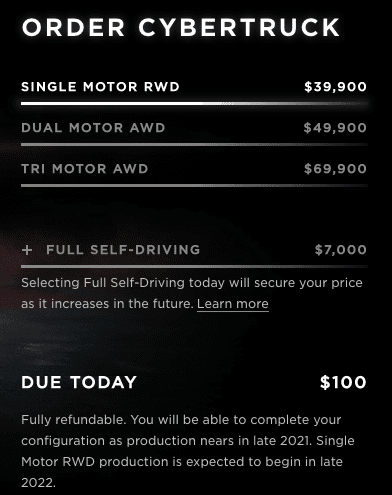
Again, Tesla gives us a great example. Customers could pre-order Tesla’s new truck for a $100 downpayment, even though the truck likely won’t be released until 2020.
Not only did this pre-order promotion build up excitement around the product launch, but it also generated revenue that Tesla can use to complete any loose ends in production.
Next, you should have a few targeted posts as your launch date approaches to build excitement.
When you’re writing your product launch posts for social media, it’s good practice to think about your launch as an event. The tone should be exciting, fun, and enticing for your followers.
Finally comes your launch post. You should write specific copy for each social media platform you’re using. Sorry, no copy/pasting from Facebook to LinkedIn on this one.
Keep your messaging unique and tailored to the platform.
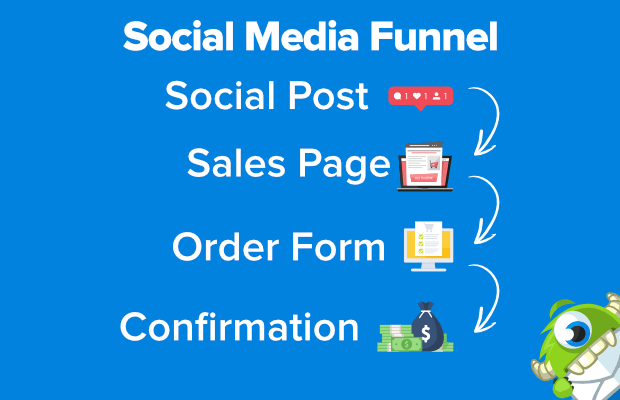
From your launch post, you need a place to direct traffic. Once people click the link in your post, the process looks like this:
You’ll use a sales page here instead of a pre-sell page. That’s because you’re working with followers who are presumably familiar with your brand. Hence, they need less warming.
However, you may want to run an A/B split test with a sales page and a pre-sell page to see what brings you the most success.
Email Marketing Funnel
Now we reach the ultimate tool for your product launch: email.
The value of email marketing can’t be overemphasized. And building an email sequence for your product launch is always a winning strategy.
Many email sequences are between 6–8 emails. For today’s post, we’ll go with 7 (though you can tweak these as needed).
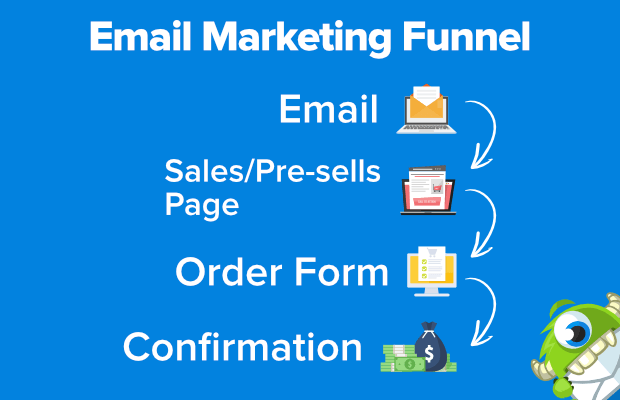
Here is an overview of what your product launch email sequence will look like:
Note that sometimes your email will send customers to a pre-sell page while others will send them directly to a sales page. It really depends on which email in the sequence you’re using.
And don’t worry. We’ll be looking at the difference between a pre-sell page and a sales page in just a bit.
But first, let’s check out how your product launch email sequence should look:
Email #1: Just saying hi. In this email, you aren’t trying to sell anything. The goal is to simply show up in your client’s inbox with a friendly message to “touch bases.” You can send this out 1-2 weeks before your product launch date.
Towards the end of the email, casually mention you have a new product coming out soon that you’re excited to share.
Email #2: Talk about the problem, tease the solution. You built your product to solve some problem in your clients’ lives. Your customers are in some pain right now, and your product is there to solve it. In this email, focus on the problem.
A good strategy is to tell a story about how you’ve been through the specific struggle the client is currently facing.
Then, at the end of this email, you can mention that you’ve developed the solution and briefly mention your product.
From here, you can send traffic to a pre-sell page for your product to take pre-orders.
Email #3: Educate about the problem and the coming solution. In this email, you want to dive deeper into the problem your clients are facing. Rather than using yourself as an example (like you did in the last email), share statistics or case studies about other people who’ve been in a similar position.
Your goal is to further educate your customers on the problem in a more detailed, science-based way.
Your customers should also finish that email with the impression that this particular problem affects more people than just them.
In other words, they aren’t alone.
Then you can talk more about how your solution can help. Like in the email before, send your readers to a pre-sell page for pre-orders.
Email #4: Educate about the coming solution and highlight pre-sales. This is the email before your official product launch. Rather than focusing on the problem, you’ll be nothing but smiles and positivity here.
You have the answer to their problem, and you’re excited to share it!
Outline the tangible benefits of your product. How will your product help your clients? Why is this something they simply can’t live without? What makes your upcoming product unique or better than the competition?
Then you can offer a limited-time pre-order offer. Give a discount for clients who purchase the product before its official launch date.
Again, pre-orders are an optional part of your product launch plan. But by letting people purchase your product before it’s launched, you can build hype and revenue for your company.
From this email, you should be sending your audience to a targeted pre-sell page to handle any last-minute objections your clients may have.
Email #5: Launch product. This email is all about letting your audience know that your product is officially ready, and you couldn’t be happier with the results.
If you have any feedback from private product testing, share it here. If you sold out from your pre-orders, share it here. Anything that’s fun or exciting about your new product, share it here.
The goal is to find a way of saying, “The product has arrived. I love it. Other customers love it. And if you buy it, you’ll love it too!”
From this email, direct your readers to a sales page for your product.
Email #6: Launch reminder (create urgency). Either later in the day of your product launch or the day after, send out a follow-up email reminding your customers that your product is out.
But this time, focus on building a sense of urgency around your product.
Note that the urgency you create will depend on your specific product. If you’re selling a physical product, you may mention that your product is flying off the shelves and won’t be available much longer.
For digital services, perhaps, you’re offering a special discount for people who sign up before midnight.
Whatever the case may be, this email should be focused on getting people feeling that sense of urgency.
Email #7: Gather feedback for potential future buyers. This last email is a gentle follow up. You’ll usually want to send this 1-2 days after your product launch. It’s where you can ask your audience who didn’t purchase your product for some feedback.
Was there something about your product they didn’t love? Was there a specific reason they hesitated to use your product? Or did all your previous emails simply go to SPAM?
The goal is to try and understand why people didn’t optin to your product on launch day. More than anything, this feedback will be useful in helping you craft sales pages for your product as time continues.
By identifying common objections, you can work them into targeted product pages for future use.
Finally, you can close this email with one last, hail-mary offer for those clients who regret not opting in. You may not see high conversion rates from this email, but even gaining one lifelong customer may make it worthwhile to offer.
And that’s it! Your email sequence is ready to go.
The four product launch funnels above aren’t set in stone. Most companies will need to tweak various aspects of their funnel depending on their team size, their budget, and their product.
But these are the general guidelines for creating a product launch funnel that works. Now all that’s left is actually creating the content for each section of your product launch checklist!
Step 3. Create the Content
In our last product launch step, we looked at four popular options: paid advertising, organic traffic, social media, and email marketing.
Whether you go with one of those options or you decide to use all four, you now know exactly what kind of content you need to create.
And you may have noticed there are a few types of content that are needed in all the strategies mentioned above: popups, pre-sell pages, sales pages, and order forms.
These are all the pages that will move your audience further down your product launch funnel.
Let’s briefly discuss the specific purpose of each page and how you can create them in just a matter of minutes.
Popups: Popups are a great addition to your organic content funnel. If you have a blog post or a page with video tutorials, for example, a popup can be an engaging way to teach your audience about your upcoming product.
Plus, they can be used to redirect traffic to your pre-sell or sales page.
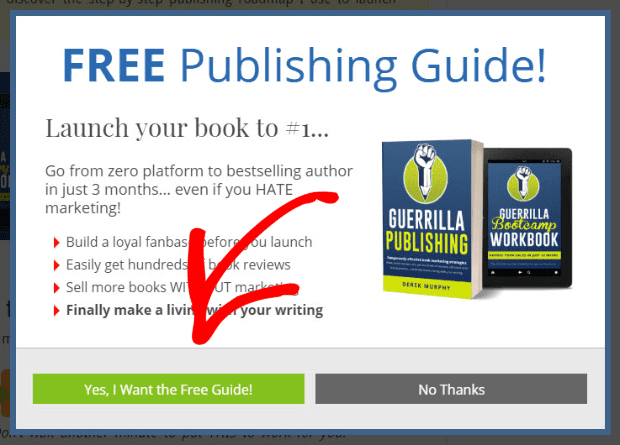
With OptinMonster, you can design your popup to have a Yes/No feature. This allows traffic to voluntarily enter your funnel without needing to share their contact information right away:
This is called a 2-step optin and is powerful because it relies on the Zeigarnik effect.
The Zeigarnik effect is a psychology-based marketing tactic that proves people tend to finish processes they’ve started.
In the image above, for example, the visitor is given a Yes/No option. Once they click Yes, they’ll go to a second page to enter their email address and claim the offer.
Since they’ve already begun the optin process, they’re more likely to finish by converting.
Again, with OptinMonster, you can build these 2-step optin popups in minutes. Build your own 2-step optin with our tutorial.
Pre-sell ages: A pre-sell page is a type of landing page that warms up your colder traffic. That means they work best with paid advertising, social media, and organic content funnels.
Your pre-sell page should be mostly educational and not over-the-top “sales-y.”
Your goal here is to inform the reader of who you are, create an emotional connection to the problem they’re facing, and show how your product can heal their pain.
Here’s an example of a (long) pre-sell page that uses informative content to lead to a call to action:
The first 80% of this page is full of great content that teaches rather than sells. Then, at the bottom, there is a subtle call to action that doesn’t require anything but a click from the user to optin.
Can anybody say “Zeignarik?”
Never built a pre-sell page? No worries. We got you covered. Check out this in-depth article on how to make a killer pre-sell page with OptinMonster in under 5 minutes.
Sales Page: A sales page is another type of landing page. As the name suggests, it has one goal: sales. This is where you want to really show off the benefits that will come from using your product.
This is not the time to be humble.
Talk about all the cool features your product has and how well it can solve the clients’ problems. Add social proof through testimonials, statistics backing up your product’s features, or videos showing the product in action.
Whereas a pre-sell page is more educational and connects the reader to their pain point, a sales page gets the reader feeling excited and hopeful.
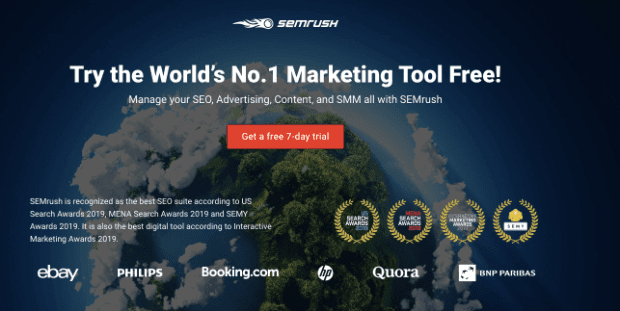
Here’s a good example of a sales page in action from SEMrush:
Though the image only shows the top 25% of the page, it’s immediately clear who SEMrush is, what they do, and how many other reputable brands trust them.
Then there is a single, clear call to action for users to take when they’re ready to buy. And the value proposition is hard to pass up: Try for free.
Not sure how to make a sales page? No worries. We’ve got you covered. Here’s how to make a sales page that converts.
Keep in mind that the content on your pre-sell and sales pages will change depending on your product. We’ve provided a general product launch framework that shows when each type of landing page usually works best.
But the final decision for using one over the other will ultimately be up to you and your team.
When in doubt, you can always A/B split test your campaigns and let the data decide which is best for you.
Order form: This is where you’ll be gathering billing and payment information. There are many tools you can use to build an order form, but we highly recommend WPForms.
With WPForm’s drag-and-drop builder, you can build a customized order form in literally a matter of minutes. Plus, these forms are packed with useful features:
- Send notifications to yourself and your team upon order completion
- Integrate with your email marketing service to add users to your email list
- Configure your payment settings with PayPal or Stripe
- Set up order confirmation forms to thank customers for their purchase
Your order form should be simple, mobile-friendly, and intuitive to use if you want to avoid shopping cart abandonment. With WPForms, you can quickly have a professional-looking order form added to your product launch funnel.
And the best part is that you don’t need to ask a team of developers for help adding it to your website. These forms can be embedded without any coding skills.
All that’s left now is to watch your creatives go into their hibernation spots, get to work, and produce killer content for your product launch funnel!
When the pieces are all built and assembled, it’s time for the next step.
Step 4. Prepare for launch
Ok. So all your funnels are in place, and you’re ready to go but you still have a couple of things to do before kicking off any or all of your product launch funnels.
First and foremost, you should check back with your entire team to make sure they’re ready to move forward. At the start of your product launch marketing plan, you identified potential obstacles. Now is the time to make sure those obstacles were totally squashed.
It’s also a good time to make sure each member knows specifically what they’re doing and when they’re doing it.
If your team is running an email sequence, for example, are the emails pre-scheduled to align with launch day?
For social media, who is in charge of posting teasers? When will those specifically be posted?
Are the landing pages ready to go? Have they been checked on mobile to make sure they’re responsive across a wide variety of devices?
These are all the types of questions you should be going over with your team to make sure everyone is ready to successfully complete their part of the product launch strategy.
And next, you should test everything. Go through every stage of every funnel personally to make sure it’s working smoothly. Once you’re satisfied, ask a select group of colleagues or trusted friends in your network to do the same.
Look for problems with broken links or spelling errors in your landing pages’ copy. Check for any user interface (UI) issues across mobile, tablet, and desktop. In fact, when it comes to mobile, make sure everything looks good across different smartphones (not just iPhones ?).
Your goal in the test phase is to go through your own funnels as if you were a client. If you’ve done your job up to this point, the test phase shouldn’t take long. And if the test phase has problems, you’ll be thankful it was you on the other end of the screen and not your cold traffic.
Related ContentHow To Build A Successful Pre-Launch Marketing Campaign
Step 5. Launch
The day is here. It’s finally time to push the little red button and launch. But now what?
Well, that really depends on your product. But because these funnels are mostly automated AND because you’ve already thoroughly tested everything, launch day should be pretty stress-free.
In fact, it should be fun.
Your only job now is to check your analytics, monitor the team, and gather feedback from your audience.
Oh, and count the money as it comes in.
Excited to Launch?
We hope you enjoyed this article and found our product launch funnels useful. Remember that there is no one way to build a successful funnel, but there are plenty of wrong ways.
Our product launch guide was designed to keep you on the right track and help you build the funnel that is best for your product.
And once you’ve launched your product, don’t forget that you need to continuously promote it as time goes on. For that, check out these 15 must-try strategies to promote your product online.
If you found this post helpful, you may also enjoy some of our video tutorials. We’d also love to hear about your experiences, so hop on Facebook or Twitter and say hi.
And did you really make it through this entire product launch guide without signing up for OptinMonster?
Our powerful optin campaign builder is designed to take your business to the next level. So what are you waiting for? Join the OptinMonster family today!






Add a Comment