What if you could reach more than 90% of the world’s internet users with your retargeting ads?
With Google display retargeting ads, you can!
The Google Display Network (GDN) is made up of 2 million+ sites, apps, and videos that reach so many people, 90% of everyone in the world on the internet, that your audiences and targeting options are pretty much limitless.
We’re going to show you how to use Google display retargeting to increase brand awareness, boost sales, and drive registrations… and with the bid optimization strategies, we’ll show you, it’s a budget-friendly Google AdWords option.
Let’s do this!
What Is Google Display Retargeting?
Google display retargeting is used to show targeted ads across the Google Display Network to people who have shown interest in your brand (through visiting your site, using your app, watching your videos, etc.).
How Does Google Display Retargeting Work?
Like all other retargeting marketing, Google display retargeting works through the use of a tracking cookie.
Visitors to your site get a tracking cookie from a piece of code embedded on your site. This code tracks their behavior and serves ads based on that behavior.
Benefits of Google Display Retargeting
We already mentioned that retargeting helps you increase brand awareness, boost sales, and drive registrations, but let’s talk about specific benefits.
Broad Reach
The Google Display Network lets you reach people across 2 million+ websites and apps, as well as across devices.
Budget-Friendly
You can use real-time bidding to calculate the best bid possible for the person seeing your ad. This means that you’ll be creating high-converting retargeting campaigns that are cost-efficient.
Targeted Ad Campaigns
You can create highly targeted campaigns for specific use cases. Got a lot of cart abandoners? Create a remarketing list for cart abandoners and target them specifically!
Reporting
Google retargeting reports let you know exactly how your campaigns are performing and how much money you’re spending. So, if you see that a campaign isn’t performing, you can make an informed decision to cut it off.
So, now that you’re all excited about the benefits, let’s create a Google display retargeting ad, m’kay?
How to Create a Remarketing List for a Google Display Retargeting Campaign
Creating a remarketing list is the first step to creating a Google display retargeting campaign and you can do it one of two ways:
- Google Analytics
- Google AdWords
We’re going to cover both methods here, but we recommend the Google Analytics method because you’re not limited to creating audiences based on visits, but can target based on just about anything you can create a report for!
If you don’t have a Google Analytics account, you’ll need to sign up for one. Go ahead, we’ll wait.
Got everything you need? Cool. Let’s get started!
Create Remarketing Lists in Google Analytics
Before you can use a remarketing list from Google Analytics in a Google Ads ad campaign, you have to link Google Analytics to Google Ads.
Fortunately, it’s really easy.
From your Google Ads account, click Tools » Linked Accounts then Details under the Google Analytics section.
Related ContentWhat’s a Good CTR for Google Ads + How to Improve Yours
You’ll see a list of Google Analytics properties to which you have access, as well as the status – linked or not.
To link a property, just click Link. Easy peasy!
Now, let’s create our remarketing list in Google Analytics….
From the Google Analytics dashboard, click Admin. Then, in the Property column, click Audience Definition » Audiences » + New Audience.
You can choose from the preconfigured audience definitions:
- Smart List: Let Google manage the audience for you.
- All Users
- New Users
- Returning Users
- Users who visited a specific section of my site/app
- Users who completed a goal conversion
- Users who completed a transaction
Or, you can create a new audience definition or import a segment.
Create a New Audience Definition
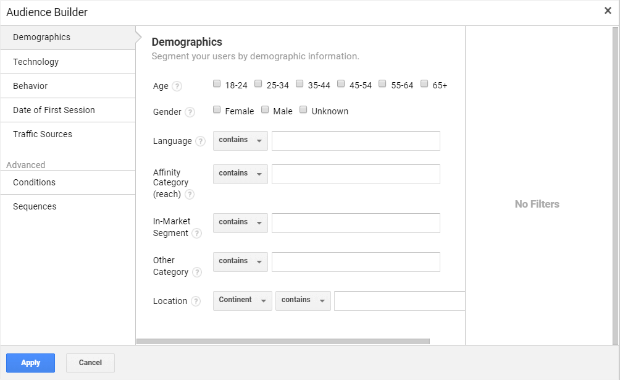
To create a new audience definition, click Create New:
Here are some useful audiences to build retargeting campaigns around:
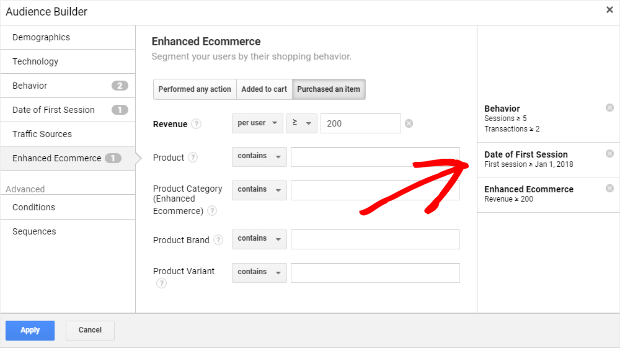
High-Value Users
High-value users are users who have converted recently or convert frequently, and who engage in what you consider to be high-value conversions for your brand.
The goal of retargeting these users is to keep them engaged with your brand and encourage new conversions by showing them 3 things:
- New products that they may like based on previous purchases
- Products they’ve seen but haven’t purchased
- Products similar to products they’ve purchased
You can reach this audience using a combination of these fields:
- Behavior
- Date of First Session
- eCommerce
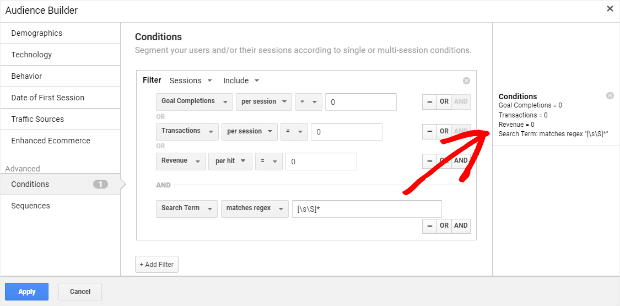
Users Who Searched But Didn’t Convert
A user who searched your site and found something that matched their search, but ended up not converting for some reason is an excellent retargeting candidate.
You can reach this audience using Conditions filters:
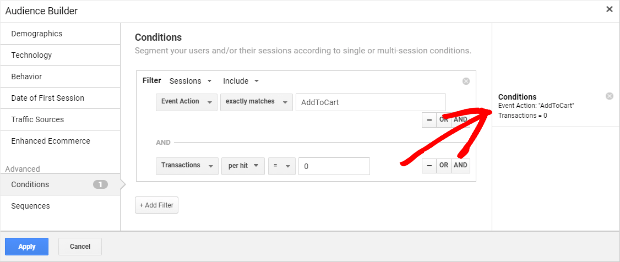
Users Who Abandoned Their Carts
With 70% of users abandoning carts, we just had to include this one.
You can reach your cart abandoners using these Conditions filters:
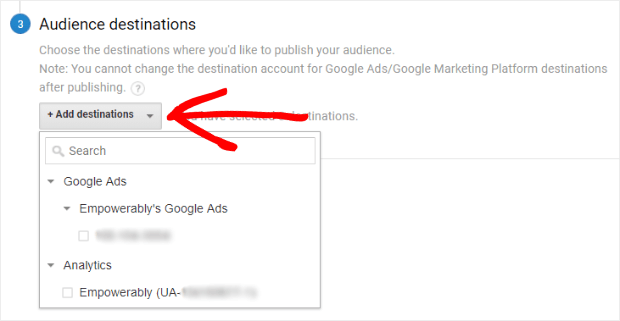
After you define your audience, choose where you want to publish your audience.
You can save your audience to Google Analytics only, but we recommend saving it to both Google Analytics and Google Ads so you have it available to use when creating your retargeting ad campaigns.
For more ideas about different audiences to target, check out our guide to segmenting your email lists. You can use these same segments to create your retargeting ads.
Create Remarketing Lists in Google AdWords
If you’d rather create your remarketing lists in Google AdWords, you can easily do that. Here’s how…
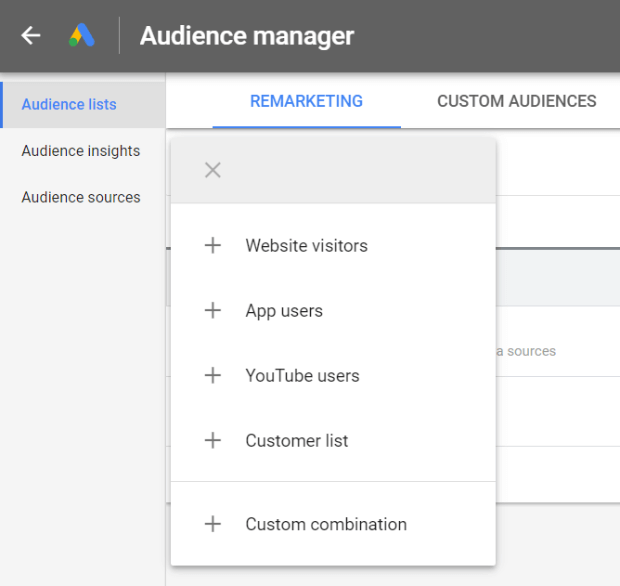
Log into AdWords and click Tools » Audience Manager (under Shared Library).
You’ll notice that you have 2 tabs: Remarketing and Custom Audiences.
Click the + (Plus button) to create a new remarketing list. You can choose to create a list based on one of these audiences:
- Website visitors
- App users
- YouTube users
- Customer list
- Custom combination
We’ll use Website visitors to create our remarketing list.
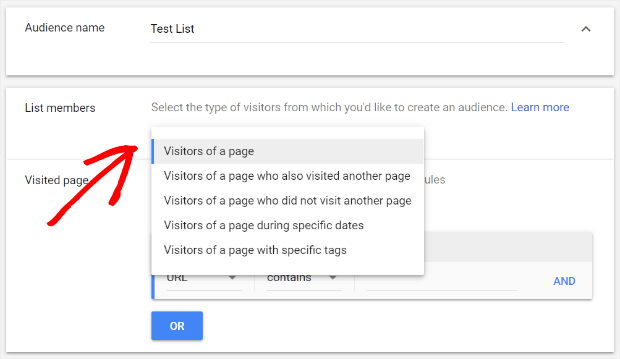
Enter a descriptive name for your list and select the type of visitors you’d like to you from List members:
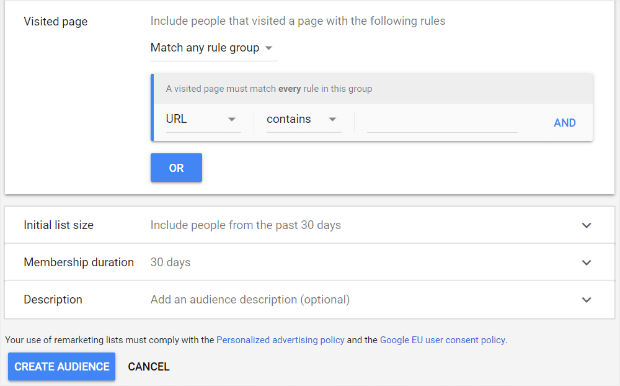
From there, you can add as many or as few rules as you want to fine-tune your audience targeting before clicking Create Audience.
How to Set Up a Google Display Retargeting Campaign
Now that we have our remarketing lists set up, we’re ready to create a Google display retargeting campaign.
Start by signing into your Google Ads account.
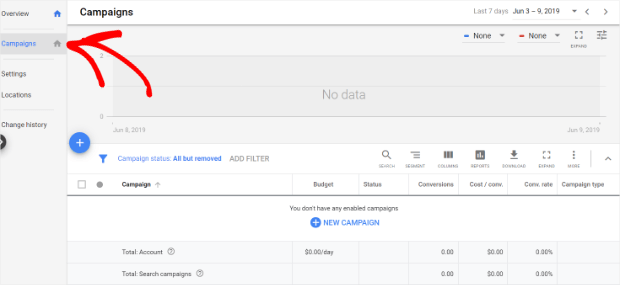
Click Campaigns to bring up all of your existing campaigns, then click the + Plus button to create a new campaign.
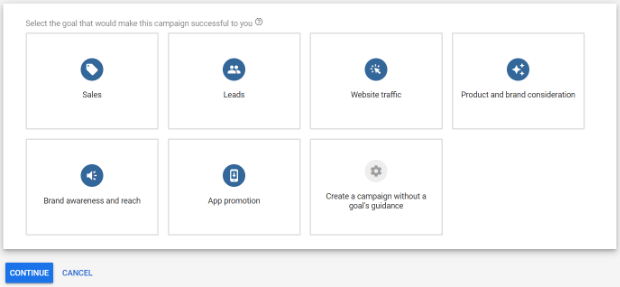
Clicking New Campaign will bring up a grid with different campaigns goals from which you can choose.
Select a goal (or create a campaign without a goal’s guidance) and click Continue.
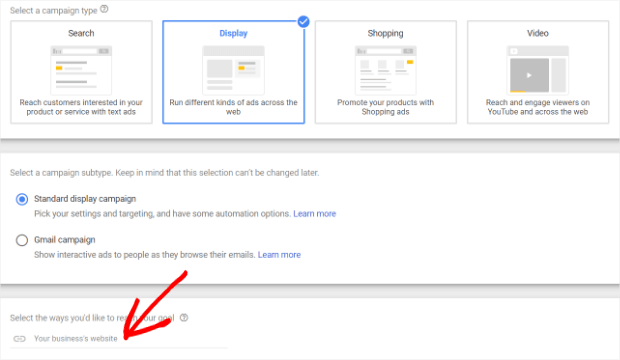
For the Campaign Type, select Display, then Standard display campaign, and enter your business URL before clicking Continue:
Set the parameters of your campaign as you want.
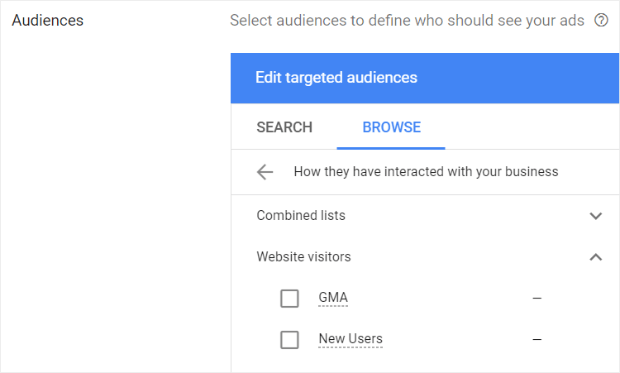
When you come to Audiences in the People section, you’re going to select the Browse tab, click How they have interacted with your business, and find the remarketing list you want to use for your ad campaign.
You can choose to create your ads now or later (your campaign won’t run without ads), then click Create Campaign.
Google Display Retargeting Strategies
As with other retargeting platforms, frequency capping is important. You don’t want visitors to feel as though they’re being hunted down by your brand at every turn, but you don’t want them to forget about you either.
Here are 5 more strategies you can use to get the most out of Google display retargeting ads:
1. Use OptinMonster to Boost Effectiveness of PPC Campaigns
Once you use Google display retargeting ads to get users back to your site… what are you doing with them?
Hopefully, using OptinMonster’s killer set of features to seal those deals.
Seriously. Using targeted optins is one of the most effective yet underutilized methods to boost signup rates and revenue. Get started with OptinMonster today to take advantage of the #1 most powerful conversion optimization toolkit in the world.
What if, for instance, your Facebook retargeting is doing really well, but Google needs a little push? So, you decide to give an additional 5% discount to the users who come to your site from your Google ads.
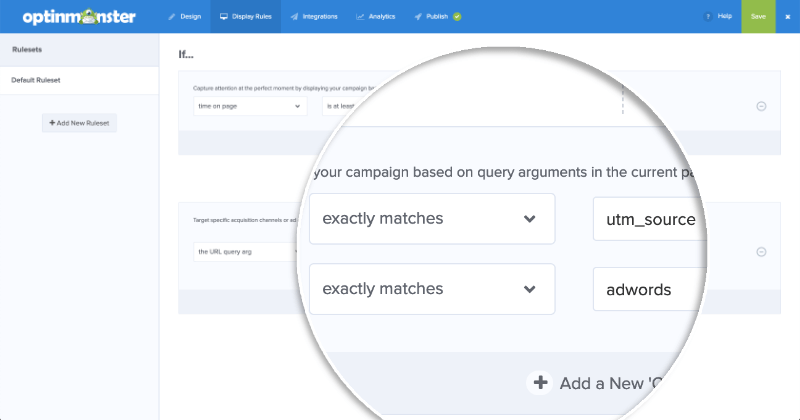
OptinMonster’s display rules make that so easy! All you do is set your OptinMonster campaign to show up for the visitors referred by the UTM link from your Google campaign instead of your Facebook campaign.
But you don’t just have to target by the utm_source parameter.
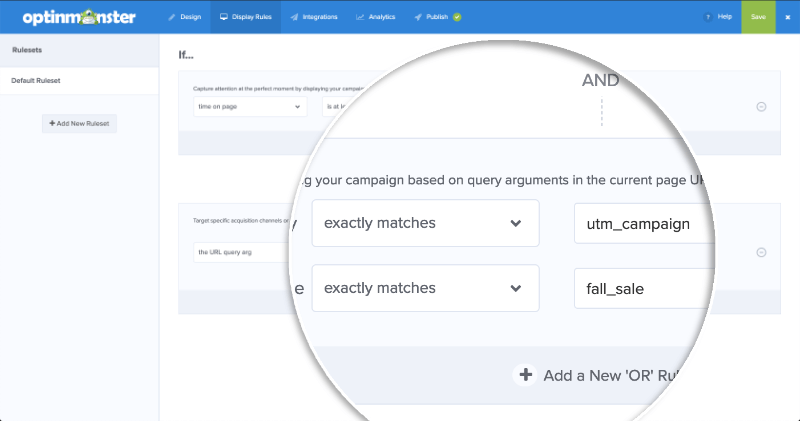
If you want to show different campaigns to visitors referred by the Google ad for your fall sale versus the Google ad for free shipping, you’d use the utm_campaign parameter instead:
In addition to the “exactly matches” condition from the examples shown above, you also have these options:
- does not exactly match
- contains
- does not contain
- starts with
- does not start with
- ends with
- does not end with
- is anything
- matches the pattern
What can we say? We like our customers to be able to fine-tune their targeting so you get the most out of your campaigns.
2. Exclude Mobile Game Placements
Mobile game placements may seem like a great spot to get a captive audience for your ad, but how many times have you accidentally clicked on an ad while waiting (impatiently) to get back to a game that you will NOT be spending $5.00 on just to skip out on a 30-second ad every 2 rounds, thank you very much?
Yeah, your visitors do that too.
And let’s not even get started on the number of times children click-clickety-click random things on their parents’ phones. Do you want your ad budget used up like that?
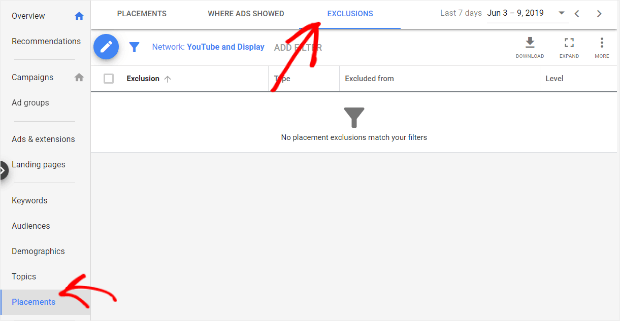
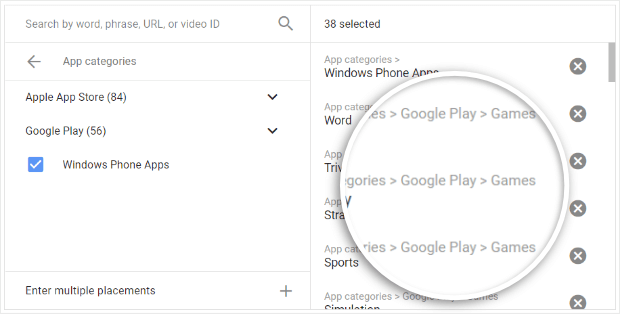
You can keep it from happening by going to your AdWords dashboard and selecting the Placements tab, then clicking Exclusions.
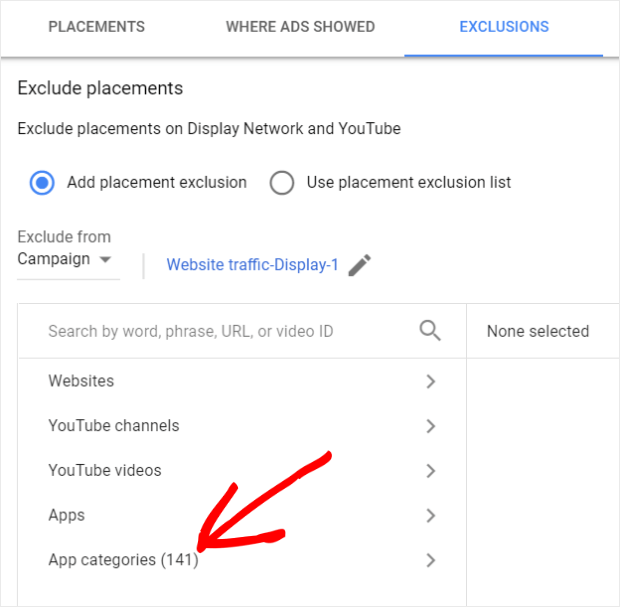
Click on the Edit button, select the radio button next to Add placement exclusion, click Select a campaign to choose the ad campaign you want to work with, then select App categories:
From there you have the option of excluding app categories from the Apple App Store, Google Play, or Windows Phone Apps.
We’re going to exclude all of the game placements from the Apple App Store and Google Play, as well as all of the Windows Phone Apps, just to be safe.
3. Retarget Your YouTube Audience
You know all those people who view and like your YouTube videos, share them, and leave comments?
You can create remarketing lists based on those actions and retarget those users!
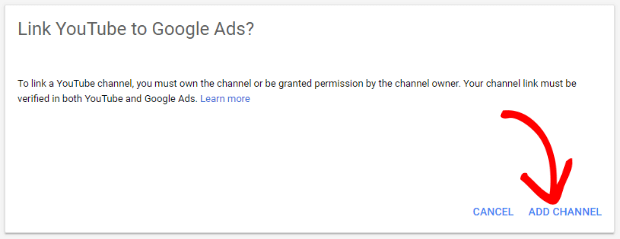
First, you need to link your YouTube channel to your Google Ads account by logging into Google Ads, click on Tools » Linked Accounts and click Details under YouTube.
Click on Link YouTube Channel on the next screen:
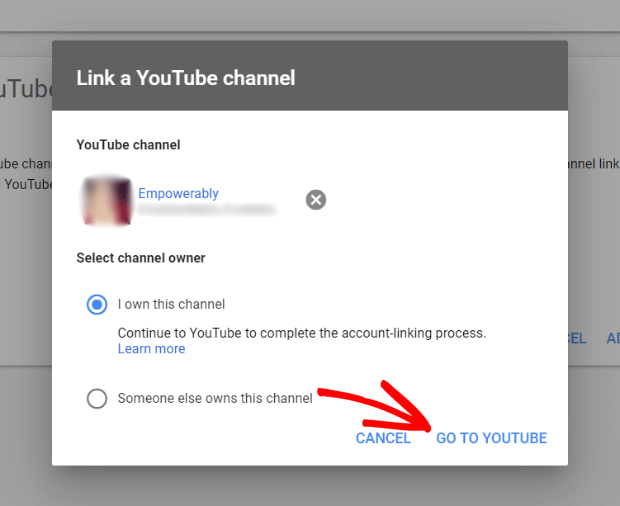
Enter the link to your YouTube channel and click I own this channel (if you don’t own the channel, don’t do this).
Next, click Go To YouTube to finish the process.
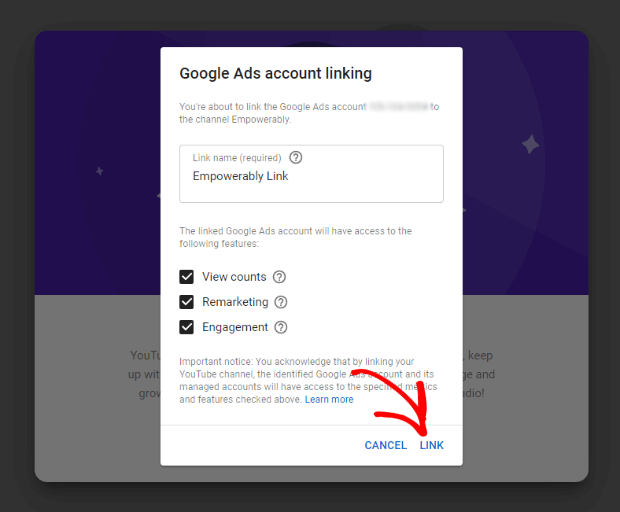
On the screen that comes up, choose a name for the link and click Link.
Now you can create a remarketing list in Google Ads using YouTube as the audience.
4. Use Shopping Campaigns to Drive Foot Traffic
If you have a brick-and-mortar location, you’re probably interested in how you can use retargeting ads to drive foot traffic to your physical store, right?
Google display retargeting can help you with that with what they call local inventory ads.
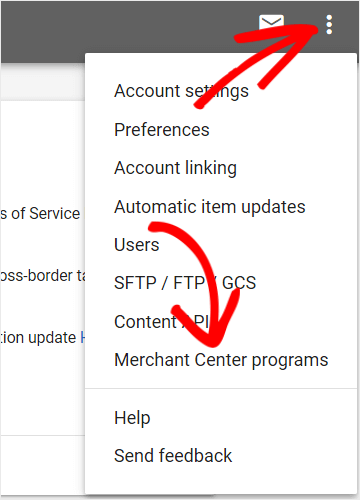
To use local inventory ads, log in to your Merchant Center account, click the 3-dots in the upper righthand corner, then select Merchant Center programs.
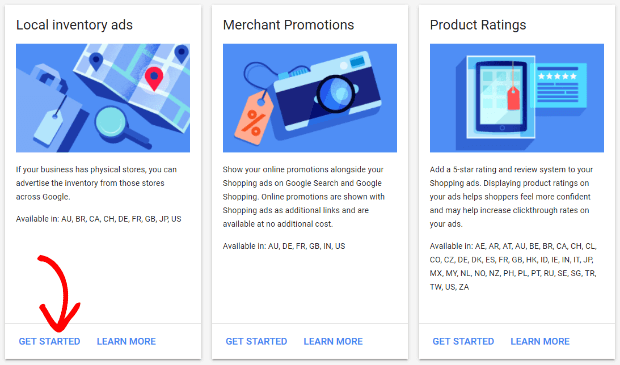
Click Get Started on the Local inventory ads program card.
If you meet the requirements on the next screen, click Enable.
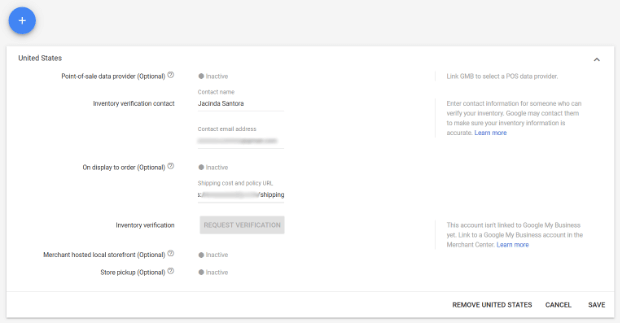
Click the + Plus button to add the country where your physical stores are located.
Once you have local inventory ads set up, you can show ads to shoppers based on their proximity to your store and whether or not the products they’re searching are in your store.
For example, if a shopper is searching for a product you sell only online, they would see an online shopping ad.
But, if that shopper is searching for a product you sell only in-store (and they’re near your store location), they’ll see a local inventory ad. If they aren’t near your store, they won’t see your ad because they’ll have no way to actually buy your product.
For products that you sell both online and in-store, the ad the shopper will see depends entirely on where they are when they search. If they’re near your store, they’ll see the local inventory ad; if not, they get the online ad.
5. Optimize Bids for Key Shopping Moments
This strategy is really an extension of #4, but optimizing bids is definitely a tool that you should use even if you don’t have a brick-and-mortar store.
But, first, how do you even make a bid adjustment?
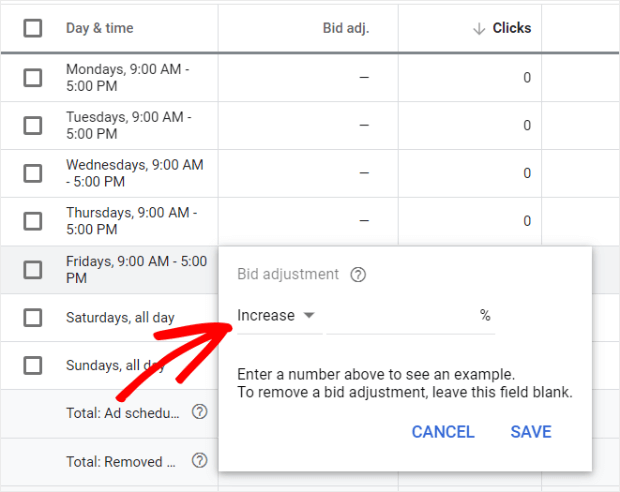
In Google Ads, click the campaign or ad group you want to change, select the row you want to adjust, and click on the edit icon (the pencil) under the Bid adj. column. Then, you just enter the amount you want to increase (or decrease) your bid by.
That’s all there is to it, but if you need more help, just click here.
Now that you know how to make a bid adjustment, we’re going to talk briefly about 3 ways you can optimize bids to encourage shoppers to visit your physical store.
Increase Bids During Open and High-Traffic Hours
Keeping bids active 24/7 may sound like a lot of wasted ad dollars, but you can keep your standard bid low and use a positive bid adjustment during your store’s open hours.
You can also use ad scheduling to increase your bid on high traffic days and hours:
This helps keep your ad costs low while still keeping your ads in front of shoppers looking for your products while you’re open!
Adjust Bids Based on Shopper’s Proximity to Your Store
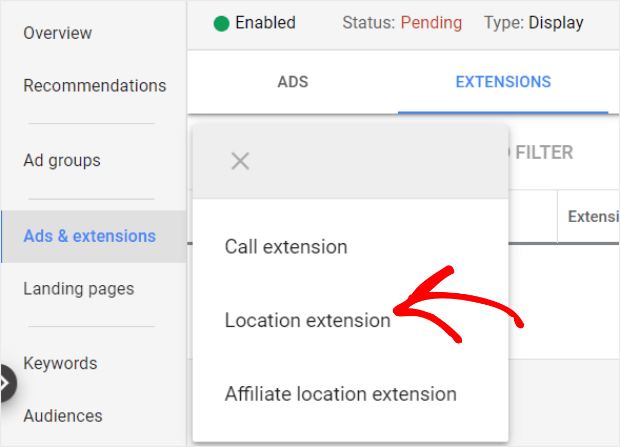
Just as you can show local inventory ads to nearby shoppers, you can use location bid adjustments to increase bids based on shoppers’ closeness to your location extension address.
You’ll have to link up your Google My Business account in order to use location extensions.
Use Stronger Bids to Capture Mobile Shoppers
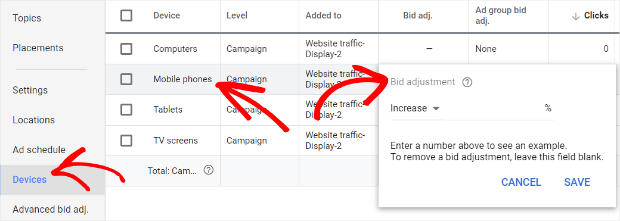
Since local inventory ads are designed with the goal of pushing shoppers to your brick-and-mortar store by showing ads when they’re nearby, it only makes sense to target mobile shoppers.
And, since you already know all about bid adjustments, setting one up for mobile shoppers is a piece of cake:
That’s it! Now you’re an old pro at Google display retargeting ads. Be sure to check out the other posts in our retargeting series:
- How to Use Onsite Retargeting to Boost Conversions
- Facebook Retargeting Ads Made Simple
- Retargeting Best Practices
- How to Properly Run Retargeting Ads for Shopify
Next Up: Remarketing Lists for Search Ads: Custom Campaigns and Tailored Bids










Add a Comment